Table of Contents
PAPERS OF SPECIAL VALUE TO ALL INTERESTED IN THE DEVELOPMENT OF ART AMONG THE CHILDREN
BY
CAROLINE HUNT RIMMER
ILLUSTRATIONS BY THE AUTHOR
ORIGINALY PUBLISHED IN 1893
REPUBLISHED IN 2013 BY DRAWINGBOOKS.ORG
PLEASE SEND ALL COMMENTS AND CORRECTION REQUESTS TO:
THIS WORK IS AFFECTIONATELY DEDICATED TO
LOUISE HARDING WILLIAMS
BY THE AUTHOR.
The following lessons, while intended for children, contain a plan of work of value to all who wish to understand and draw the child-figure. In the choice of materials, for ordinary drawing, the Faber pencil marked HB. and the one marked HH. are preferable — the first mentioned for fine paper and the last for coarse paper.
There are some things about the choice of materials a pupil must decide for himself, and this he can do after a little experience. Some always prefer a soft, others a hard, pencil, but anything softer than HB. or harder than HH. would not be found serviceable in ordinary work. Some of the cheaper pencils are excellent for ordinary use. It is not wise to say just how one should hold or sharpen his pencil. A certain amount of method is desirable — but to say drawings must always be made on one kind of paper or with a pencil having just so much lead exposed would be about as sensible as to say one must always draw while facing to the west or east in order to have the work correct. Never let any notions take the place of common sense. A good workman will be likely to get good work out of his tools.
The directions given here will be of small value unless to lead the student to look for what lies in and behind the various forms, and cultivate in him an appreciation of the beauties and meanings of these forms. These rules should also help in giving expression through these child-forms to any idea that can be conveyed by them. In short, rules must be kept only as tools.
In beginning the study of particular forms such as are found in the human figure, there is a guide which will lead to the best results, and that guide we have in Proportion.
The first thing is to understand this word. Proportion. Take an example: if one should draw a picture of a horse with the head twice as long, for the size of the body, as a horse's head ever is, that head would be called "out of proportion," because it would be neither natural nor graceful; it would have to be drawn much smaller before it would be right — the nearer it was drawn to the natural size when compared with the whole the nearer it would approach " good proportion." If the person meant to continue drawing horses and to have his work correct he would need to avoid making this kind of mistake, and in order not to repeat it would have to study horses carefully wherever he saw them — on the street, in the field or stable; one part would have to be compared with another and all the details learned. If he made a study of race-horses, he would find that they have certain lines different from the draft-horse for instance, and these variations would be called the different proportions. "In Proportion" may be said to mean having all the parts in tune — one with another.
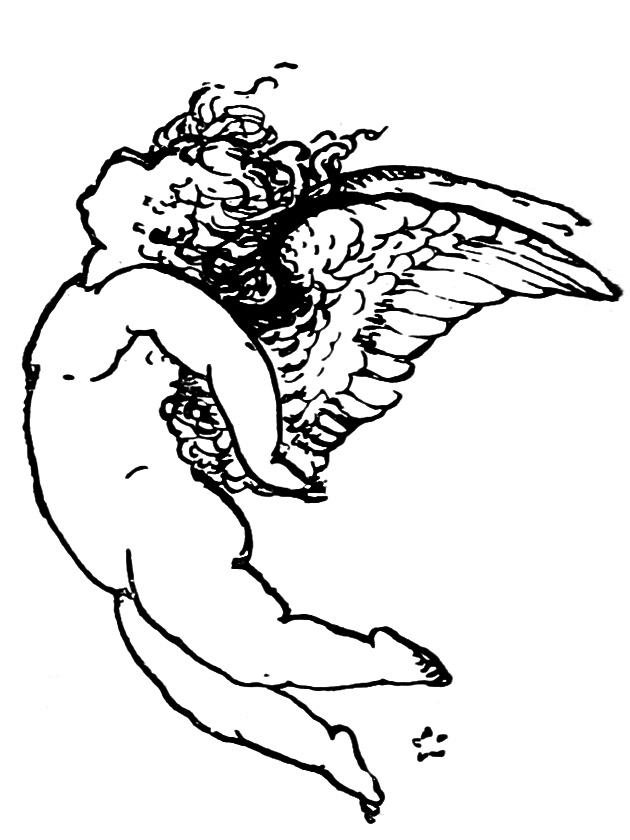
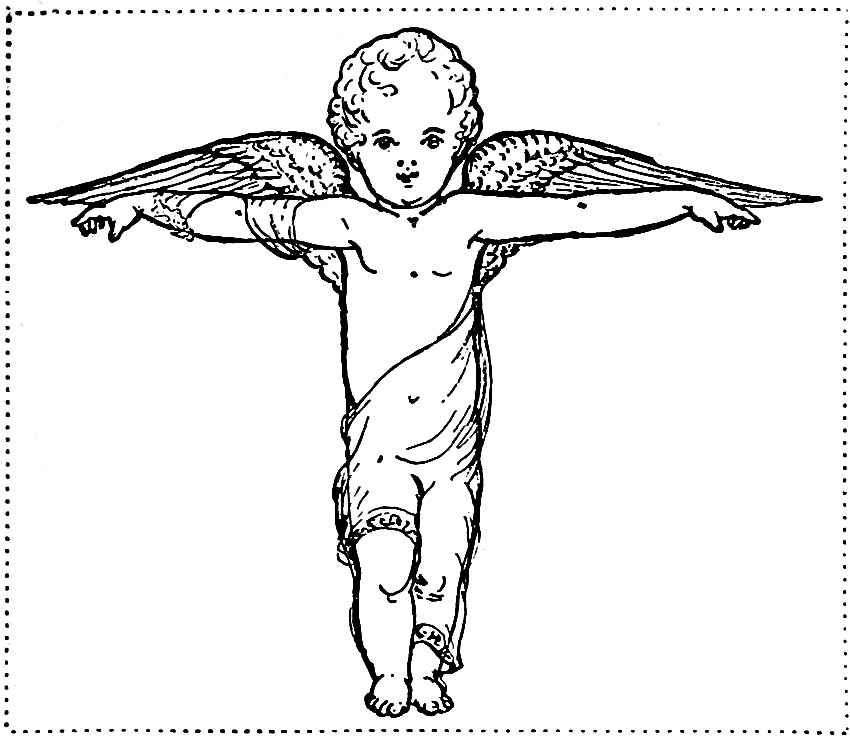
One of the first steps in learning how to draw a particular form is to observe it closely; this habit alone can teach one to know good proportions from bad. One should be so accustomed to seeing the natural form, and to selecting the best to study, that he will detect mistakes in his work when he comes to try to draw what he has been noticing. It is a very clever thing for a pupil to be able to detect his own errors and correct them; if he find the lovely cherub he started to draw suddenly changing into a clumsy being quite too large and mature for a cherub he will know it and can bring the figure back again to cherubic proportions. Again, if the artist constantly works to correct bad proportion he will develop in himself a sense of that which is correct and finest in drawing, not only in one form but in many.
In drawing; a child the first thing to know is how to go to work to make the figure we draw look like a child and not a grown-up person — and as the best way to learn is to go directly to the life, one must watch children closely and find if possible what it is that makes them seem young. It is not alone their height or size; there are other things — certain forms, certain relative sizes of the different parts, which always belong to a baby or young child and never to an adult; these are called the child-proportions, and must be learned.
The following rules will probably be thought very easy, and the beginner may say, '' Oh! anyone can do this," and then hurry on to what he may consider difficult enough to command his attention.
Let such an one remember that there are few people who can get upon any of the higher rounds of a ladder without taking the first few steps.
The easiest lessons to be learned in any work are too often passed over, not because they are thoroughly known and understood, but because ''anyone can learn them;" and by so thinking, and so passing simple things by, the important groundwork of many a difficult undertaking has been allowed to lie unused, and the result left to show the lack. Errors in earliest lessons come most often from thoughtlessness, so it is well to consider at the start that anything that is worth working upon is worth giving one's best thought to. The result in your work will be of your making, and not that of your materials.
Never let any one have an opportunity to criticise your drawings for lack of employing a rule well known to yourself. As one goes on it will be found that very often the apparent simplicity of a work is the most difficult to acquire.
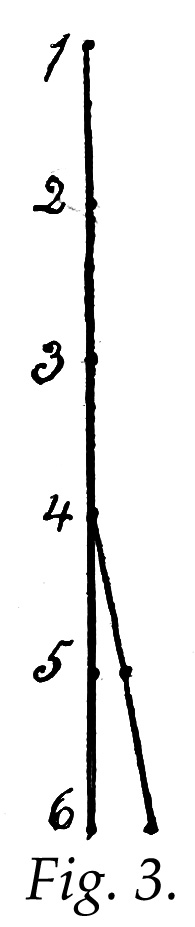
To begin, draw a straight perpendicular line (Fig. 1).
Let this represent the height of the whole child-figure. Divide it into five equal parts (Fig. 2).
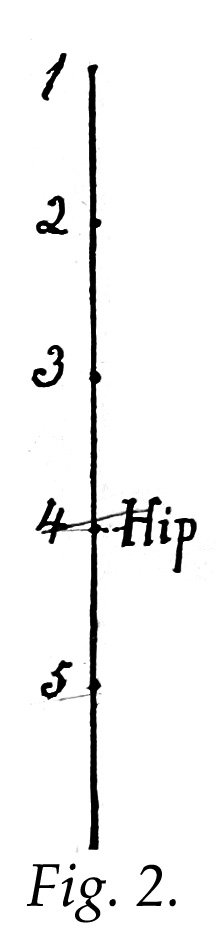
At the fourth dot, counting from the top, which we shall call the hip, start a line at a slight angle and let it go down as far as the first line; divide it into two equal parts like the one beside it and we have the legs (Fig. 3)
Now will turn to the three sections above the hip, and after doing a little more we shall have in single lines the whole framework of the figure of a baby or young child — cherub if you like.
From the second dot, counting from the top, draw a line at a slight angle which shall reach a little below the fourth dot; divide this into two equal parts. With a similar line made on the other side we have both arms (Fig. 4).

Now for the head draw an oval inclosing the whole space from the top of the line to the second dot. Be careful that the oval is not made smaller than the space will allow — it can safely be made a little larger (Fig. 5).
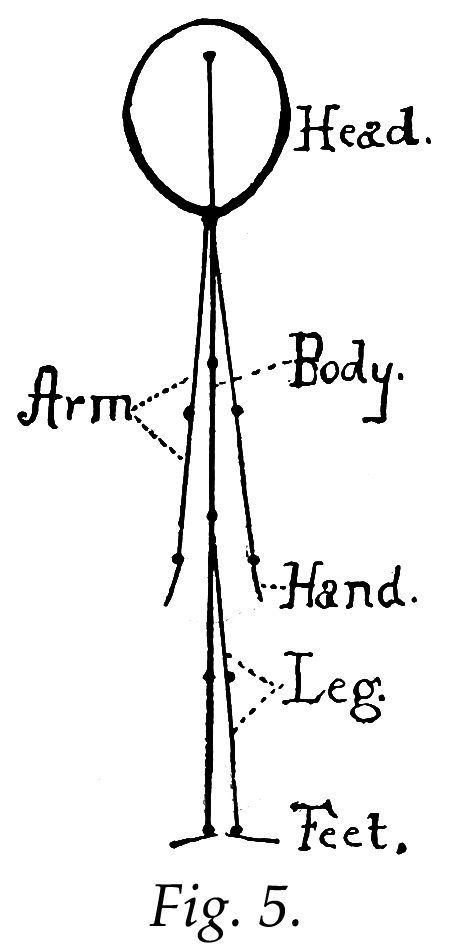
A large head always dwarfs an adult figure, but it is a marked feature in the proportions of the child. Little room is left for the neck; it is because babies or young children have very short necks; and at the beginning of the study it is quite as well not to consider the neck, as it would be safer to have no length given for it than have the neck made too long. The space it really occupies will be seen as we go on.
Short lines may now be added to the arms and the legs for hands and feet. The end of the hand should reach to about the middle of the thigh. We now have (Fig. 5) the completed plan of the child-figure, in correct proportions.
The plans given in these lessons may be drawn any size the pupil desires; the proportions hold the same in large or small drawings. It is well to make several of different sizes.
Before going on, this lesson should be well learned and well practiced, so that the plan can be made correctly without hesitation and without measuring. Success in the future work depends on these lengths — representing the proportions of the child-figure — being mastered and remembered.
Right proportions are the basis of correct figures. Rudimentary work must be accomplished before one can soar into the realm of ideal creations. No amount of good rules committed to memory, without use, will enable one to draw. Rules must be embodied in good results by constant and careful exercise.
At this lesson we shall study the single-line figure, and see how it can be made to express action without the addition of other lines.
As names have been given the different parts of the completed diagram, or single-line child-figure — head, body, arms, legs, hands, feet, etc. — the parts must now be called by their names when referred to.
Draw first five perpendicular lines of the same length, divide each line into five equal parts, and then add heads, as in Fig. 6.
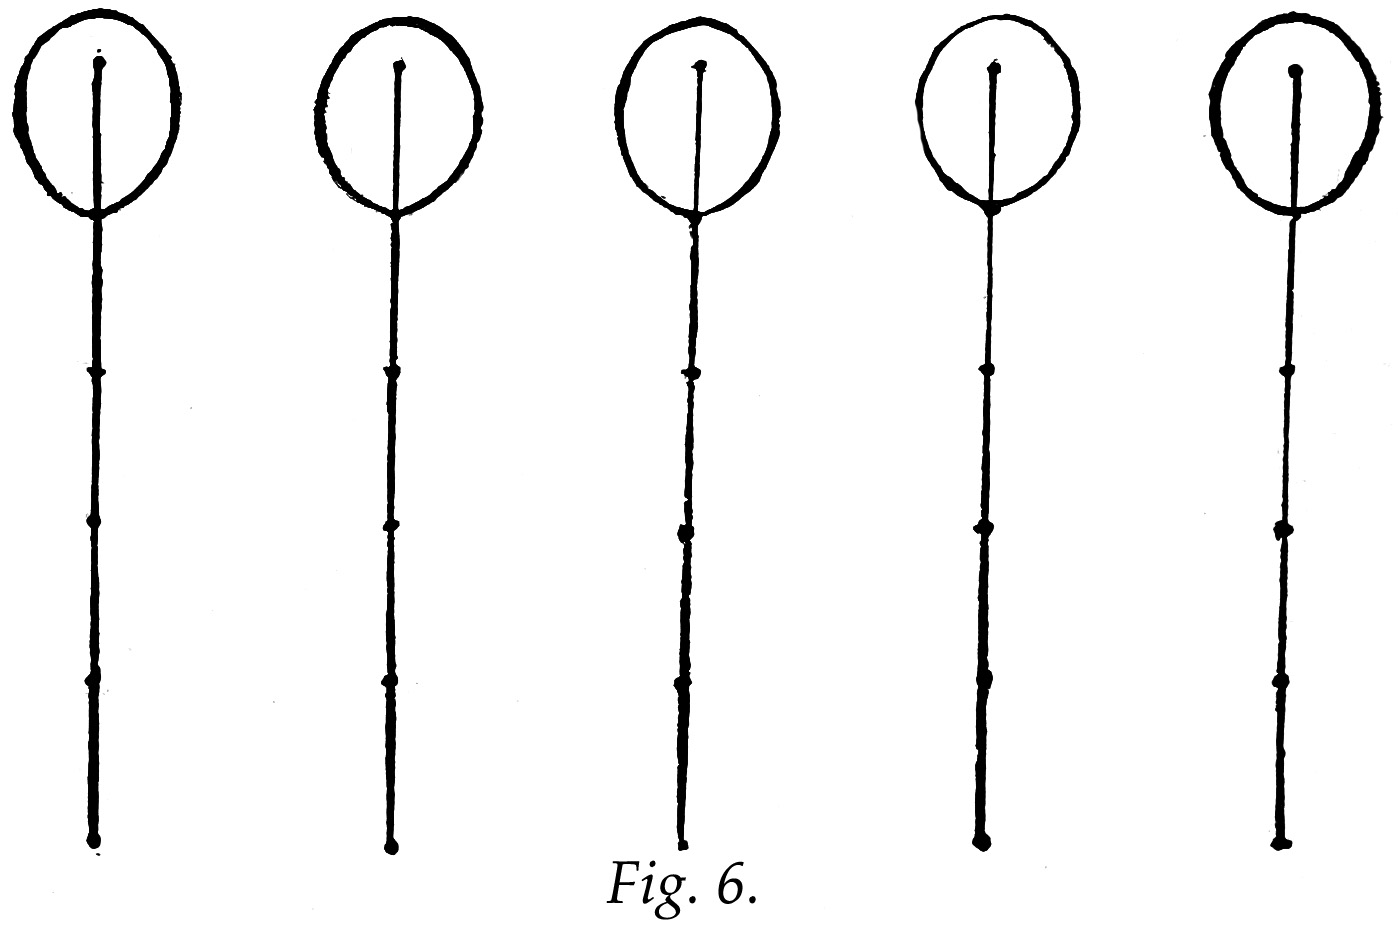
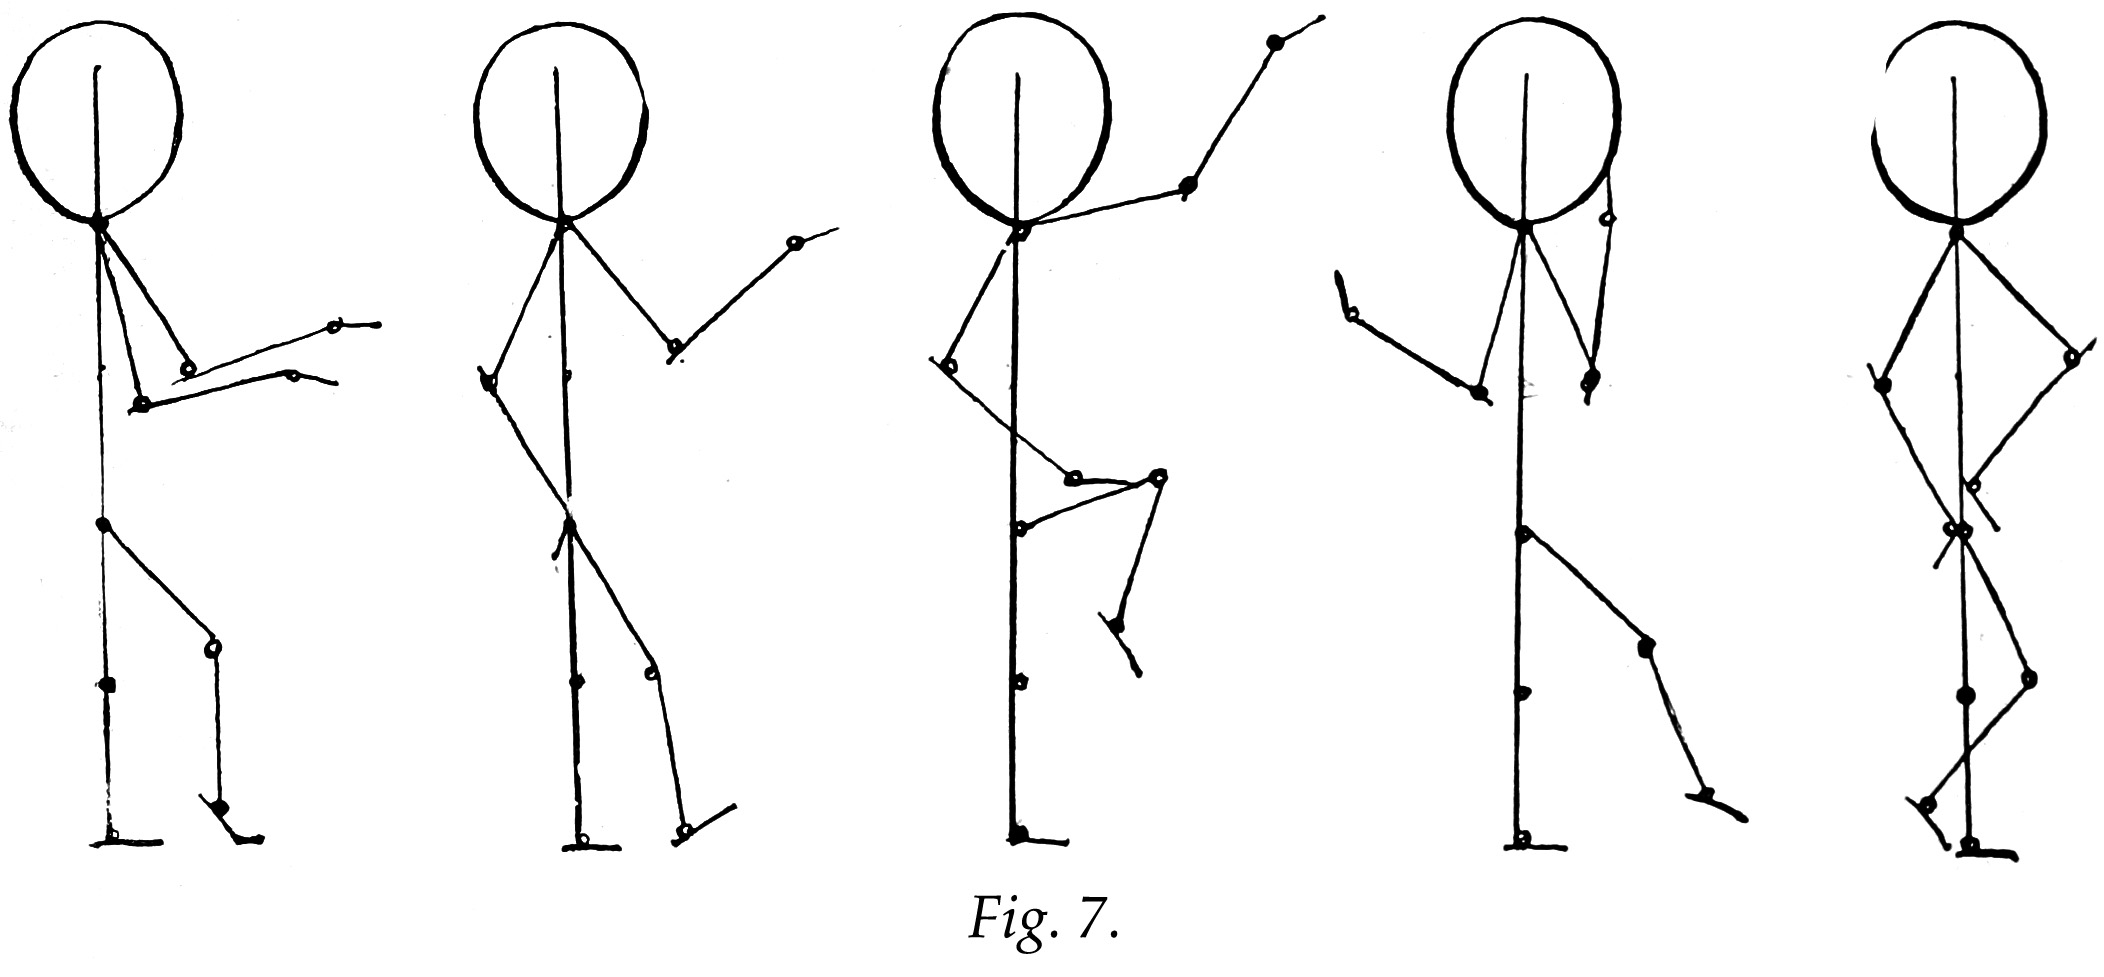
Next draw the arms and the other leg and give the limb-lines hands and feet. Do not make the five figures alike, however. Vary the direction of all lines except the first or perpendicular line, and see how much you can make the single-line figures look like children in different attitudes, as in Fig. 7.
Endeavor to give the five figures as great a variety of action as possible. Aim to get both good proportion and good action. Correct and expressive action depends largely on correct proportion. Do not expend your effort on funny figures only. Try to embody the serious emotions also. Action, life, movement, is first; then work for strong and graceful and expressive action.
Observe that with very little change in the lines very great change can often be made in the action — in the idea or feeling expressed. This indicates the value of every line and touch of the pencil, and the importance of careful attention to every detail.
In the examination and comparison of all work done lies the sure means of progress.
While working, if the result is not what you think it should be, do not erase all and perhaps lose much that is good. Instead, consider with care and ascertain precisely what is wrong, and correct that. Do not throw away time and labor. Never give up a first idea merely because you lack Patience; persevere and master the difficulties.
The work at the start — the single-line child-figure — is very simple, and there is danger that the pupil may become careless, and forget the guide, the imperative importance of right proportions, and make one leg long and the other short, or both legs longer than the body. In drawing trees and rocks it would do to have a change from the nature-study in the length of lines here and there, because in landscape there is no exact relation in size of rock to hill or flower to tree, but in the human figure there is a definite relation in size of arm to body, in foot to leg. The work will be incorrect and unsatisfying if the law of proportion is not remembered and observed, and all the work done with care.
It is well to have a slate or blackboard on the wall for practice work. As you draw, be your own critic, by walking off and taking a view of the lines from a distance, where the real relation of one part to another can better be judged. Go back and forth and correct by adding or erasing lines until you feel you ha\e reached the best you can do.
After this good work of self-criticism, sit down and copy the final result for preservation. Proceed in this way with all the lessons, and you will have an interesting and permanent record of the progress you have made. A portfolio of such drawings will be very serviceable.
I would speak again of the value of my seemingly simple directions. By standing at some distance from the blackboard one takes a comprehensive view of one's work; whereas, sitting cramped over a bit of paper on the lap. one is apt to give undue attention to parts and details, and therefore not see the real proportions and relations as a whole.
Study everything at which you look in a large, free way: consider the whole as well as the detail, and the meaning; behind it all. Try to look at what are doing as if it were the work of another. See frankly both the good and bad in it. Try to decide definitely what changes, if any, it needs, and make them.
In regard to practice work I would further say — in connection with these and later exercises — set apart a time each day in which to work seriously at measuring (by the eye only) certain objects or parts of objects, and note in however simple a form the decision in a sketch on paper. This is advised to bring about the habit of correctly comparing heights and widths. Any such work is a particularly valuable aid in figure drawing, for here one must be cautious and exact.
As you discover failures in your drawings, from time to time select a kind of exercise work with the pencil which shall be directed especially to the correction of such imperfections.
Be acquainted with your errors, and familiarize yourself with attacking the kind of work which will unmistakably improve upon such things. Look about the room, for instance, and ask yourself, "How much longer line would represent the height of a certain chair than would represent its width? How much shorter the cricket than the piano-stool? Is the line of the back of one chair perpendicular and that of another slanting?" etc. Compare the greatest height of any object with its greatest width. You may after a time prove this kind of observation by actual measurements, but do this very seldom, for it is wiser and better to cultivate the eye or a sense of "feeling" in art, than do anything which is likely to make your work mechanical.
Never be fussy about the lines in themselves; any one ought to be able to make a clean straight or curved line after a while. But do you be sure and have in mind that which you wish to express; if the meaning is in it the line is likely to take care of itself. One who thinks only of lines will be apt to get nothing but lines, whereas, for instance, if striving first of all to express action, he will be sure to have some spirit and significance in his work. Whatever one sets his mind earnestly upon, that his pencil will be very sure to produce sooner or later.
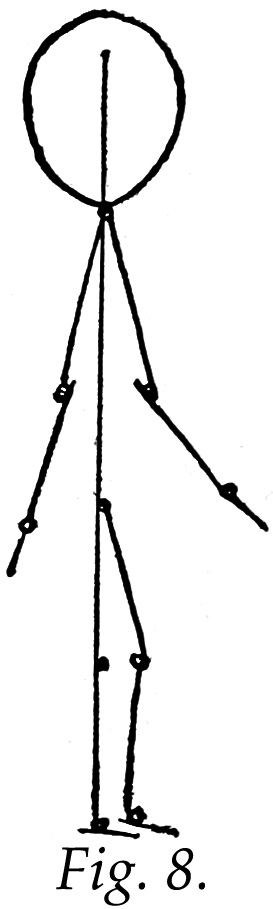
Sometimes the best way to learn the value or meaning, the good points or defects, of what we see or do is to compare it with something else. For instance, let us draw side by side the single-line child-figui-e and the figure of a man in single lines, and note the differences.
Draw two perpendicular lines of the same leno-th. Divide one as in the preceding lessons, and complete with head and limbs (Fig. 8).
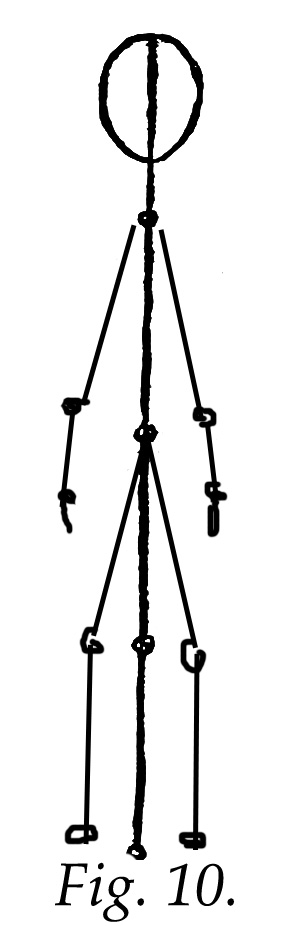
To the other, which is to become the adult figure, add the head, which should be in length about one seventh of the whole length of the line; then place a dot about half the length of the head below it, which will mark the space of the neck.
Next divide with dots the balance of the line into three equal parts (Fig. 9).

Then start a line from the first dot, at the lower end of the neck, and carry it nearly to the second, and to that add another which shall reach to about half-way between the second and third dots. Those lines form both parts of the arm. Draw the other arm in the same way. Now start a line from the second dot and carry it down to the end of the first line; after dividing this into two parts we have the legs. Add the feet and the hands. We now have the complete single-line adult figure (Fig. 10).
Compare carefully the completed single-line child and adult figures constructed on the same length of starting-line (Fig. 11.). Note the relatively greater length of leg, the far longer neck (almost none in the child), and the smaller head, in the adult figure.
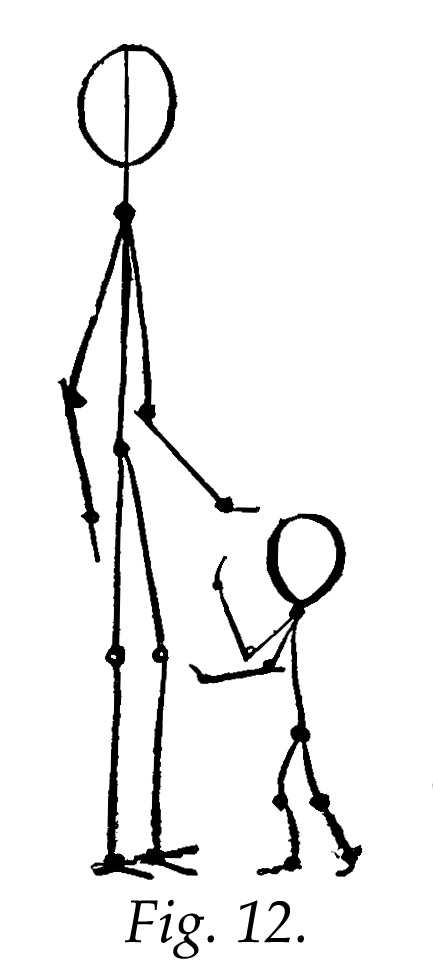
In real life the height of the child and adult figures is not the same, however, though the proportions of each are as shown in the single-line figures in Fig. 11.
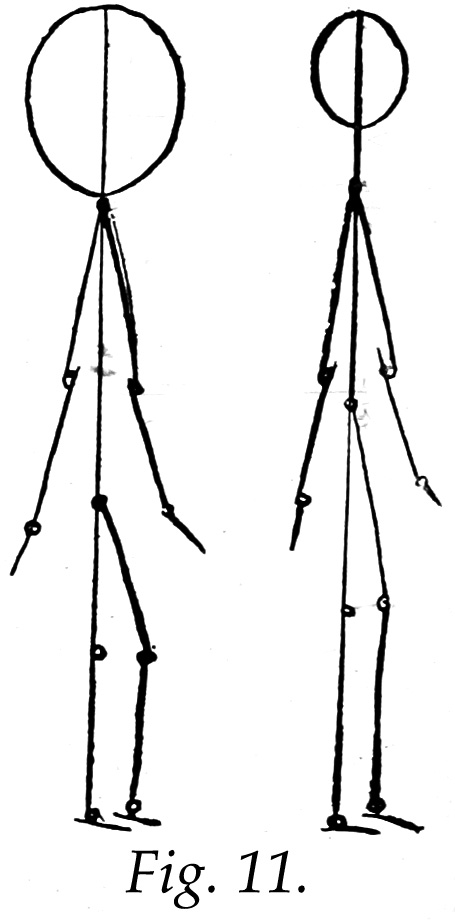
If, therefore, we draw the two single-line figures with the relative heights of real life, though the proportions of each remain the same, we get as a result Fig. 12.
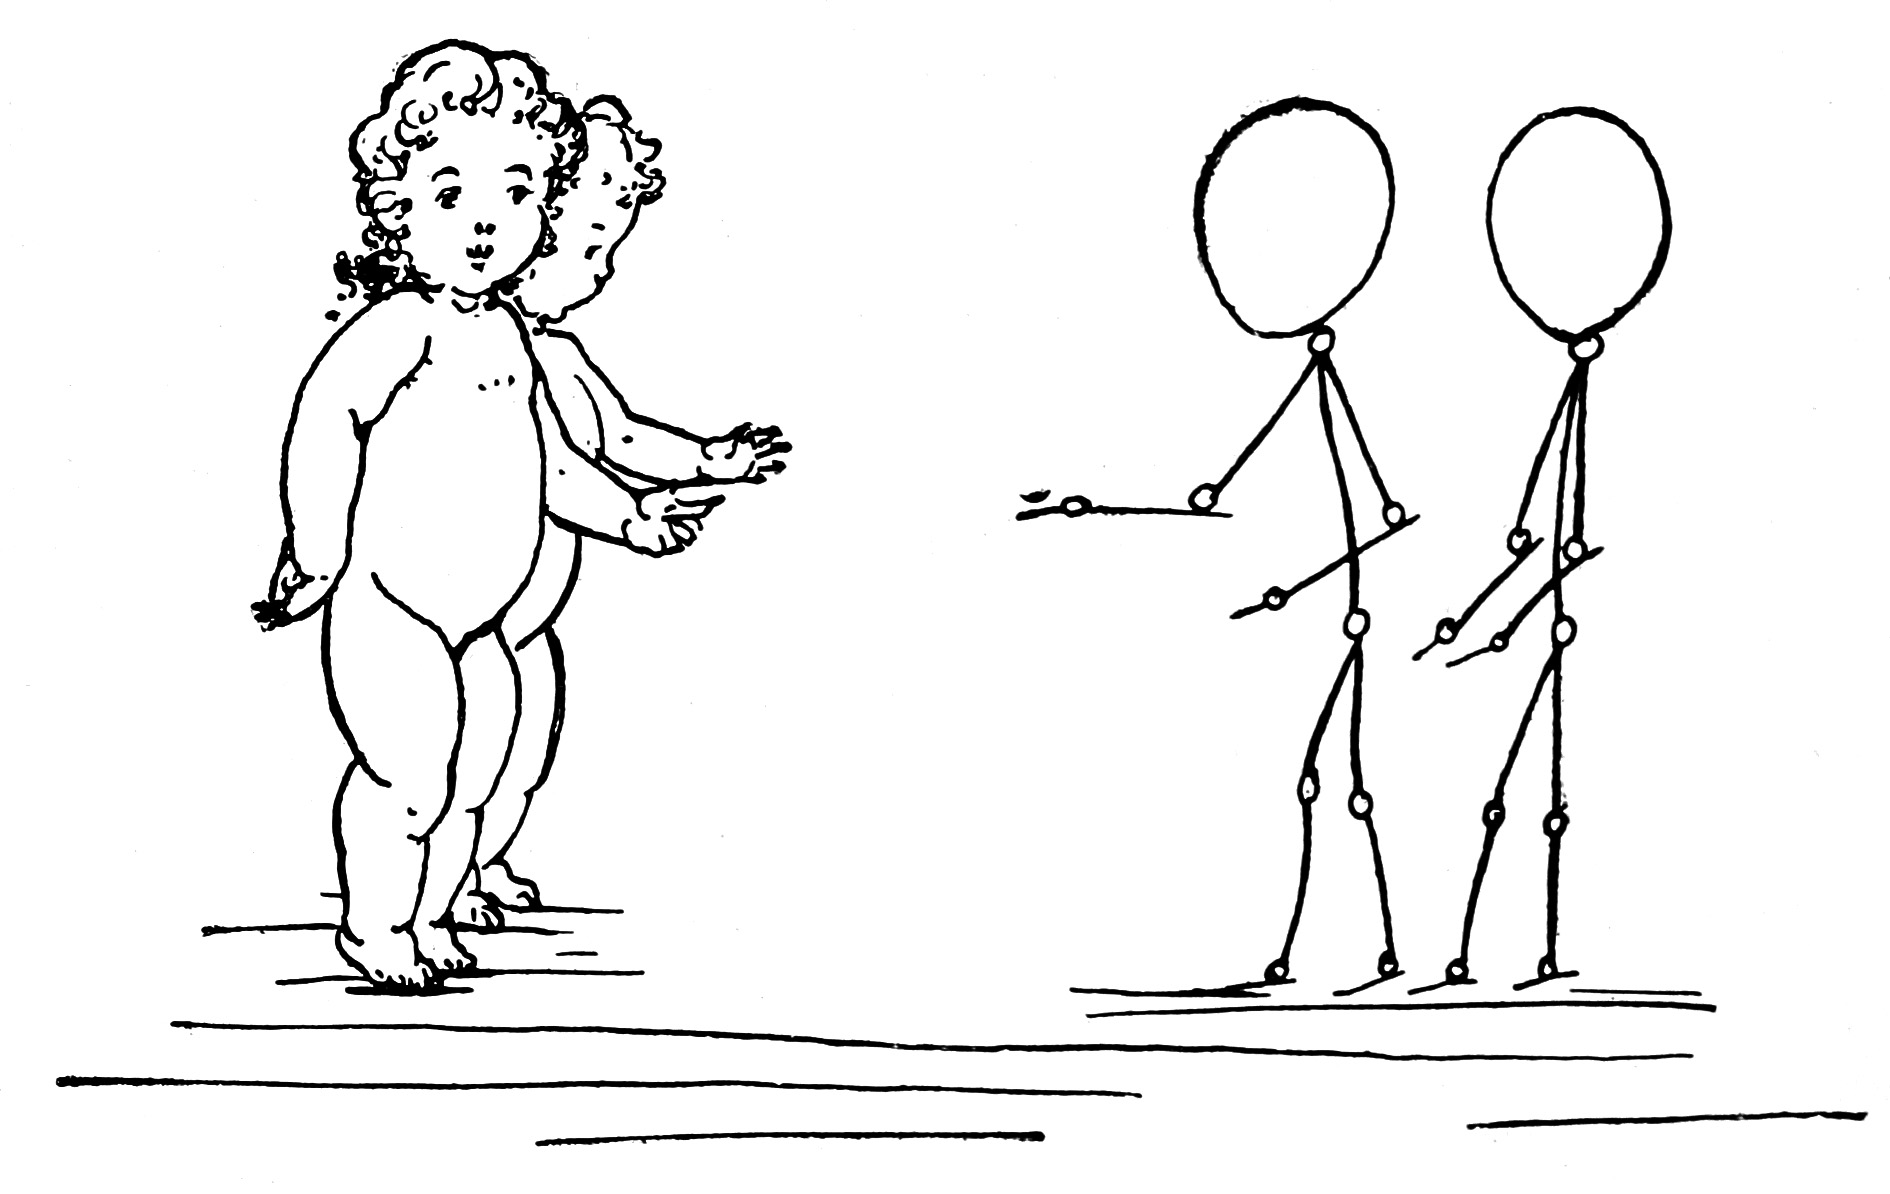
We will now proceed with the study of action by means of single lines. In the last lesson (Fig. 7) we were limited to ihe movements of the arms and one leg. We will now vary the action of both legs, and of the head. We will also curve the lines to further approach the real human figure.
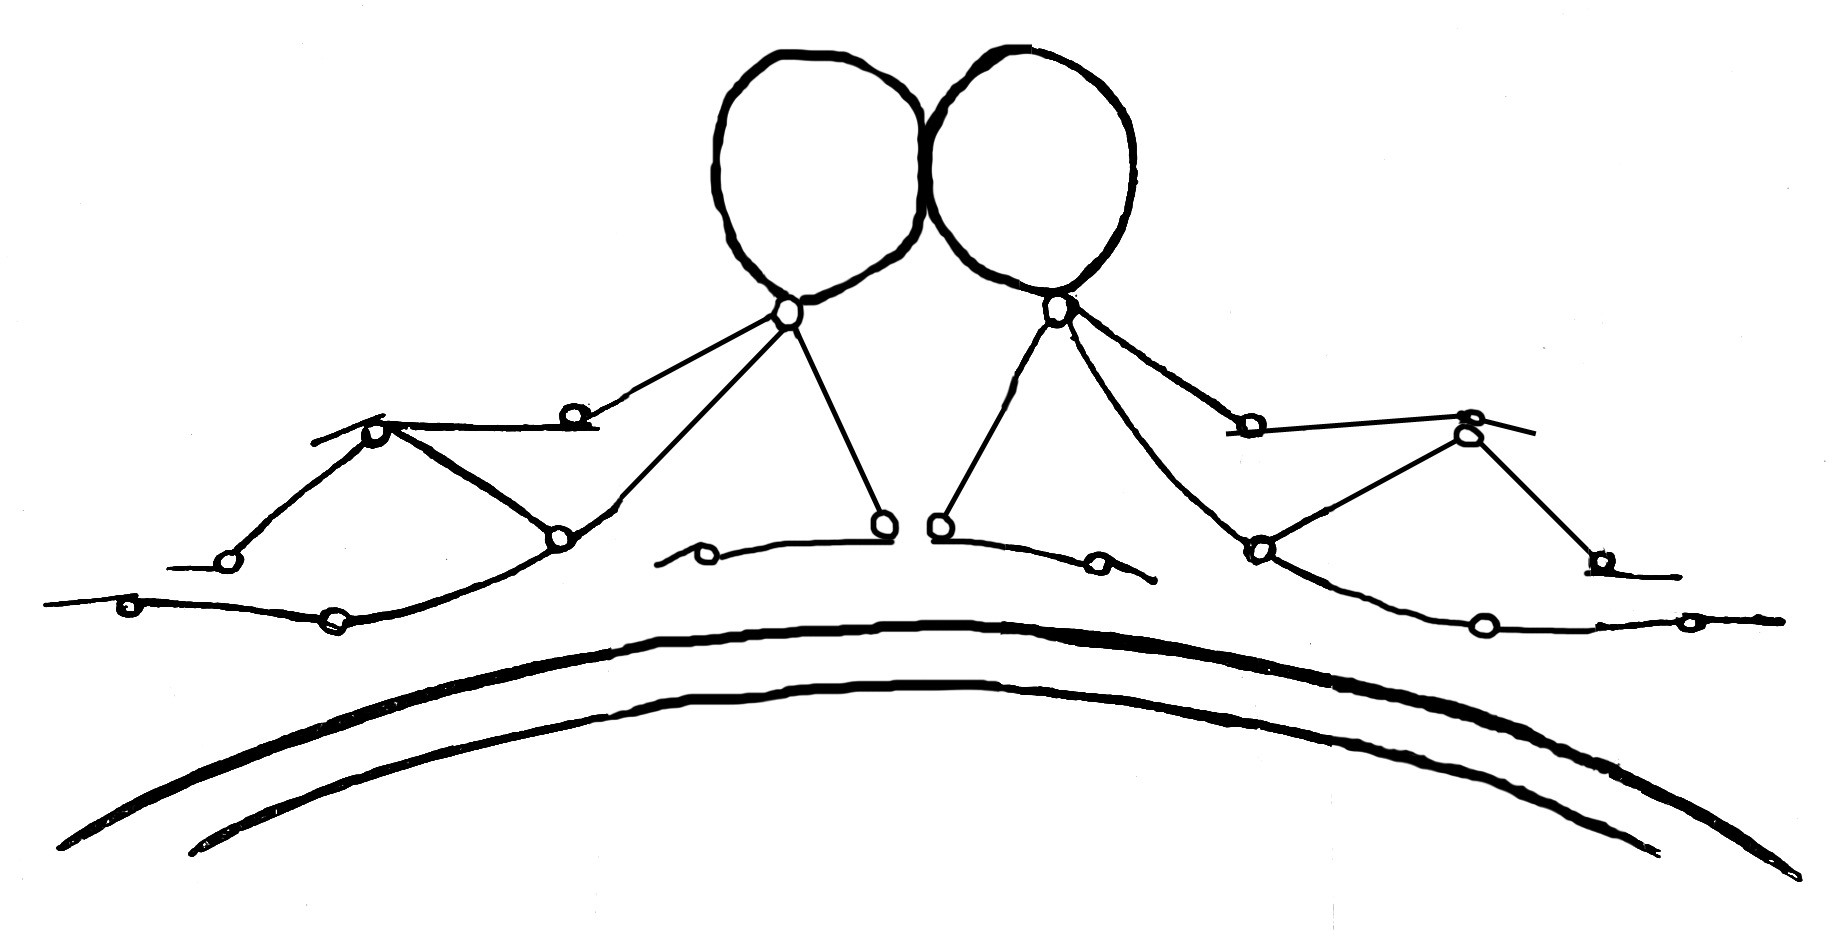
The single figures and groups in Fig. 13. indicate the wide range of pose, action and expression now possible.
Copy these carefully on a larger scale. Do not stop there, however; do not merely copy these, but go on, and draw original figures and groups that shall express ideas and tell stories — this work is by far the more important. Let the examples in Fig. 13. only serve to give suggestions of what to do and how to do it. The intention always is to develop the pupil's own faculty for seeing and doing.
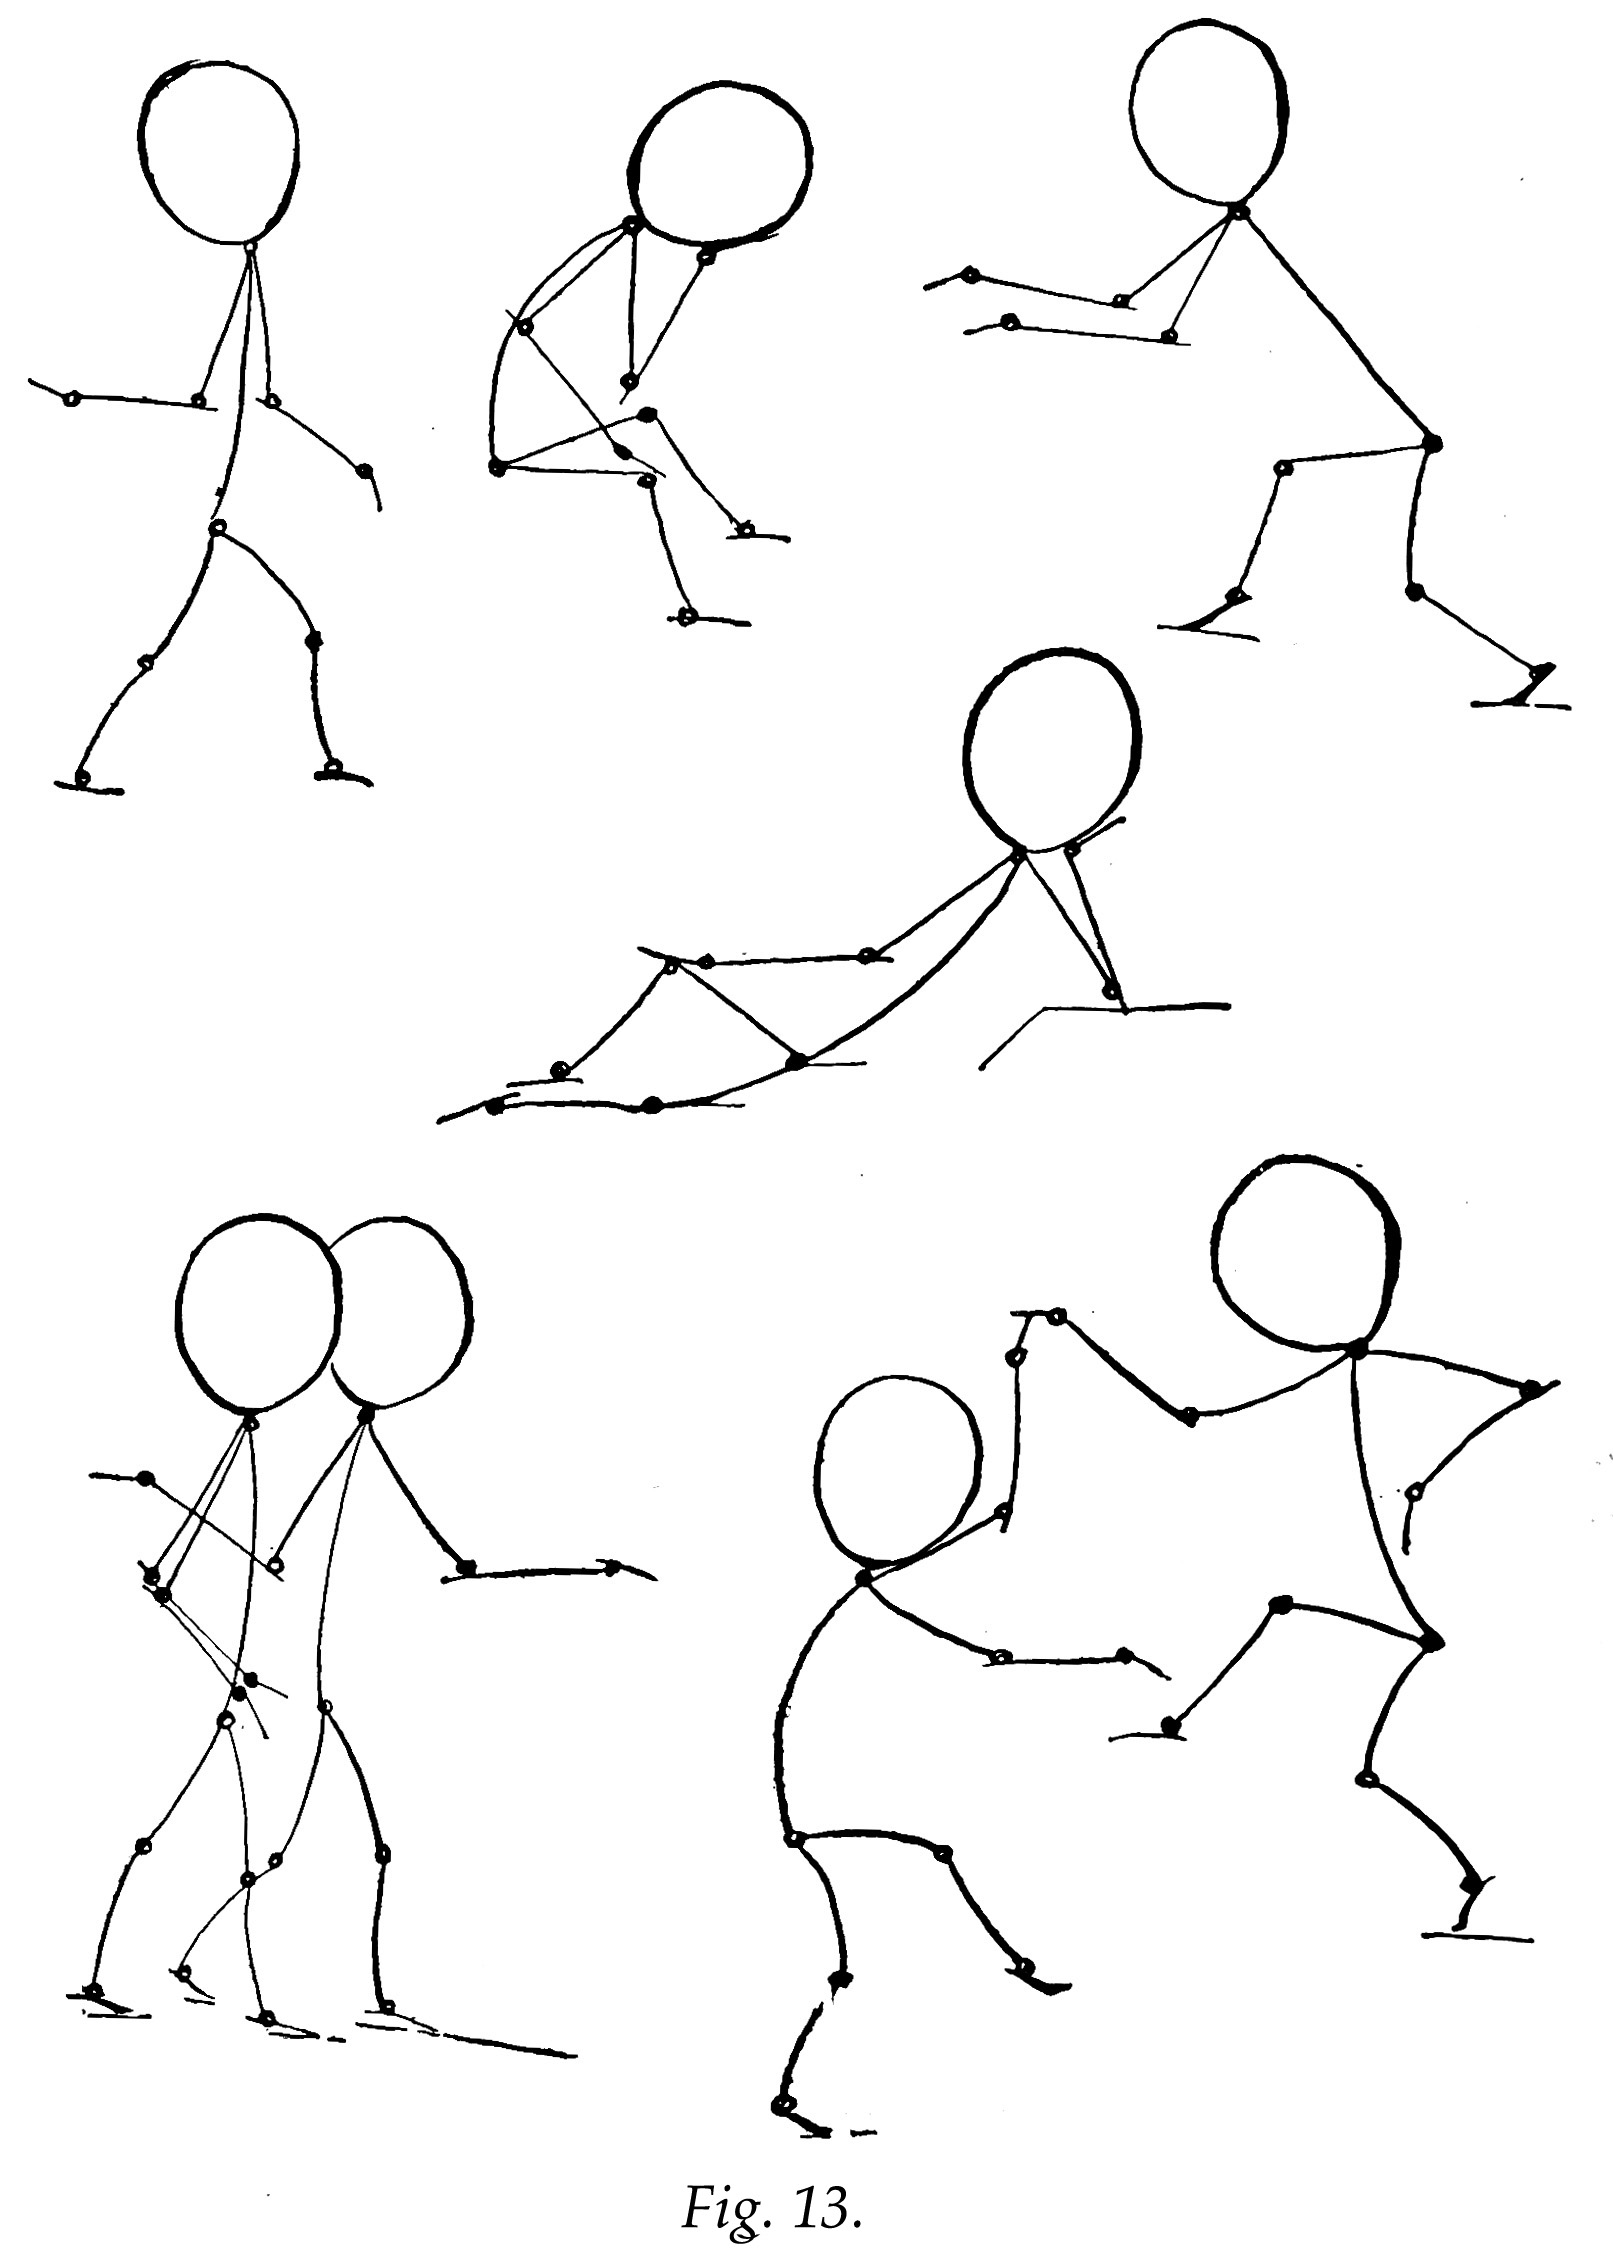
It will be good practice to make two drawings ot each figure. As it is usually easier to draw the figure facing either to the right or the left, make a second drawing facing in the opposite direction. This will be good discipline, and will, as it were, by rule prove the example.
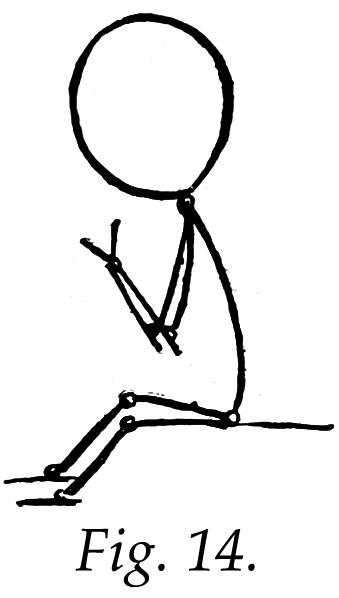
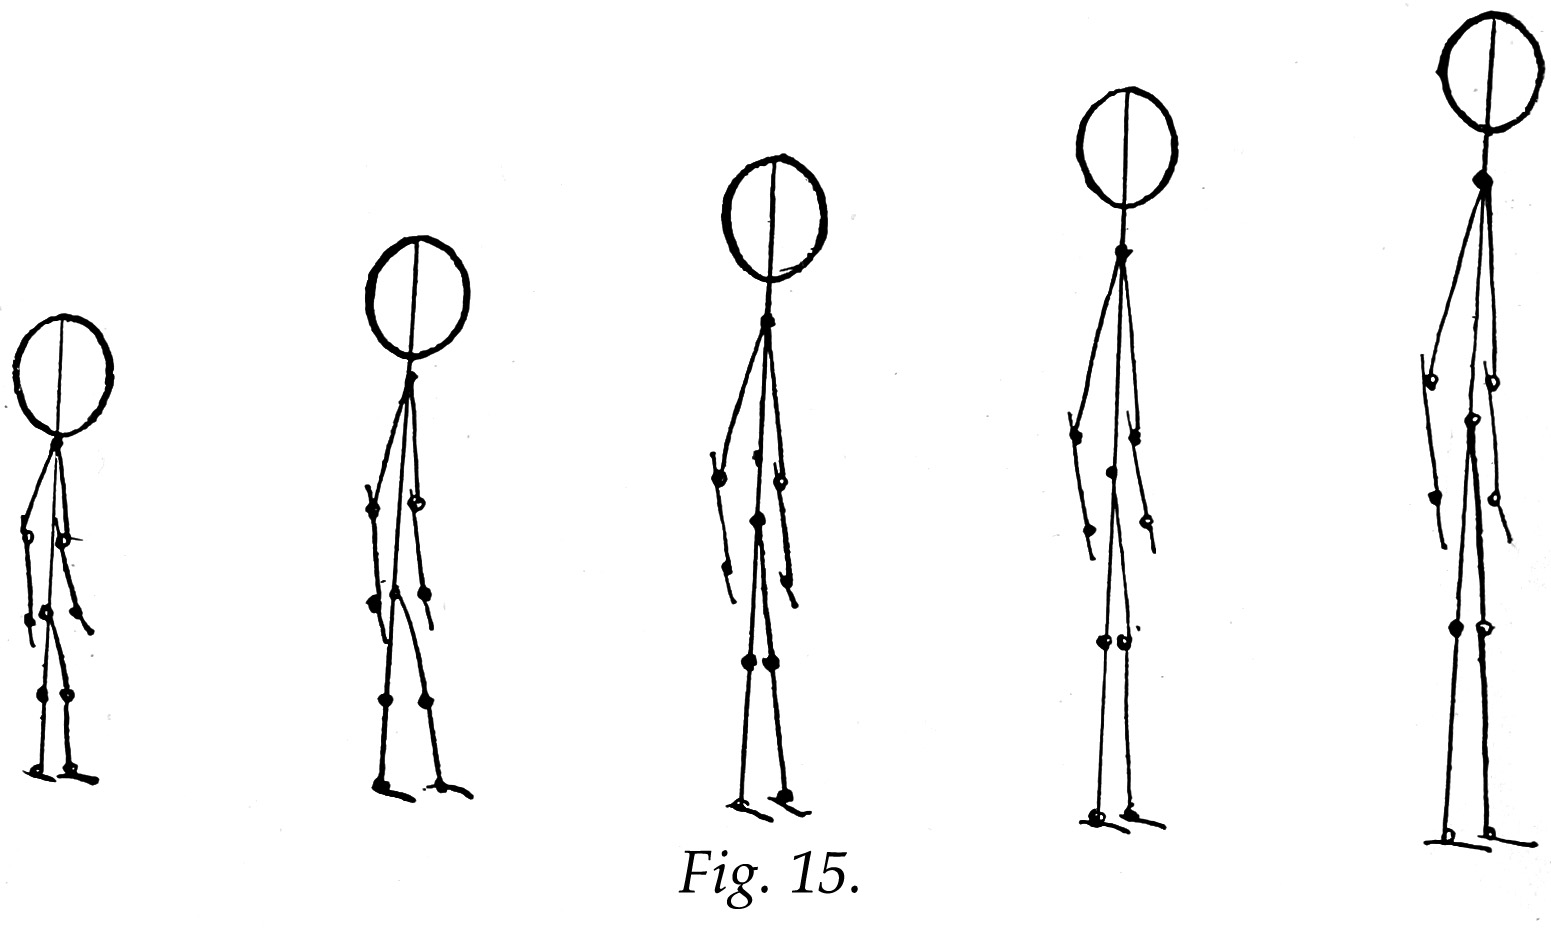
Some simple rules of proportion are often convenient, and may be given here. In the figure of a child there must be about four and a half times the length of the head in the height of the whole figure, that is from the top of the head to the bottom of the feet. A baby is about three and a half times the height of his head, which you see gives a still larger head for the baby than for the child in proportion to his whole height (Fig. 14) In the series of figures in Fig. 15 this change of proportion with change of age is more clearly shown by the same-sized head placed on figures of different heights and proportions. Of these five, the first httle figure represents the baby with large head, long body and short limbs; the second is the young child with head still large for its height, the body yet long, but with limbs grown a little; the third stands for the youth with longer neck, arms and legs; the fourth represents the young man fast approaching man's proportions; the fifth represents the full-grown man.
In drawing the figures in action be careful in your first work that you have the lines bend the right way at the joints. There are two kinds of joints in the human figure. The joint at the s'houlder and that at the hip is called a cup-and-ball joint, or socket, because the arm and thigh can be moved not only backwards and forwards, but sideways in all directions. The joint at the elbow and at the knee is called the hinge-joint, because it can be bent only back and forth as a hinge is bent.
An excellent way to get suggestions of action for figures is to run the pencil or chalk in a line curving or bending sharply in one or more ways the length you wish the whole figure to be, and then regard it as the main line of action, and by dividing it and adding the head and limbs make the complete figure in single lines. Do this repeatedly and you will come to see life and movement in any and every line.
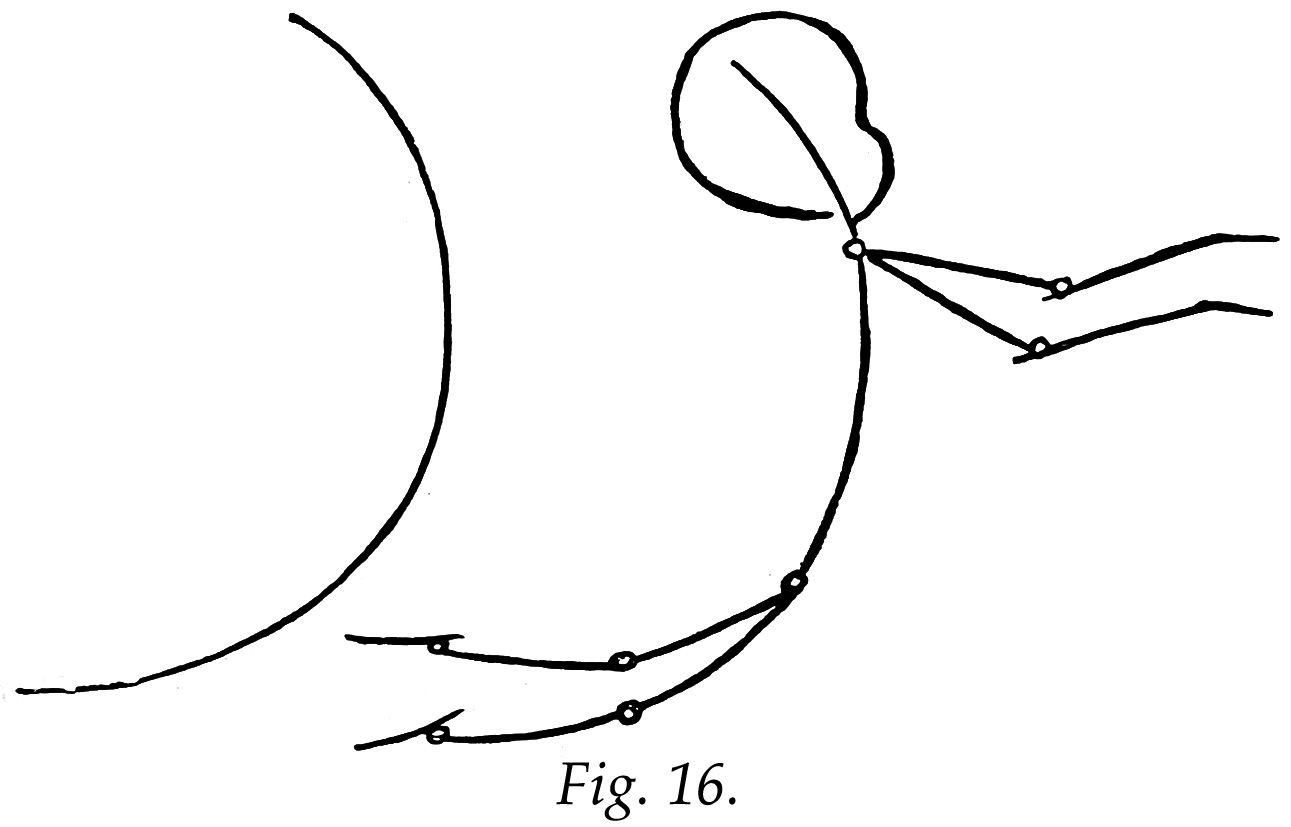
If you see a person in a position which you would like to imitate in single lines on your paper, and there is not time for the whole drawing before the position will be changed, think one line will best express the attitude, and quickly put it on paper, and then from memory add the different parts (Fig. 16). It will be well to accustom irself to this sort of pictorial short-hand.
Now is the time to gain facility in using the pencil, and to acquire freedom in line. While having practice with these simpler forms it is not wise to venture beyond what you know, but do boldly what you can with the knowledge already gained. Put all the character possible into the lines.
In trying to express on paper any action you have seen, be sure you do not give it less force than it had. It is better to have your work too strong than to have it weak and meaningless.
We shall next study and draw tho solid form of the child-fitrure, that is, instead of employing only the single straight or curved lines, we shall give in their places the rounded sections which belong to each part.
In leaving the simple form — single lines — for solid sections, bear in mind that the parts of the figure are all to be represented by rounded sections, and not by anything which approaches the square; that the head and body lead as most distinct, both in form and proportion; that the limbs are more subordinate, though having their important divisions, which will be carefully considered in a later lesson.
At first it will be best for the student to carefully draw these new shapes over a plan in single lines, so that the lengths of the different divisions may be kept in mind, and no liberty be taken with the proportions.
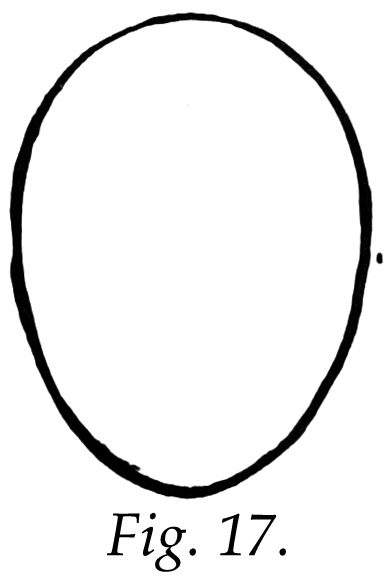
To proceed with a more particular rendering of the forms, we shall hereafter make the head in the shape of an egg, which may be described as a long ball with the lower end narrower than the upper. This is called an egg-shaped oval, and should always be remembered as the general form of the human head — see Fig. 17. Of this, more will be said in another lesson.
All the parts represented in solid sections, when seen in front view, should be drawn as in Fig. 18. The forms here given closely approach the completed figure, and must be thoroughly understood and mastered, so that they can be drawn readily without referring to the example. Study each section carefidly, comparing one part with another.
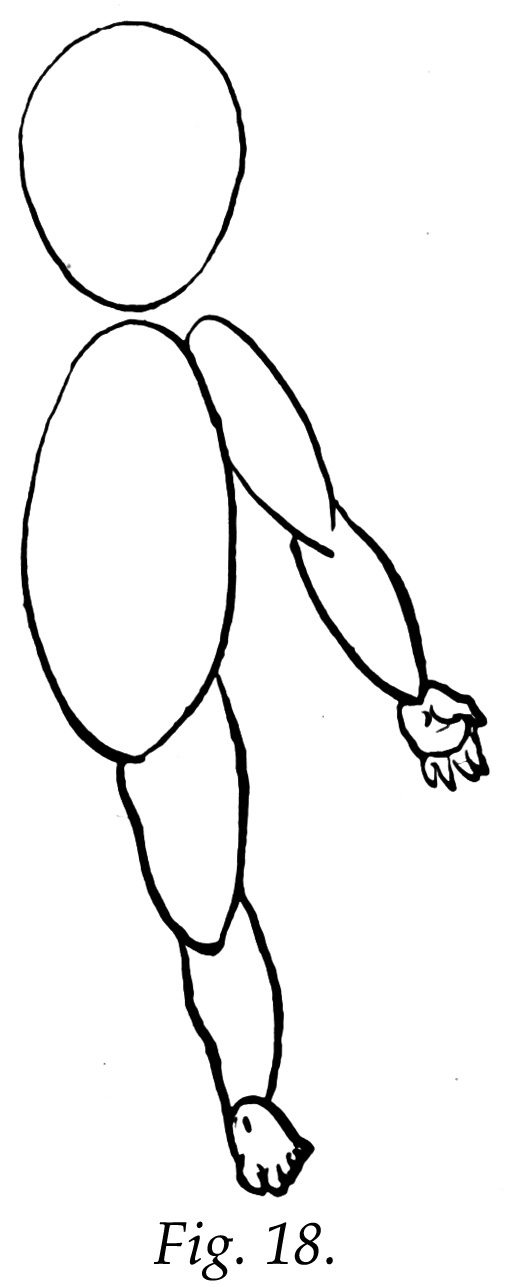
Observe that the body piece is about twice as long as it is wide, and greatest width is at or a little below the center.
We now come to the limbs. The upper, the whole of which is commonly called the arm, is divided into three parts: that from shoulder to elbow is correctly called the arm — that from elbow to wrist the fore-arm, and from wrist to finger-tips the hand. The lower extremity, the whole of which is usually called the leg, is also divided into three parts: that from hip to knee is the thigh, from knee to ankle the leg, and from ankle to toe-tips the foot.
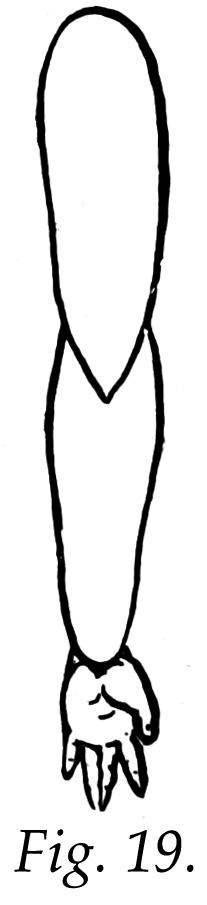
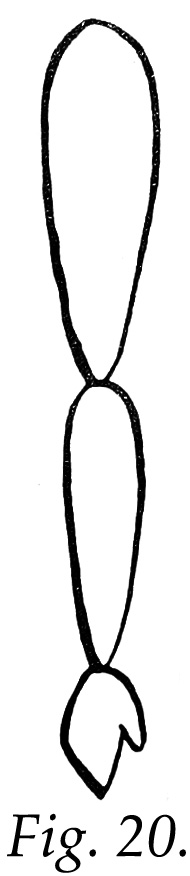
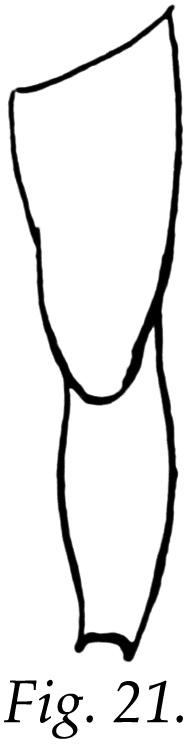
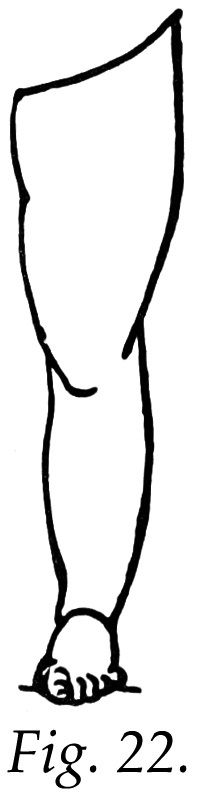
Pay particular 'attention to the way in which the parts are united. Notice, for instance, that the lower end of the arm, in front view, sets down upon the fore-arm as in Fig. 19, and that the sections are never united as in Fig. 20. Also notice that in front view the thigh at the knee passes down over the leg, as in Fig. 21. In Fig. 22, mark the way in which the leg unites with the foot. The top of the foot sets up a little way into the lower end of the leg. Study these sections carefully and then again turn to the body.
When the body piece is seen in side and back views its outline is lost in places where the arms and thighs join it, but in the front view the body piece is more clearly defined.
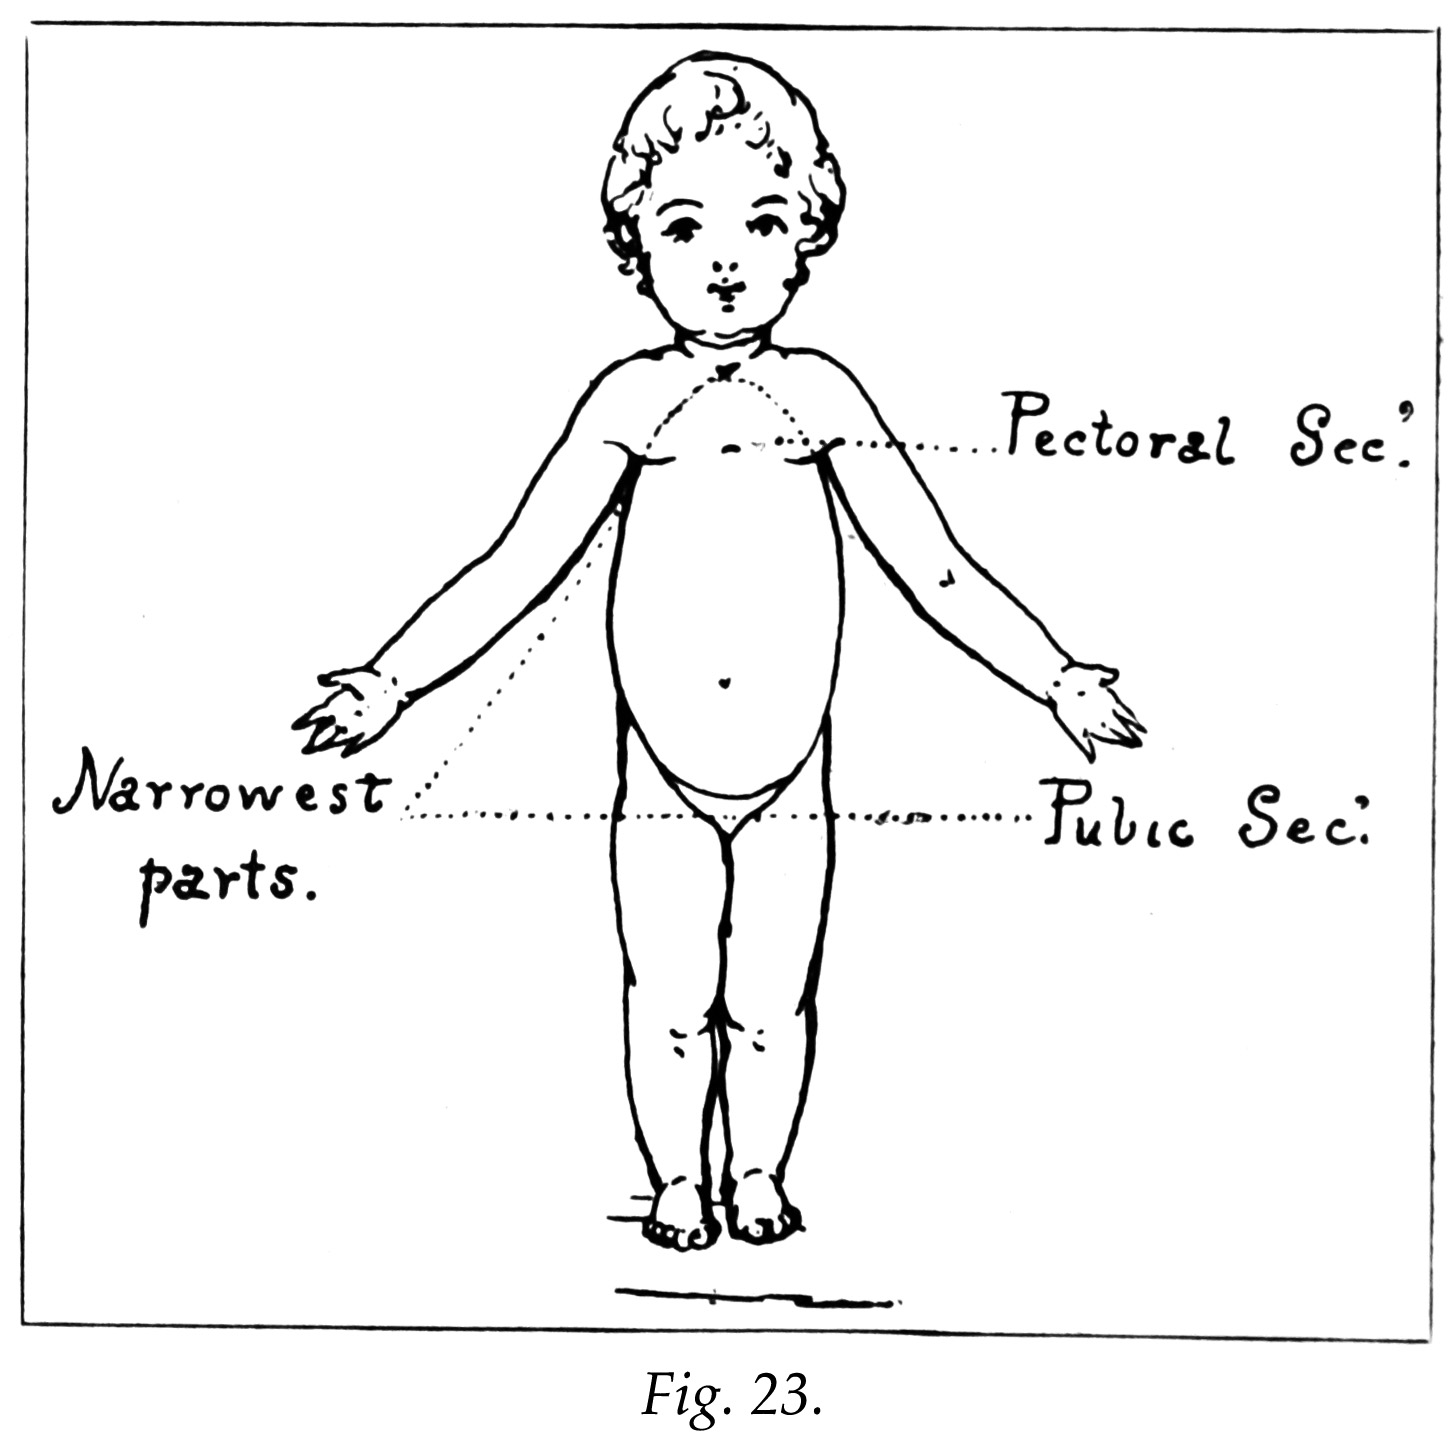
The only addition to be made to the solid sections, as shown in Fig. 18, is that which unites the arm with the body at the front and which is called the chest or pectoral section, taking its name from the large pectoral muscle which nearly fills the space between the arms of the front. This muscle hides somewhat the outline of the body section; one half of it being on either side the central line of the body and passing from a broad mass on the upper ribs into a narrow band which is fastened to the arm, each half having the form of a triangle. In the child, the pectoral or chest section is seen as in Fig. 23.
In birds, the pectoral muscle is very powerful, being attached to the breastbone and then to the wino-. which corresponds to our arm, and it is mainly by its use that they fly.
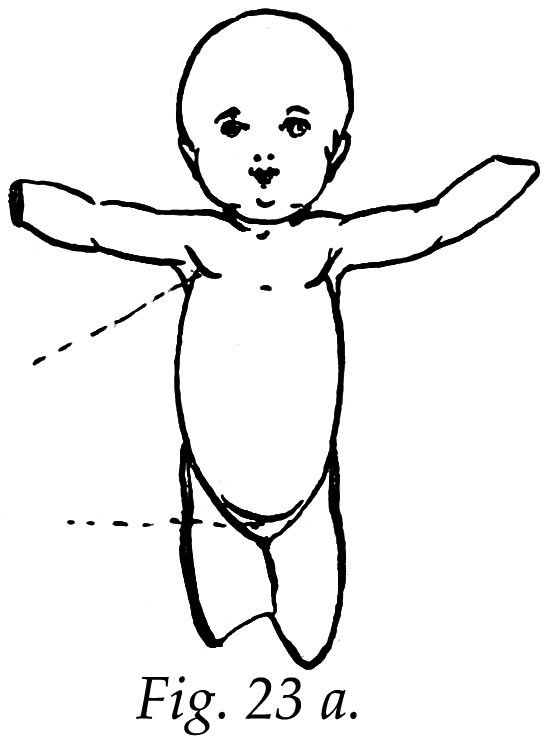
A marked characteristic of the child-figure, and one that must be secured in every correct picturing of children, is the narrowness of the body piece under the arms and at the lower end which is called the pubic section(Figs. 23 and 23 a).
Do not forget that in children the arms are placed high, leaving little room for the neck, and that the top of the arm makes the shoulder. The body piece being narrow near the head we find that when the arms are added the shoulders are near together. It may be set down as a rule that the shoulders of a child are high and narrow.
It is a little carious that most people, when they begin to draw children, fall into certain errors in proportion which surely result, however well all else may be drawn, in forms most unchild-like. By way of precaution at the outset, it will be well to point out some of these mistakes so often made.
First, the shoulders are usually drawn too wide. Now, it takes years for the shoulders to grow broad, and that is a marked feature of the adult figure. Then the legs are likely to be too long. This again is a serious defect, as it reduces the proportionate length of the body, which in the child is the longest single division. Another fault comes from making a long neck, and the head heavy at the lower end. Avoid such errors, and carry in mind the rule that of the whole height three fifths must be above the hips and two fifths below the hips. Compare Figs. 24 and 24 a and note how in the one, with a very few lines which keep to the right proportions, the child form may be obtained, and how in the other, by not observing correct proportion, the child-like character is wholly lost.
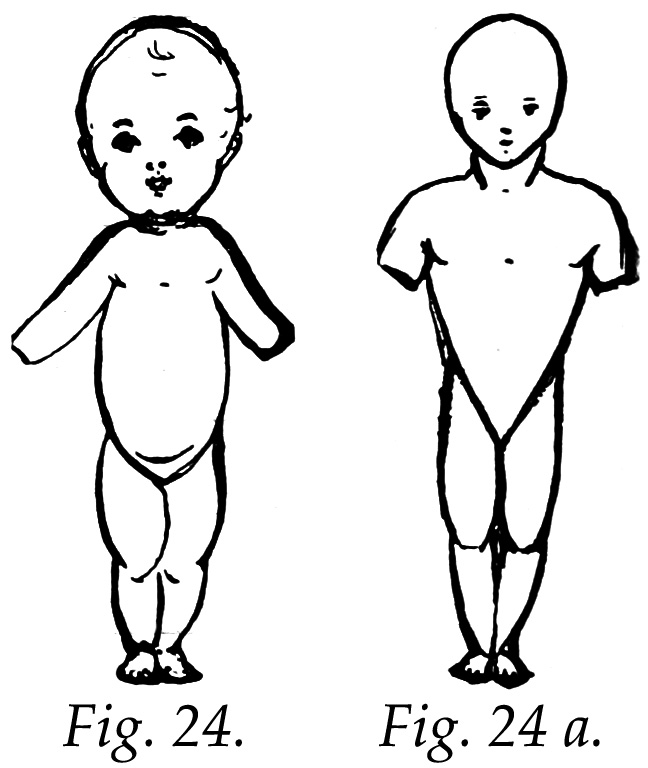
Sometimes a drawing that in certain parts is very contradictory to the rules of good proportion, will be so correct in others, and so admirable in details, that the whole passes for good and clever work. This is possible only when the worth of the parts that are wrong is less than the value of those that are right. As an example. Fig. 24 could not indicate anything but the baby form, however carelessly the details might be drawn, but on the contrary the proportions in Fig. 24 a would never suggest a child even if the minor parts were most correctly given, since so much that is essential to the child-figure has been denied it.
The largest sections are always most easily distinguished, and the, just consideration of them (which would seem easy) lies at the foundation of good drawing, yet they are too often slighted, and attention given to minor parts and details, at the sacrifice of time and labor in the first place, and of a good result in the end.
After one lias schooled himself to first define the principal divisions, he will find it easy to manage the smaller and the details of each. Bear in mind that all the little parts are of secondary importance, and only to be added to give completeness and interest to the main sections. They are only valuable when so used — just as jewels are of less value than the wearer. Be determined when drawing; from life never to see more details than are needed to o-ive refinement to your work.
In the side view of a child we observe that the body has two strongly contrasted lines — the front and back lines of the body section.
The line of the back is nearly straight, curving in slightly perhaps, and leaning slightly forward, while the line of the front of the body curves boldly outward, more in the lower part than in the upper, so that the thickest part of the body is toward the lower end.
This difference is due largely to the rigid bony structure at the back and the elastic muscular structure at the front. In a young child that part of the underlying frame or skeleton known as the spinal column, which can be flet along the back, curves but little if any, and it yields hardly at all to pressure from within. The front of the body section, on the contrary, curves strongly outward, especially at the lower end, because all the viscera, or that which is contained within the outline, cannot at this stage of growth be held in place by the bony structure, as it is in the adult figure, and consequently the muscular abdominal wall, yielding easily, is pressed forward by what lies behind.
As the figure matures, the frame or skeleton develops with marked changes; curves come in the spine, the hips broaden, and all the parts grow larger and stronger, and so afford a better support to the various internal organs; the whole figure also becomes more erect.
Notice a young child, and you will see that he walks with his head in advance of his toes. This he does to defend himself. Should he stand very straight, or try to lean back, in walking, he would very likely stumble and fall often. His body is not made so as to carry out brave ideas of speed and carriage.
Childhood means dependence and not independence, and all drawings of child-life must have in them this characteristic element.
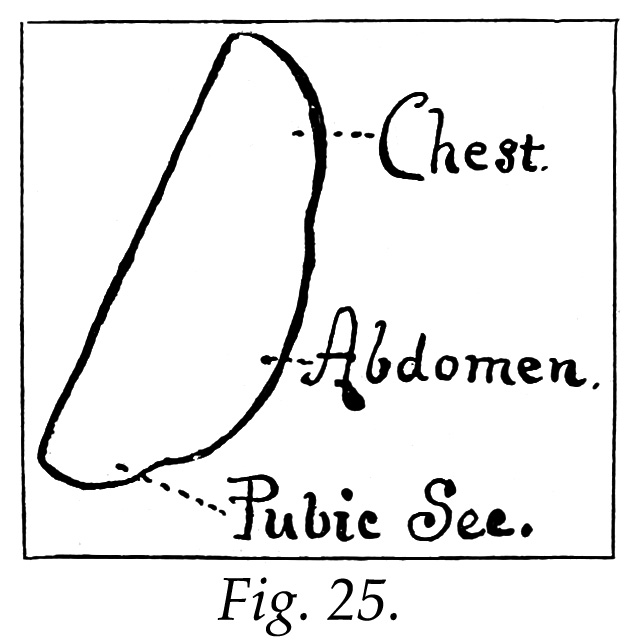
Fig. 25 gives the side view of the body section when taken alone.
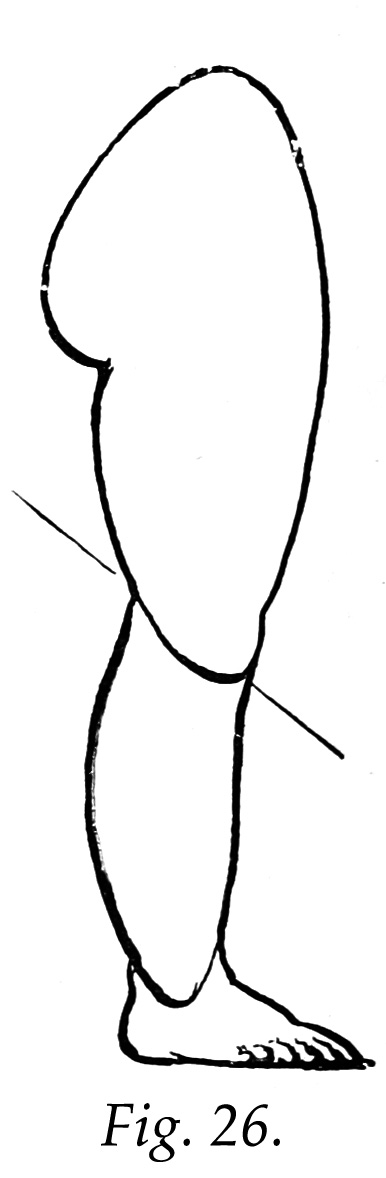
In Fig. 26 is shown the outer side view of the thigh, leg cond foot. The top of the thigh goes up to a point called the hip, and the upper back part of the thigh is a full curve, forming what is called the gluteal section. All the parts are larger at the upper than at the lower end. Notice that the front of the thigh, as it ends in the knee, extends down lower than the back of the thiLrh where it joins the calf of the leg. Observe that the lower end of the leg sets down into the foot in this view. Note carefully the proportion the foot bears to the whole limb.
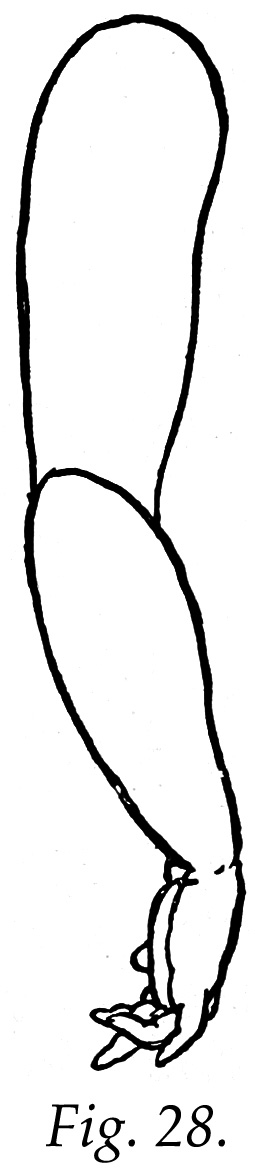
Side views of the arm will be found in Fig. 27 and Fig. 28.

In Fig. 29 we have the side view of the entire child-figure. The outline of the body section, where hidden by the other parts, is indicated in this drawing by dotted lines, to show the proper attachment of the limbs.

Give particular attention to tlie form of the body at the lower end; do not carry the abdominal line down without paying respect to the different plane at the lower end which always marks the pubic section plainly to be seen in side and front view. The front outline of the young child's body is called an unbroken curve — this refers particularly to the abdominal line — that part between the chest and pubic section.
When the baby is seated, this abdominal part is a soft section which pushes up against the chest section or down upon the thighs, making it seem difficult for the little fellow to get at his toes. When standing. this abdominal section has a tightened or firm outline, and projects well forward.
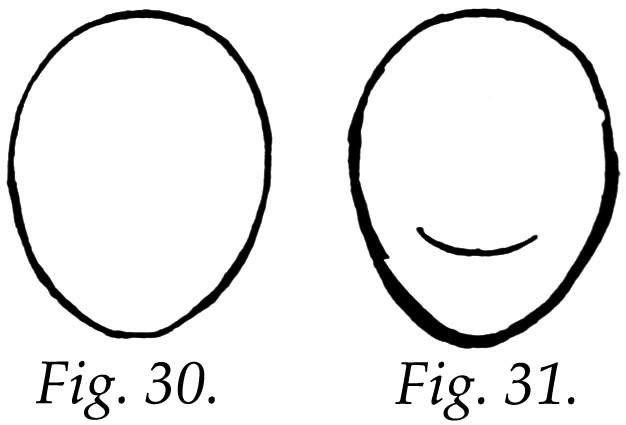
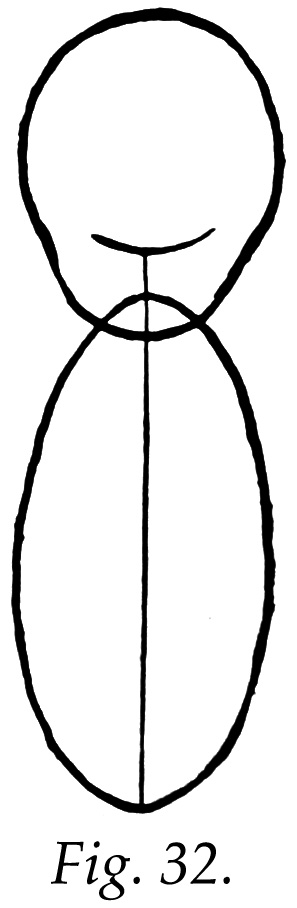
The drawing of the back of the child-figure is usually found more difficult by beginners than the front or side — perhaps because the outline of the body section is lost by its union with the head and limbs. It may be easier therefore if, at first, the entire outline of the body be left, as if seen through the arms and thighs, until these parts are rightly placed; then the lapping sections of the body outline which should not show may be erased.
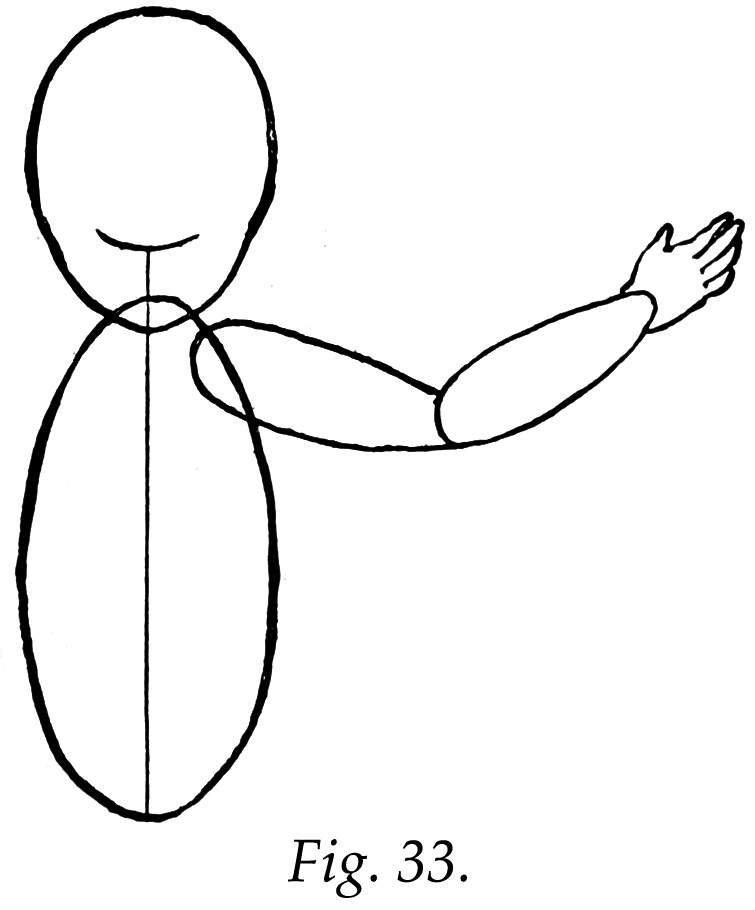
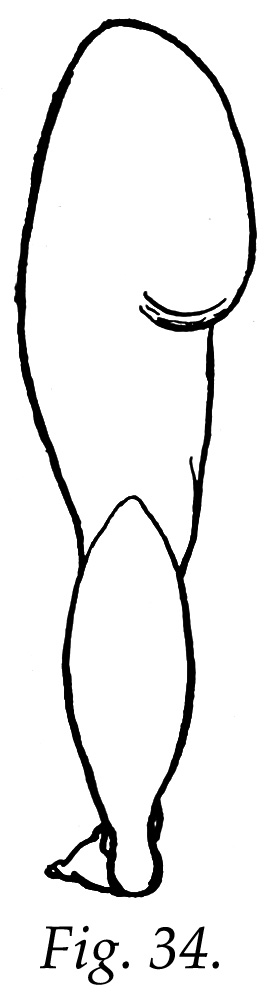
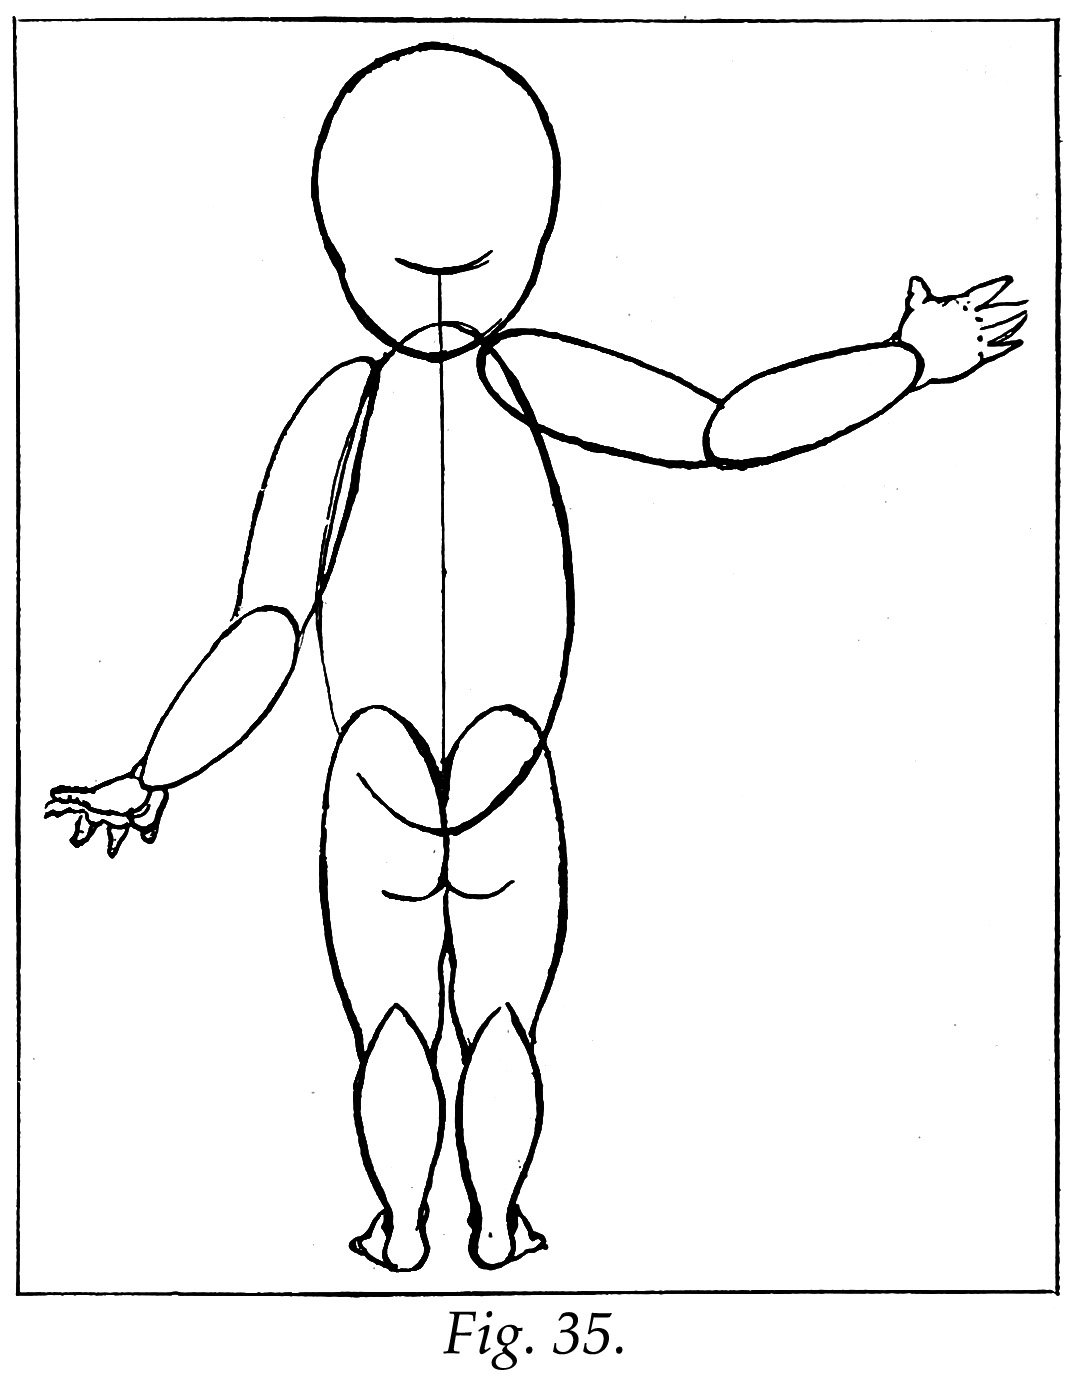
In the first place, make the head an egg-shaped oval as before (Fig. 30), then draw a line to mark the base of the head at the back, as in Fig. 31. To this add the body section, of the form and in the position shown in Fig. 32. Attach the arras at the npper part of the body as in Fig. 33. Fig. 34 shows the back of the thigh, leg and foot. Notice particidarly (Fig. 35) that the top of the thigh, forming the hip and the gluteal section, sets well up on the lower end of the body piece. In all views the hip is higher than the lower end of the body.
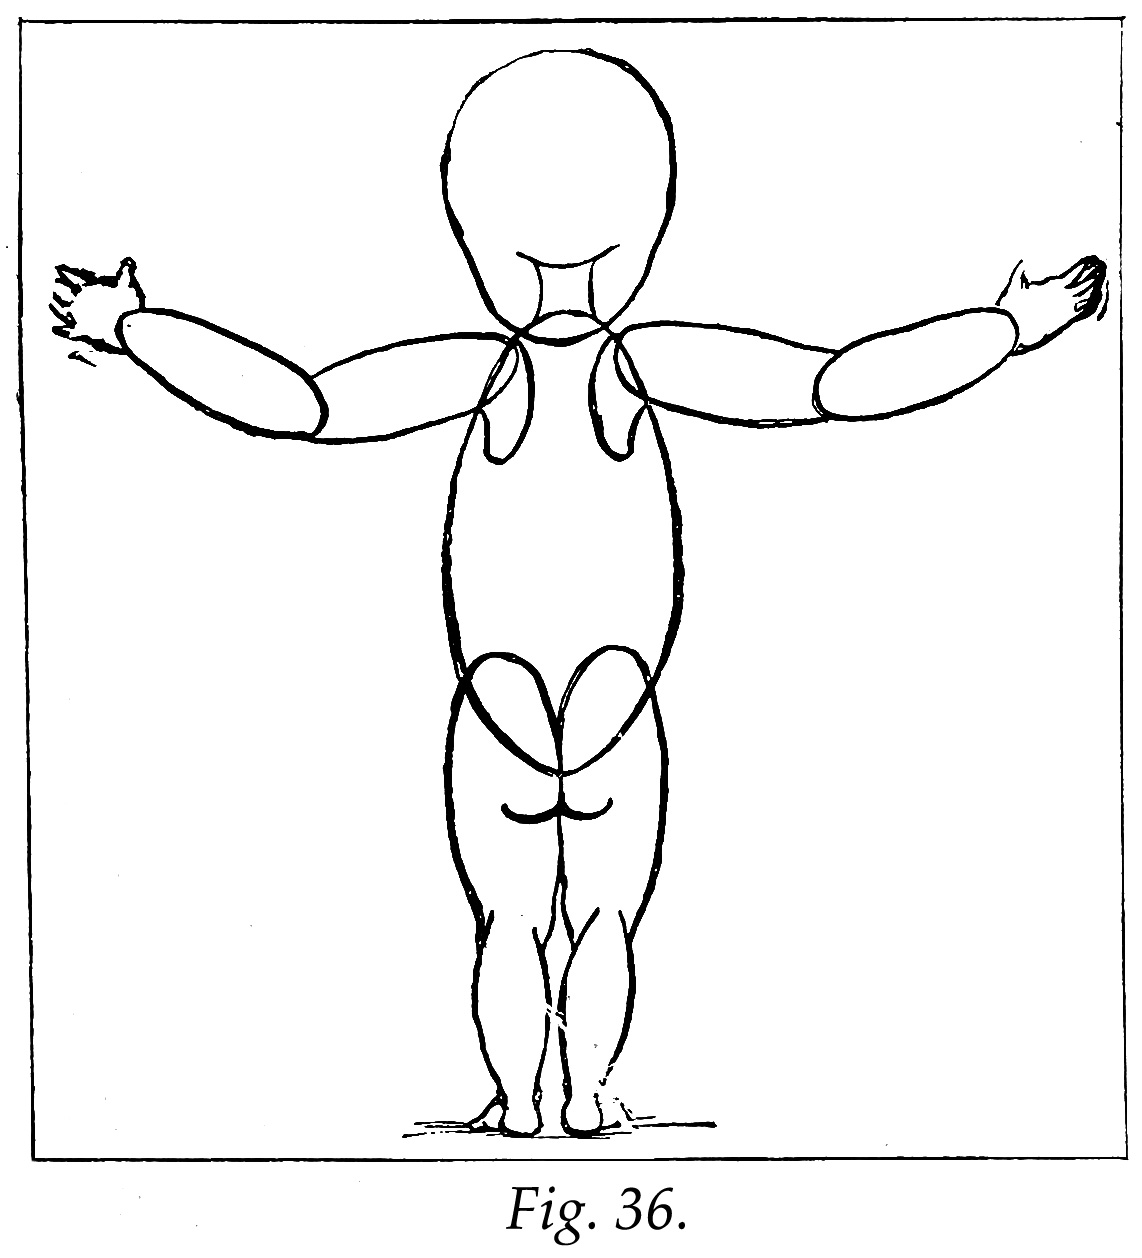
One more important section is yet to be added, and that is the scapular section, which takes its name from the scapular bone, or, as it is commonly called, the shoulder-blade (Fig. 36). This joins the arm to the back as the pectoral or chest section fastens it to the front of the body. Of these two important parts of the upper end of the body, the front is more rounded or curved. The marking of the scapular section seen in the uncovered back of a young child is unsurpassed for delicacy. This bone, which in all figures is held in its place by muscles, and moves about on' the rib section, here, though so tiny, is beautifully distinct in its action as it moves with the changes of position of the arm. The flesh upon the baby's back is never very heavy, so an opportunity is allowed for the study of the changes in outline which its movements make. The cavity under the arm is called axilla. In most positions of the arm it is well marked. Tlie neck may be indicated as in Fig. 36, which gives the completed view of the child-figure. "When working independently of lessons, and it is well to take a variety of subjects, do not touch pencil to without first having carefully studied the object which you are to represent, so that every drawing you make will be a clear expression of your idea regarding the form of its subject.
In drawing the human figure it will not answer merely to imagine or guess at the form and position of the parts; you must really know these facts and be familiar with all the details.
In whatever you attempt, never let the difficulties appear to you greater than the beauties.
Never make a drawing merely for the purpose of showing you can accomplish a difficult piece of work.
Seek to discern and preserve some delicacy, or strength, or beauty, or meaning, that will call for all your skill, and be worthy its best effort.
Now that the single lines have given place to solid sections, the next step is to represent the figure in action by means of these new forms.
Endeavor to work as freely as when using the simpler means. Bear in mind that it is always an advantage gained when you can work with confidence in yourself.
Before starting upon this new work I may say that when a lesson is learned, that is, as soon as the advance work of any lesson is well understood and has been well practiced, then make original use of it; make it go as far as it can toward expressing some idea of your own. Add to it, too, any or all the information gained from the preceding lessons. Strive to have at your command all that has been taught before. Draw and draw again any form or position that may be possible by following the plan already given. Be slow to add to this any half-learned ways of doing things from other sources, lest your exercises grow to be beyond your criticism, and you lose the whole practice by confusing that which you should know well with uncertain additions.
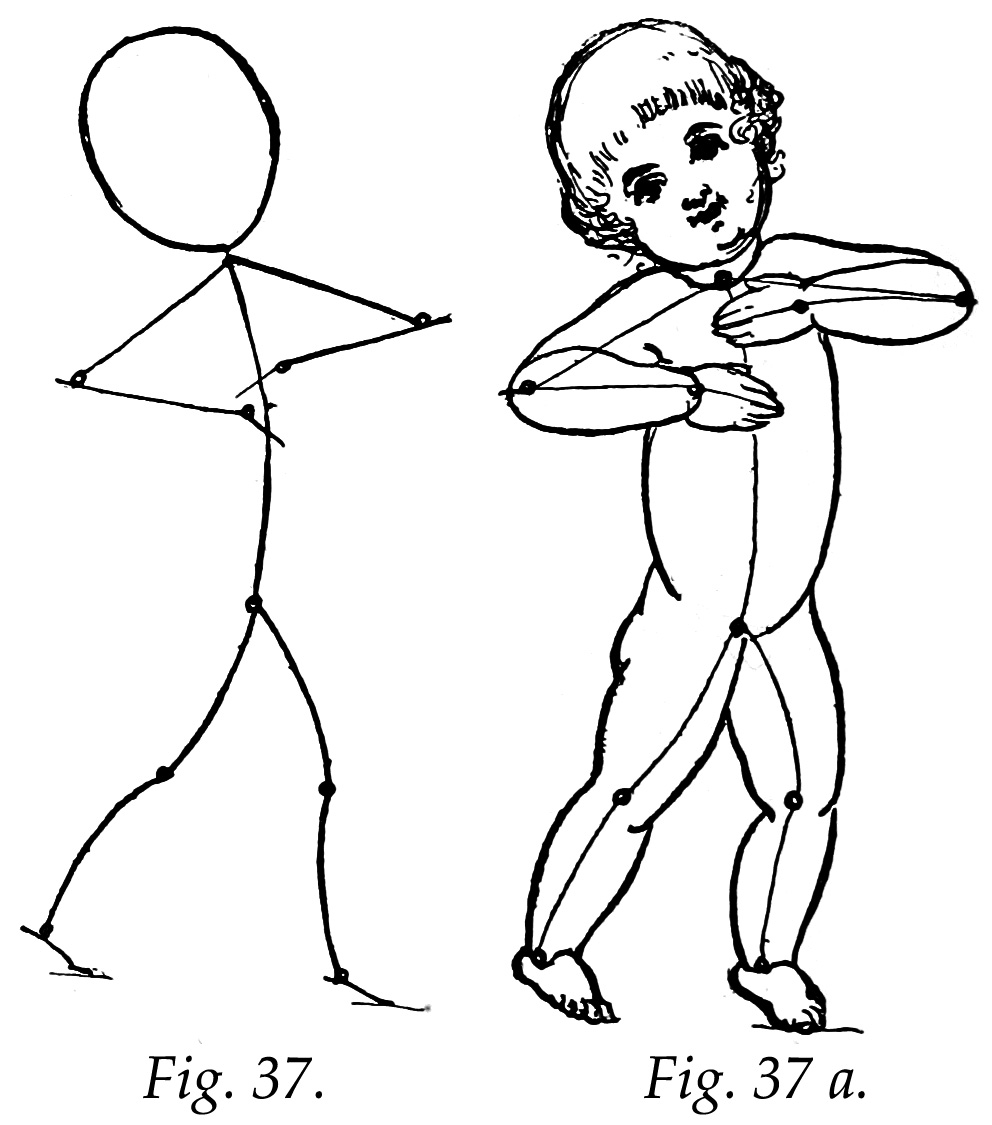
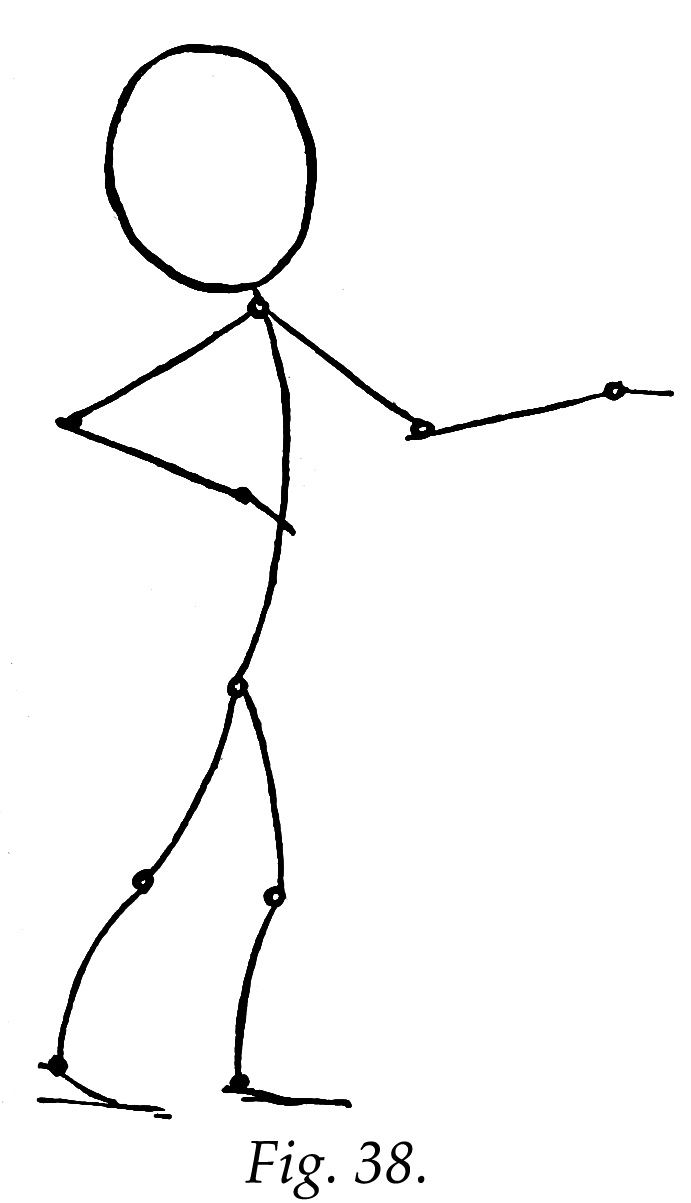
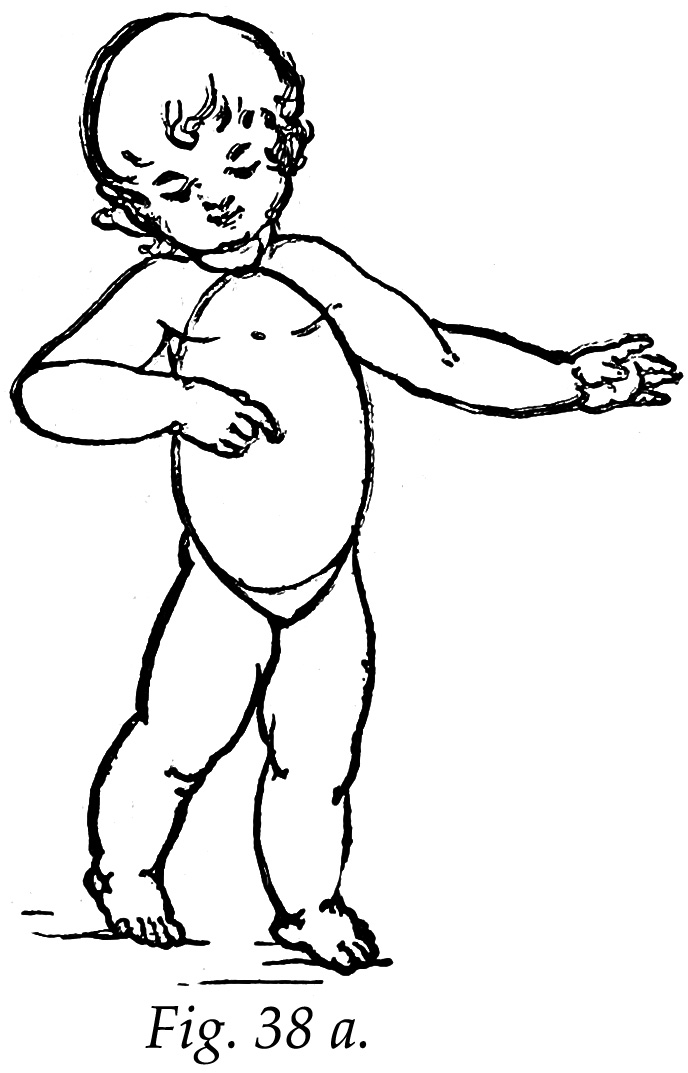
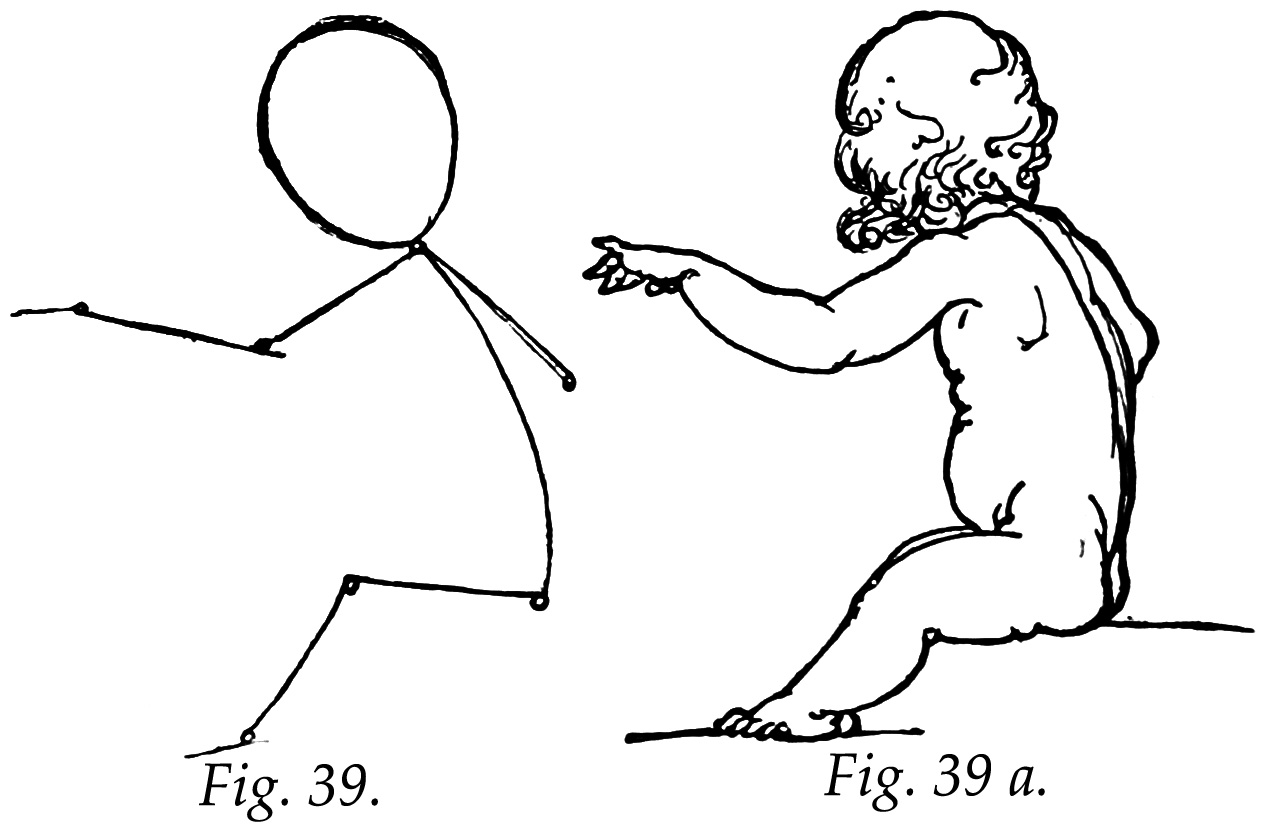
A good way to begin, in representing the solid form in action is first to draw a single-line figure in the desired position, and then draw the solid section on or outside that foundation. Figs. 37 and 37 a will make this clear. Figs. 38 and 38 a, 39 and 39 a further illustrate this method.
In the young child, the bony framework or skeleton bears a less important part as support for muscles, and a smaller share in shapino- the outline, than at any other period of growth, because it is in a state of formation The parts that later are to be strong, and come upon the surface in well-defined projections are undeveloped in the baby and concealed by the soft outer covering. This is especially true of the joints. The lack of growthin the frame and muscles is peculiar to the young child only. This is the one great reason why the baby form is so pliable, so easily bent in any position.
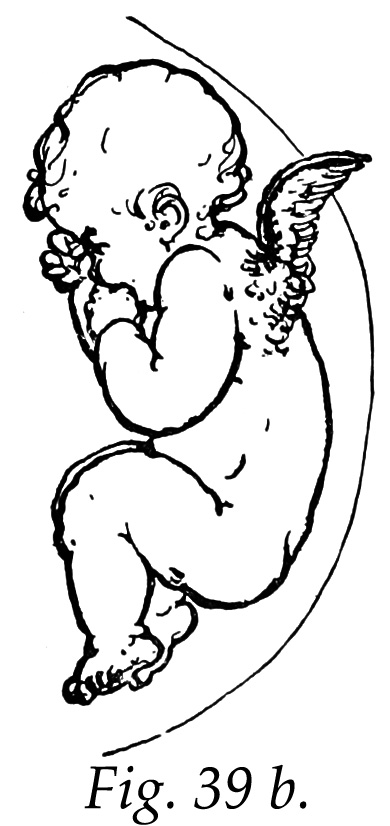
In Figs. 39 a and 39 b, notice that the abdominal or front line rolls out or doubles upon itself, and that the line of the back also is rounded. This is caused by the internal organs pressing against the side walls that hold them when the height of the cavity is shortened b y bending forward.
If any difficulty should be met when trying to draw the figure seated, it will be well to start with the side view. This is easiest for a beginner, because the proportions can easily be kept in sight, and no foreshortening be needed as in a front view. Foreshortening is the apparent shortemng o a hue or object seen obliquely, or endwise. See Figs. 40 and 40 a.
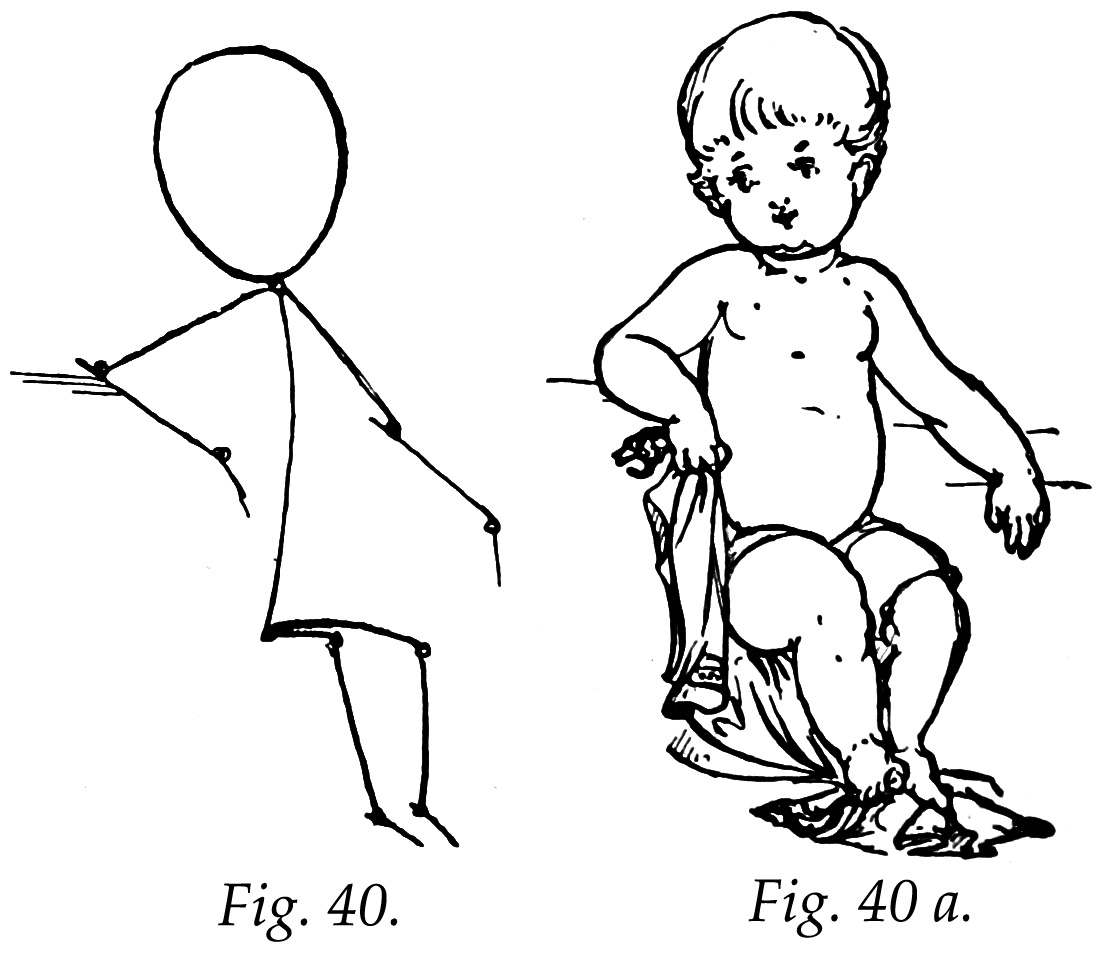
When a figure is seated it loses a portion of the height it has when standing, very much as a penknife with the blade half-closed has less length than when the blade is wide open.
To make a figure sit down, you may keep the body line upright, but from the hip to the knee the lines must be nearly horizontal. From the knee to the foot the lines may be vertical again, if you like, or bent backward or forward a little; one knee may be drawn a trifle above the other; the body line be leaned forward, as if the child were studying something in front of him, or tipped back a little as when leaning against the back of the chair. The thing that makes the person look seated is the horizontal direction of the thighs, with the upright body.
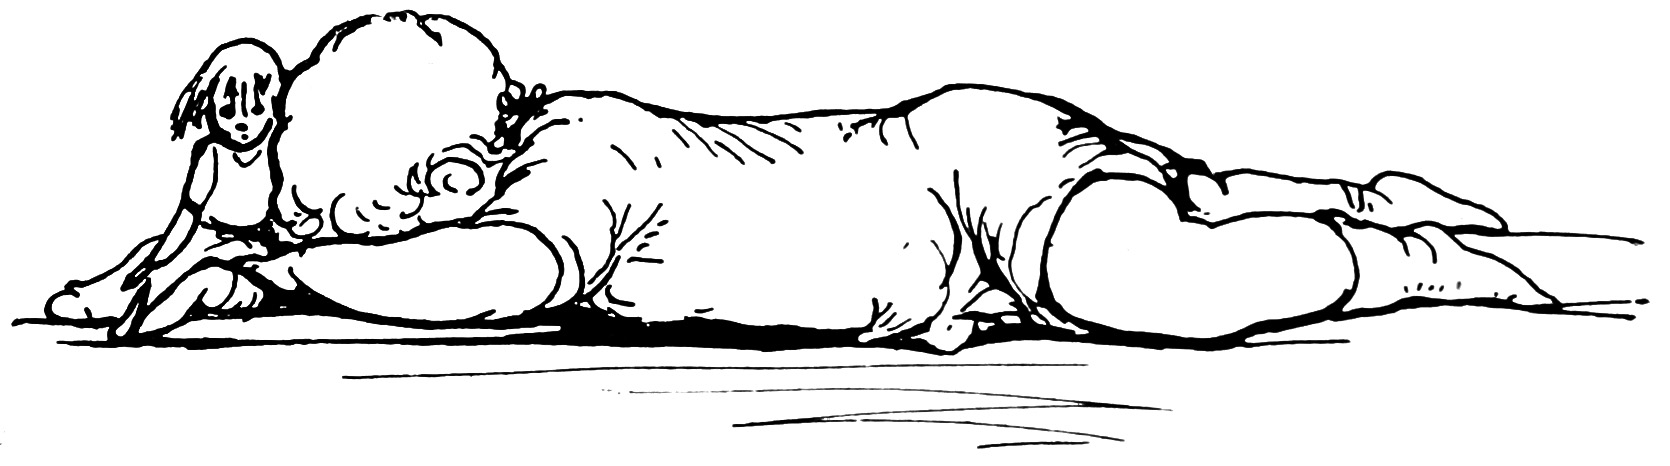
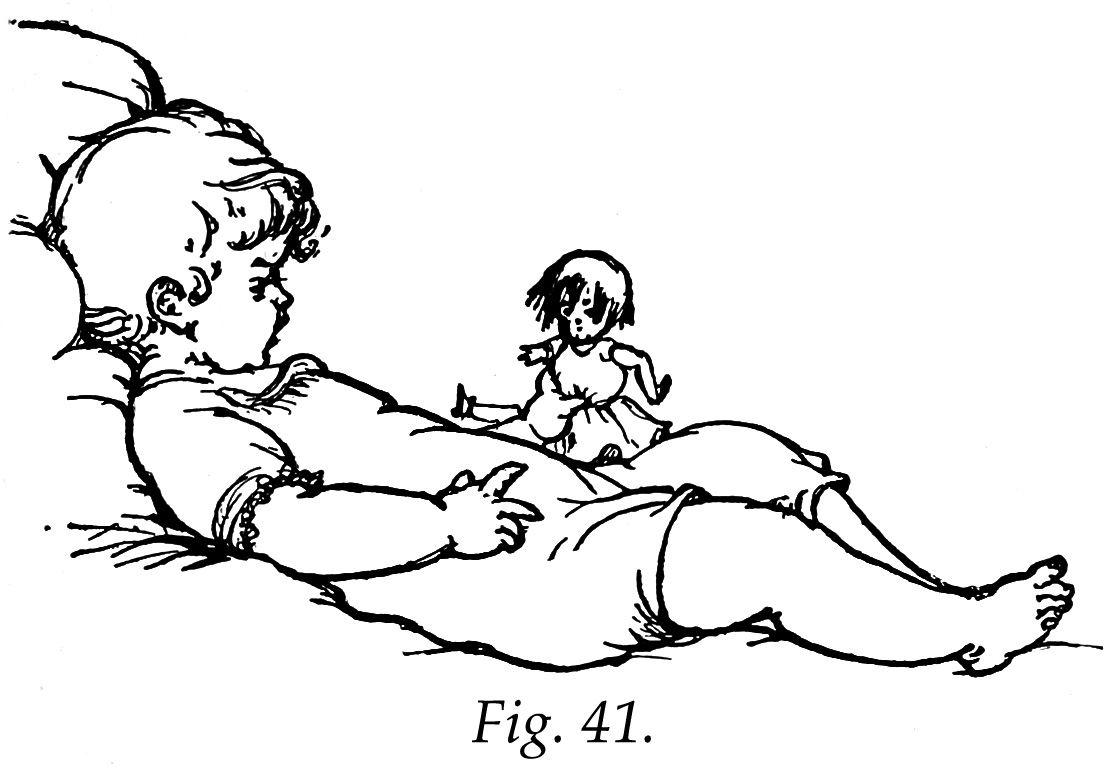
It is something worth while to be able to seat the figure; but, as comfort and ease are desirable, try also and make your children look as if they enjoyed the position. When a child reclines upon a couch, or the ground, it has stopped holding itself up and sinks down with relaxed muscles — the soft pliable outline of-the body fitting that upon which it lies. If you will notice this and work to express it, rest and repose will be suggested (Fig. 41).
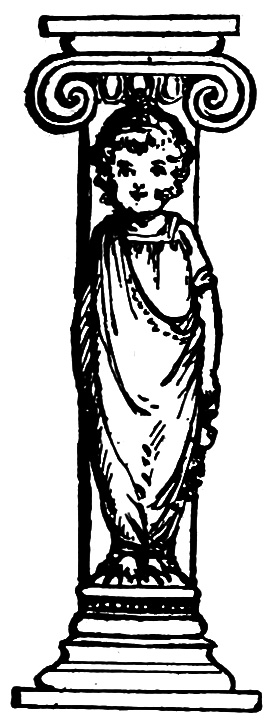
Draped figures come under the same rules as the nude or undraped. Whether the clothing be heavy or light, do not attempt to avoid difficulties by covering the form too much, so as to hide it. Somewhere the true proportions of the child should be revealed (Fig. 42). If you show only the head above a mass of clothing, without a hint of the form of what is below it, the head might as well be on a stick, and the whole be called a stand for drapery, so far as any idea or purpose is concerned. Every picture should express some thought or intention, and so give reason for its having been made.

There is a way of making artistic use of figure and drapery together, and that is, to let the folds so fall that the garment graces and adds to the beauty or significance of the figure.
As a rule to follow carefully, always choose positions in which some of the leading proportions of the figure are indicated by the lines of the drapery. Note, for instance, through the covering, such valuable and characteristic markings as the position and breadth of the shoulders, the line of the body under the arm, the point of the knee, the location of heel, the length of the back, or the bend of the elbow — any view taken will give an opportunity to show some of these places.
Never lose sight of all the points of interest and expression which belong to the figure itself, for in all draped-figure drawings the character of the work demands that somethins: of the wonderful construction of the human form be seen, or indicated.
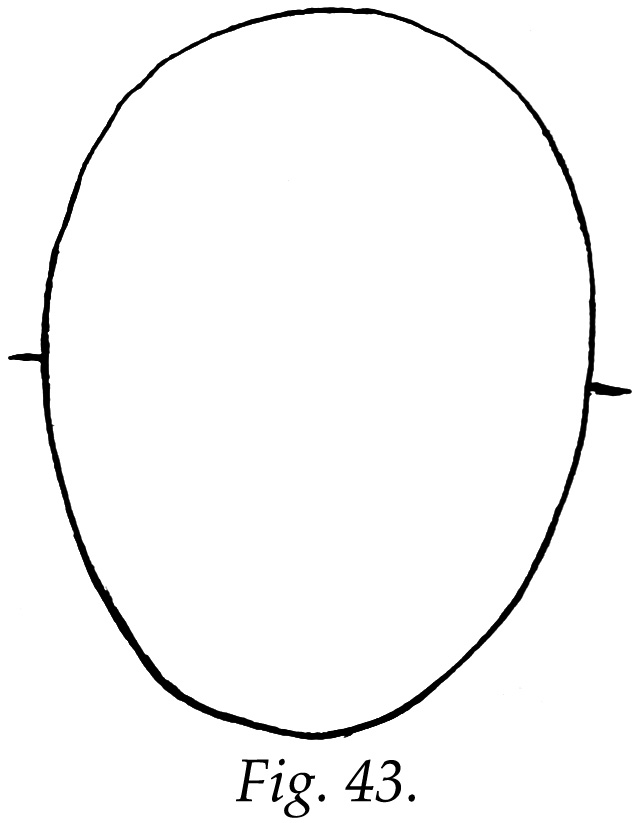
Draw several ovals like Fig. 43, by one quick sweep of the pencil or chalk. If on paper, let them be not less than a finger long; if on the blackboard, a hand and a half in length.
Repeat this exercise many times, drawing first from the right and then from the left, until a free flowing line and good form are secured.
While not absolutely necessary to complete the line of the egg-shaped oval without lifting the pencil after it has once touched the paper, the result is likely to be more pleasing than one made up of several patched lines, and also more accurate.
After a little time spent in drawing the ovals rapidly, you will, by comparison, detect where you vary most from the correct outline — for though so familiar and simple a form, you will probably not succeed with it at first.
After noting where you have a tendency to go astray, resume the same free swift drawing, bearing in mind just where you need to proceed carefully, and in the work which follows a change for the better will be evident.
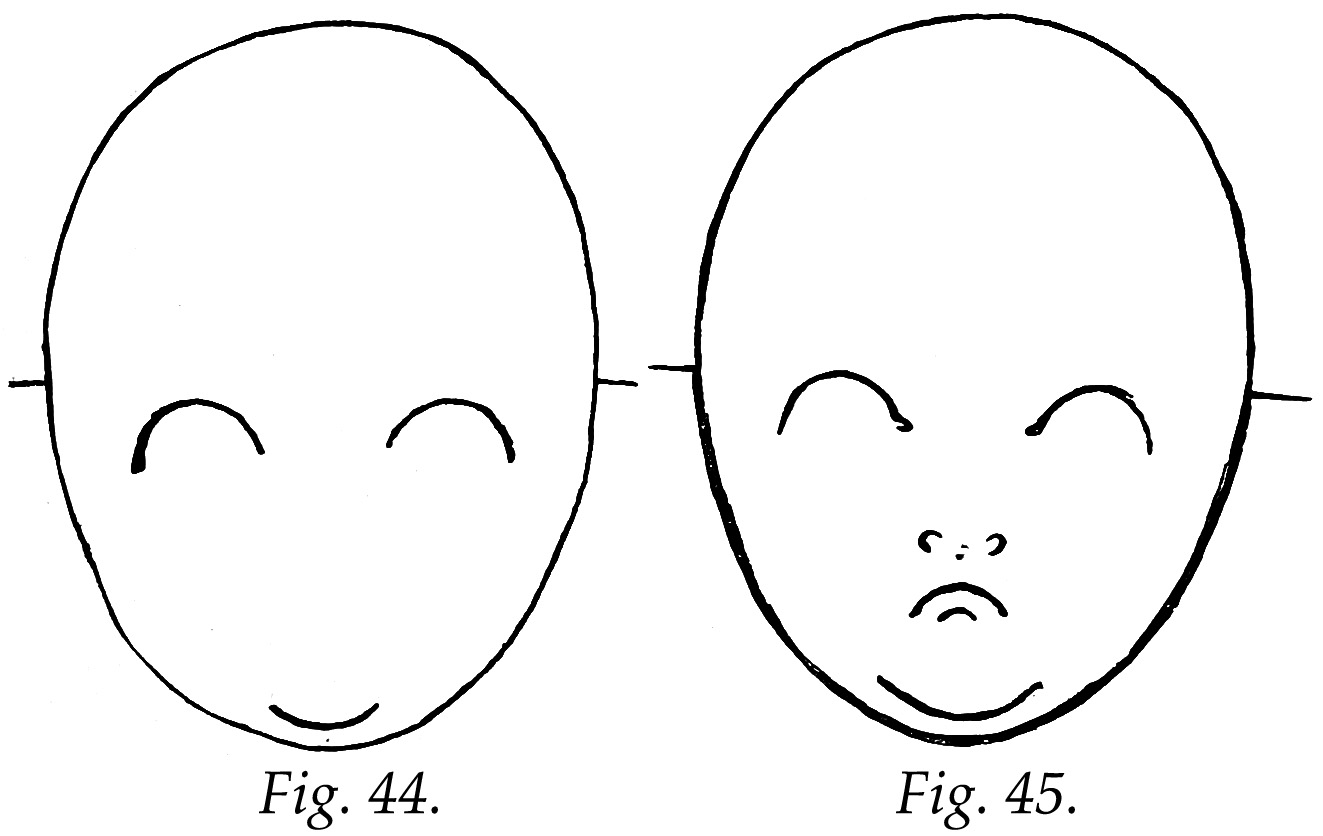
Continue to draw and criticise, until satisfactory ovals are produced. From these select the best, and mark the center by a short line at each side, half-way between the top and bottom, as in Fig. 43. The position of the eyes in the head of a young child is just below the center, so a little below this half-way line they must be located. At first indicate them merely by two curved lines which shall stand for the upper lid (Fig. 44).
It will be very easy for you to give them their correct position after fixing in mind the two following rules: first, the eyes must have a space between them equal to the length of an eye; second, there must be a space two thirds the length of an eye between the outer corners and the outline of the oval.
The chin proper may next be added. It should be shown in this phm by another short curved Une, like those of the eyes, only "upside down," near the lower end (Fig. 44).
Avoid making the chin large or heavy. Sometimes, it is true, a peculiar kind of strength is gained by departing from correct form in this respect, but here, and always at the start, it is best to learn the correct and normal form.
The lower line of the original oval forms the under chin, or marks where it joins the neck.
Next find the point half-way between the chin line and the eye lines, and there locate the end of the nose. This may be expressed by two small curves, or tiny half-circles, for the nostrils, as they are the noticeable part of this feature in the front view (Fig. 45). The nostrils are drawn thus, instead of with nearly horizontal lines, because the nostrils open forward in a child's head, and we see into the passages; they assume the more horizontal appearance, as with the change of maturity the nose elongates and the nostrils open downward.
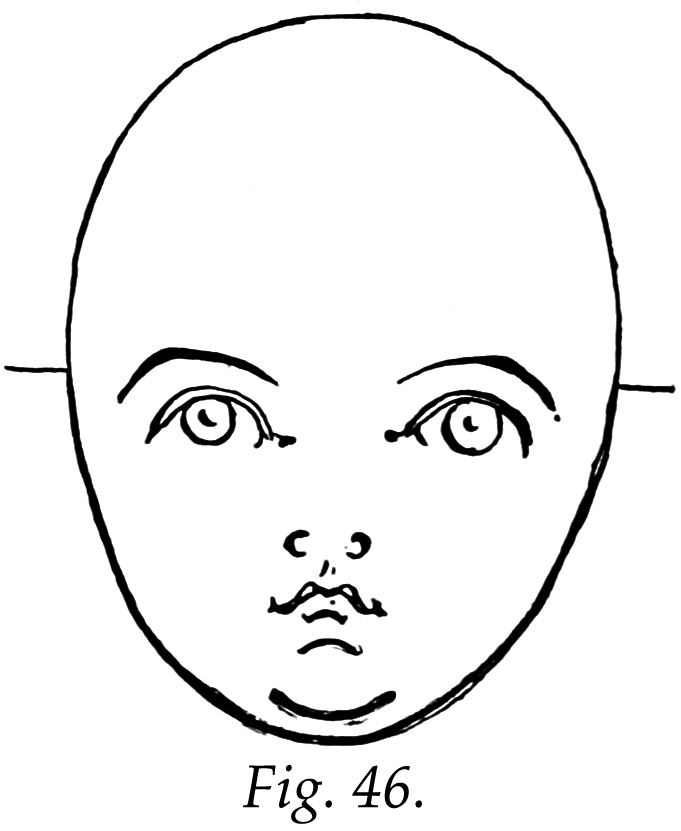
A little below the nose draw the curved lines for the mouth, as in Fig. 45. Be careful not to leave too much space between the nose and mouth.
To the eyes now give a second curved line, nearly parallel to the first, to complete the upper lid; and under it, partly concealed by it, place a small circle with a dot in the center, to represent the iris and pupil, or colored part of the eye (Fig. 46).
Above the eyes draw curved lines for the eyebrows, and let the highest parts, which should be near the outer ends, be about the diameter of the iris above the eye (Fig. 46).
The ears are seen upon the original oval in two curved lines reaching no higher than the eyebrows and no lower than the nostrils (Fig. 47). In good forms, the projection of the ears beyond the head is not conspicuous after the hair is well-grown.
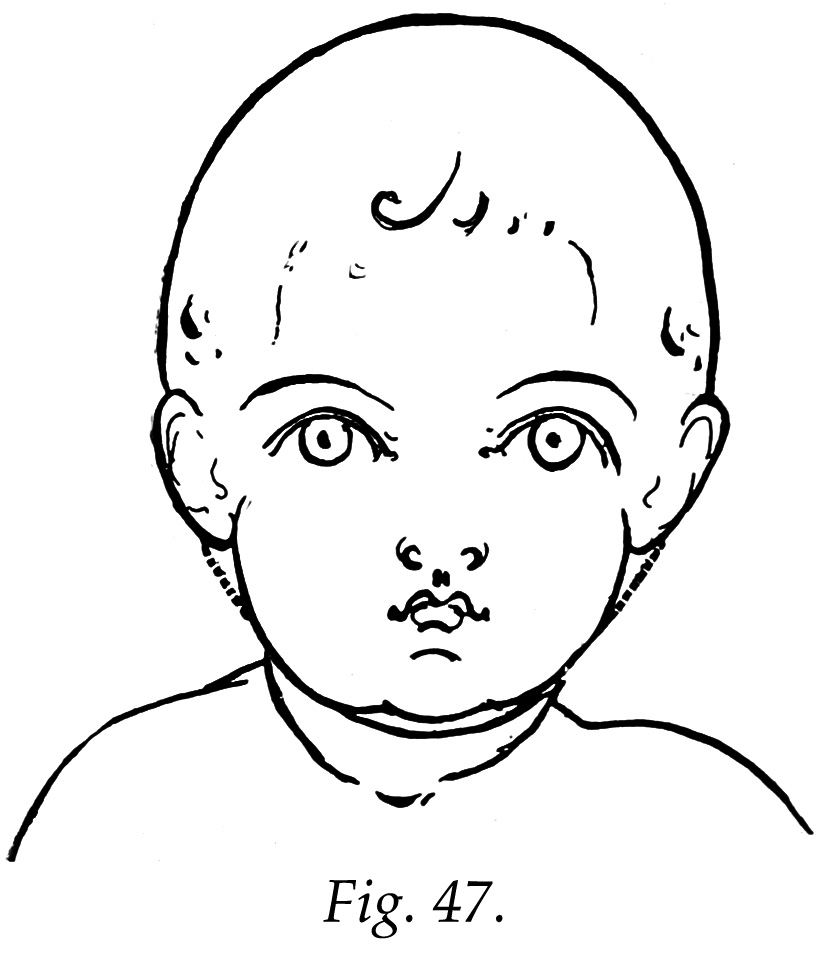
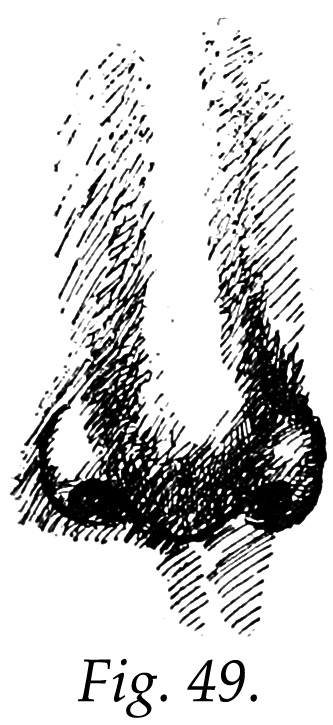
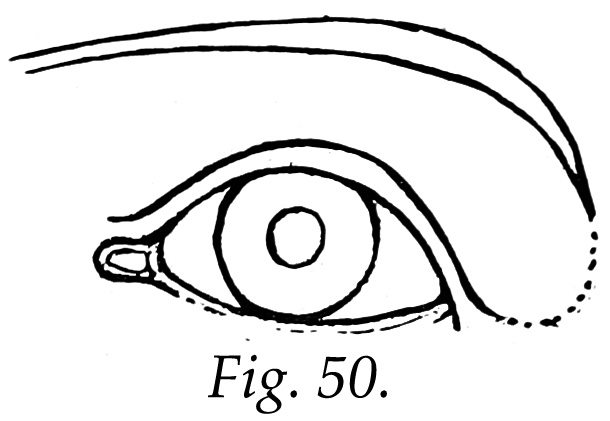
You will find it easier to brinig the baby look into the oval you make the lower end, where the face proper is, seem to belong to a smaller oval than the upper part. This can be done by drawing the cheek bone curves reaching from nearly opposite the eye to the chin, as shown in Fig. 47. For the drawing of tha mouth see Fig. 48. Study the lip curves very carefully. For the parts of the nose see Fig. 49; for the eye, Fig. 50.
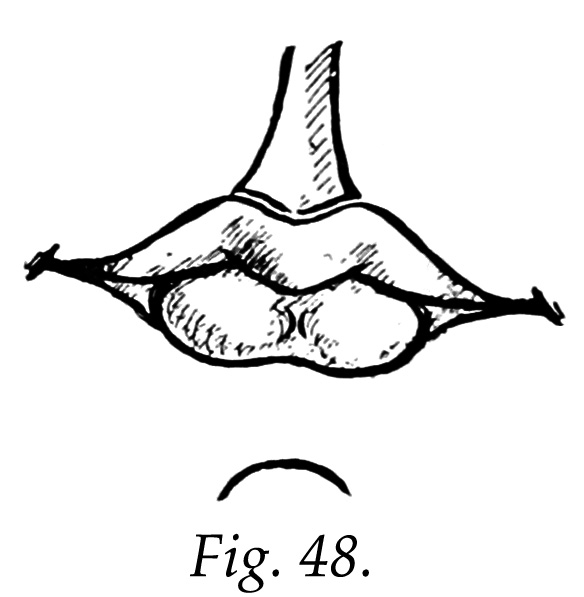
The mouth is difficult to draw because of the central line, which describes three parts of the upper lip; viz., middle and two side divisions. The upper line of upper lip and lower line of under lip describe but two parts.
A good exercise is the following: Draw a horizontal line, then draw the middle or line of union of the two lips upon this line, letting the central part of each curve, viz., the middle and two sides, come a httle below the horizontal line. Add the upper and lower lines forming the other parts of the mouth. Give a slight tendency upward to the outer corners of the mouth, to insure a good expression; any depression of the corners below the horizontal line gives an unpleasant effect. In Fig. 48, the under lip is drawn with the central part of each half, clearly defined, distinct from the corners, for the reason that this part projects forward. Remember the upper lip has three parts, and the lower lip two parts.
It is not well to attempt to put all the minor details that belong to any feature into a small drawing, for the reason that it would require too many lines for the space. The relative value or importance of the lines could not be given, and the result would be confusing. Nor is it always best, from an artistic point of view, to note every minute division and change of surface; sometimes these undulations are so delicate that they are not seen, save by the most exquisite arrangement of light and shade, and were all to be put down in detail with the point of the pencil, some would be out of proportion distinctness and therefore seem crude and coarse.
In whatever way you look at an object, only put down such lines as are important from the view you take. The forehead, that part which projects forward above the eyes, seems narrow in the front view, and when compared with the width of the cheeks might lead you to think the heaviest or widest part of the head was below the forehead, yet the greatest width of the head is about at the top of the ears.
The eyes are the only feature that can be enlarged without serious result, but even they must not be noticeable for size only.
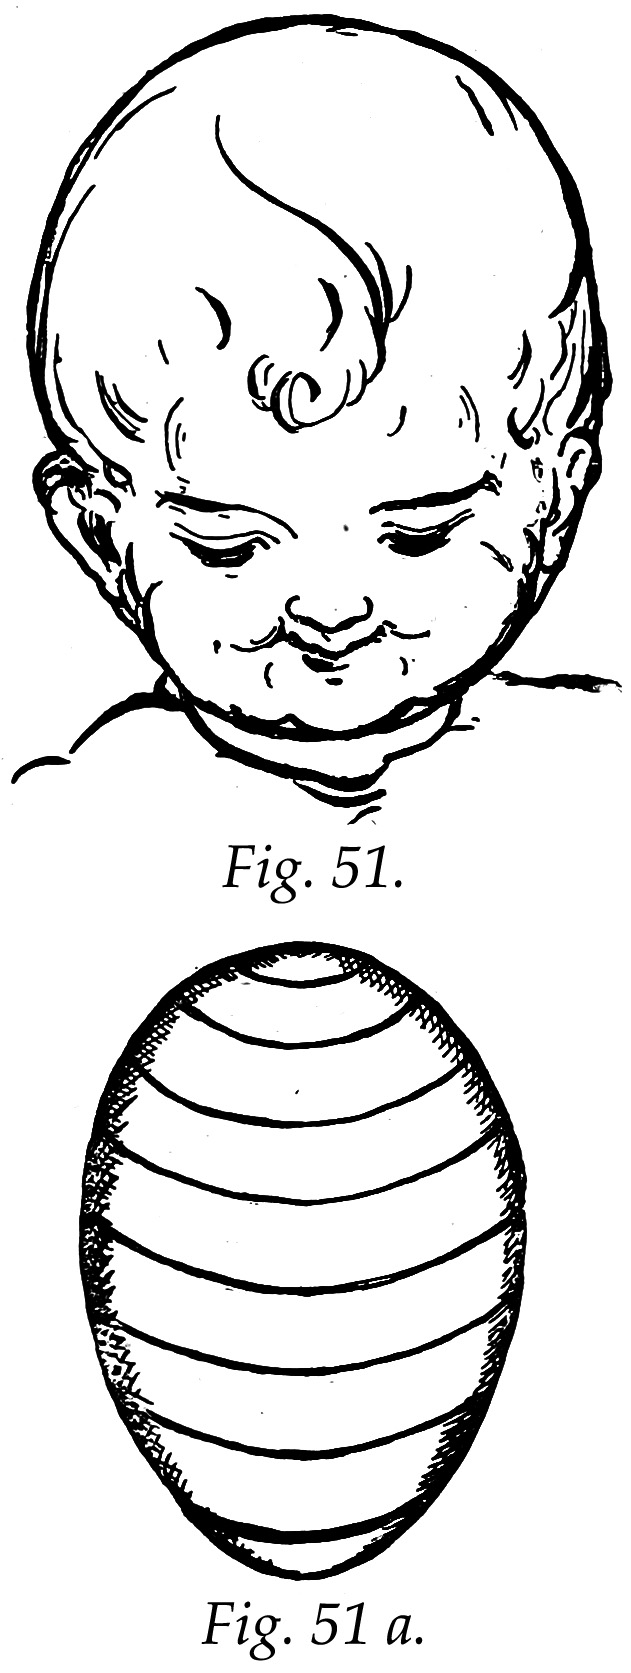
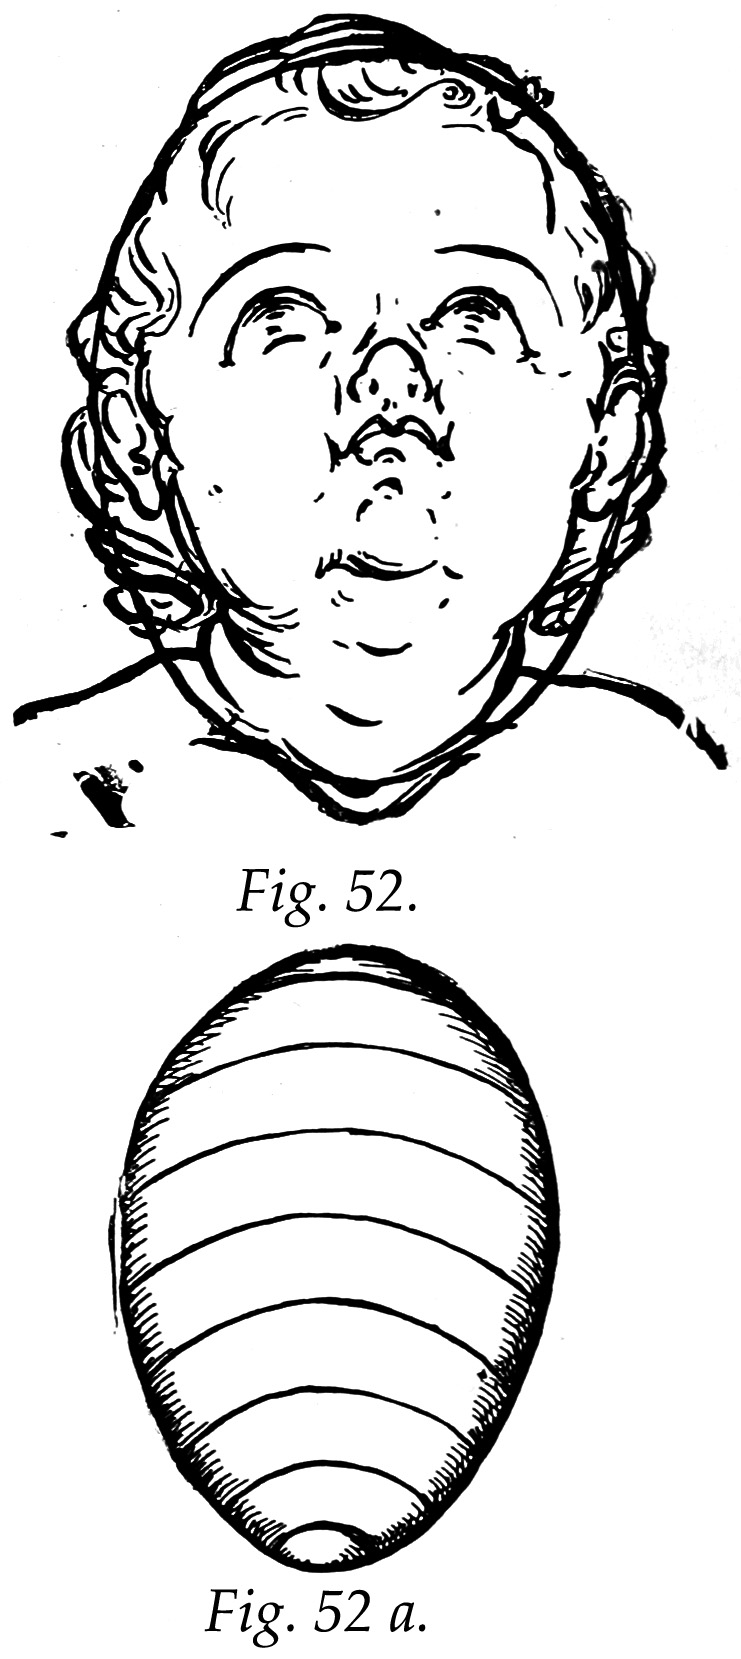
When the head, in front view, is looking up or down, the lines of the features must be drawn to conform to the curve of the oval, just as bands painted about an egg will curve up or down as it is turned toward or from you. Figs. 51 and 51 a, and 52 and 52 a, will illustrate this principle.
While working, carry all the parts of the drawing along together ; that is, do not finish one part before others are worked upon. Then add the finishing touches, while considering all the parts together— while regarding the parts as forming one complete whole.

The side view of the head is, perhaps, a little more difficult to draw than the front view, for the reason that several features break the outhne and seem at first sight to confuse it. It will not be difficult to understand and to draw, however, if the attention be fixed on the larger and more important parts; then the minor features will fall back to their proper relation to the whole form. The way to do when any form seems complex and difficult is to study it carefully as a whole, and see if a simple, general outline cannot be discerned. In most cases this can readily be done.
It is a common thing for one to meet forms that seem at first sight to have too many parts and details to be managed, but that onlv shows that the details have the student's first attention, and an undue amount of it; when the form continues so to appear it is proof that one is not attacking the subject in the right way to master it.
Do not mind the minor parts very much at first. Always begin by overlooking; them. Think only of the larger sections and the leading directions of lines, and fix in mind their relative proportions. After that is done you may take up the rest in the order of thieir importance; then they will fall into place in your drawing easily, and as they never would have done had they been given the first or longest attention.
In drawing the head, for instance, a pupil might never get any farther than the nose if he began with that little feature before considering the larger form on which it belongs and where thereon it should be placed. Little things very often make us blind to big things.
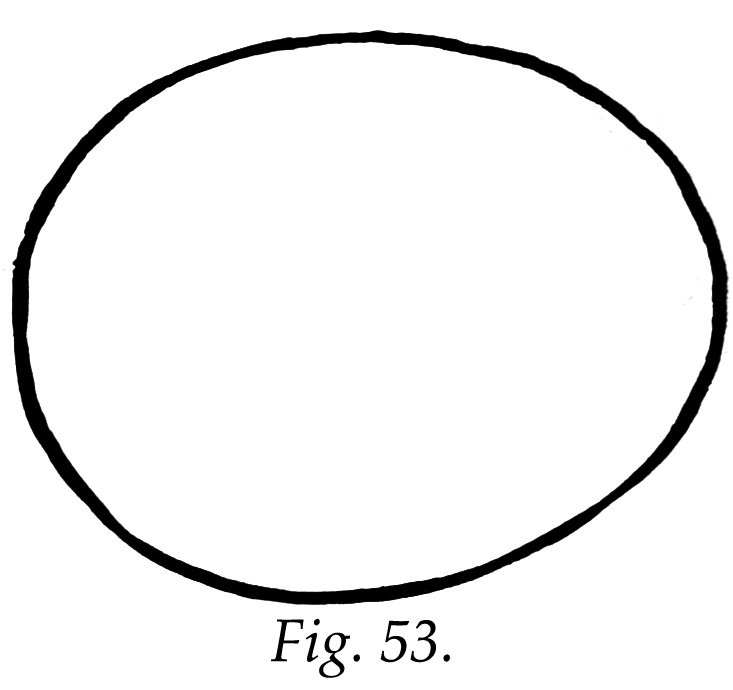
We will now begin the study of the side view of the head by drawing a horizontal, egg-shaped oval (Fig. 53).
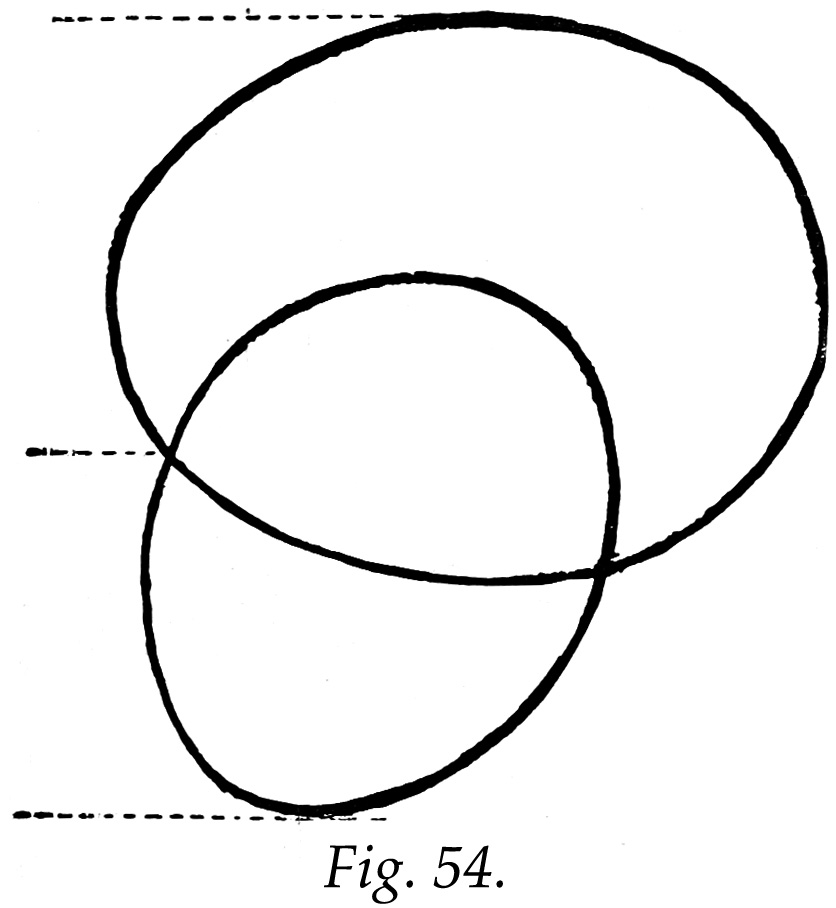
Under the small end of this oval, lapping half-way over it, and slanting toward the large end, draw another and smaller oval as shown in Fig. 54.
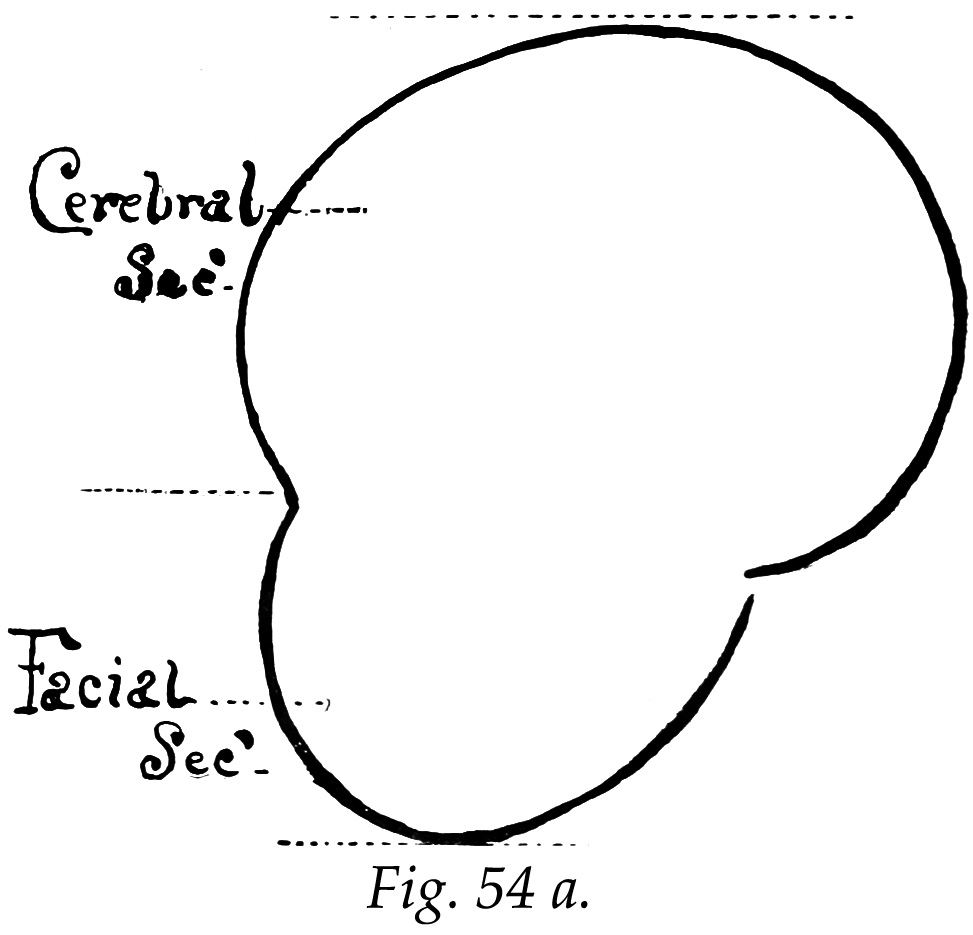
Erase the lapping portions of both ovals, and there will remain the general foundation form of the head (Fig. 54-a), showing plainly the two large and important divisions, the upper, or cerebral, and the lower, or facial.
It will not alwiiys be necessary, of course, to start each side-view drawing of the head with the ovals as in Figs. 53 and 54, but this method is given as perhaps the easiest way for a beginner to master the correct form.
Before going farther it will be well to fix in mind certain principles: first, that the upper or cerebral section is larger than the lower, or facial section; second, that the narrowest end of the upper part is at the front or forehead, which, however, must never be pointed; third, that the highest part of the cerebral section is a little back of the center. (In the adult head the highest part is farther forward.)
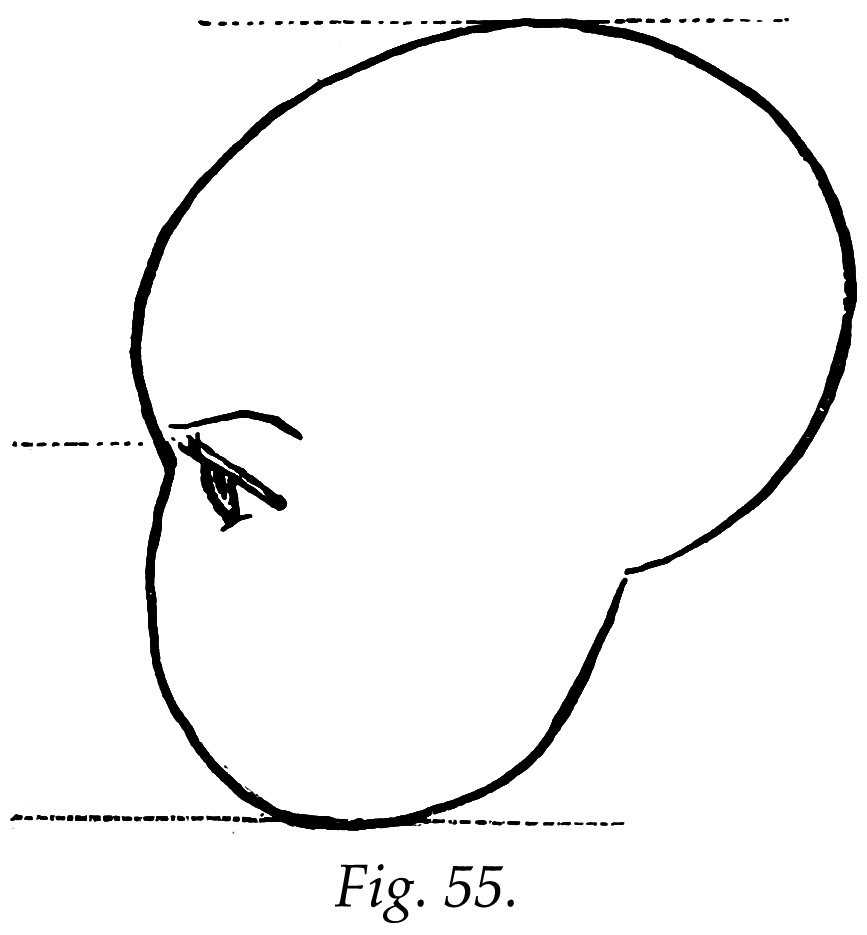
We have already learned, in front view, that the eye in the child's head is situated a little below the middle, and we find in the side view that the point where the facial joins the cerebral section (Fig. 54) is just below the center, so there the eye must be drawn. as in Fig. 55.
The chin maybe added next, just in front of the lowest part of the facial section, as shown in Fig. 56. The bottom of the facial oval, just back of the chin, forms the double or under chin, which is always more or less to be seen. About half-way from the eye to the chin locate the end of the nose. The line between the eye and the end of the nose must be drawn as a continuation of the forehead-line (Fig. 56). It is always concave, for the reason that the nasal bones are not grown. The end of the nose seems to turn up, and the nostrils here, as in the front view, open forward.
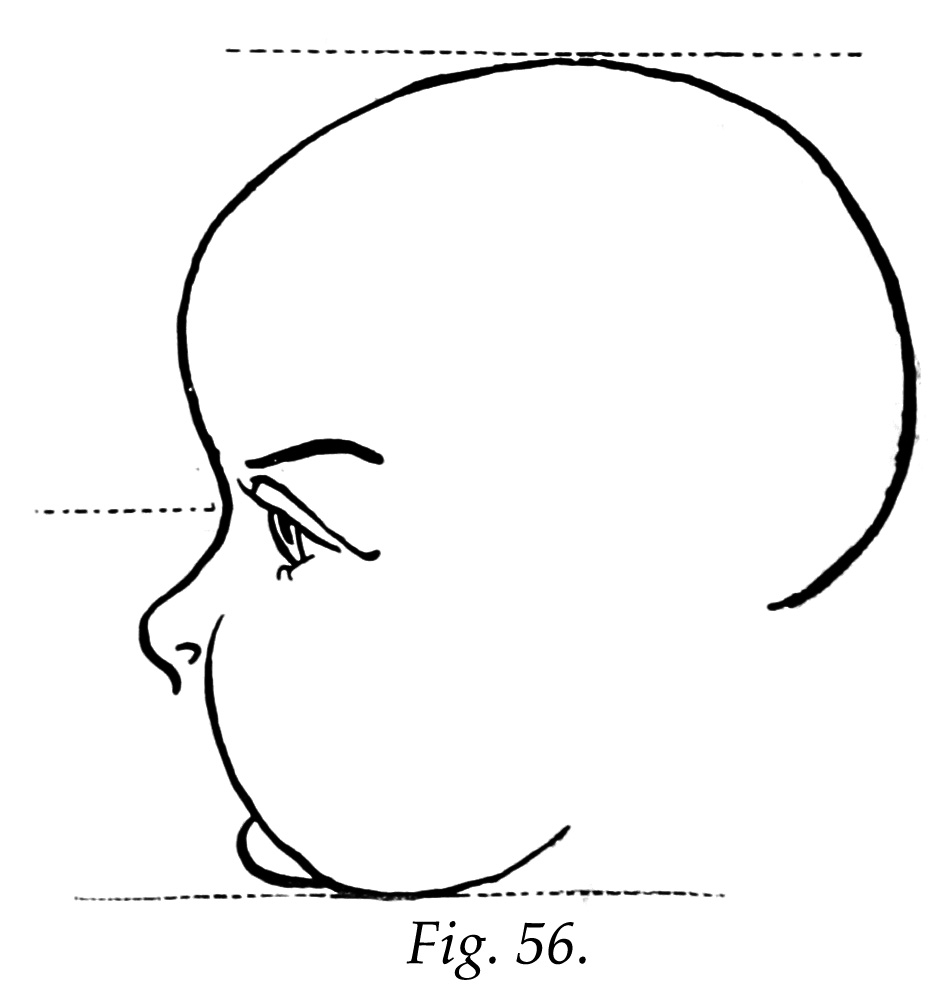
The upper lip is to be drawn as a continuation of the line of the nose, slightly hollowing, as in Fig. 57. The under lip, forming with the upper lip, the mouth, is to be drawn as a continuation upward of the chin-line, as in Fig. 57. In the profile of the child face the lips project but little beyond the cheek-line. The place for the ear is near where the cerebral and facial lines unite at the back. This feature seems set low on the head; the top reaches about as high as the eyebrow, the bottom as low as the nostril; the top is a little further back than the bottom (Fig. 57). The lines of the hair may added as in Fig. 57.
For the detail of the eye, see Fig. 58; for the detail of the ear, see Fig. 59.
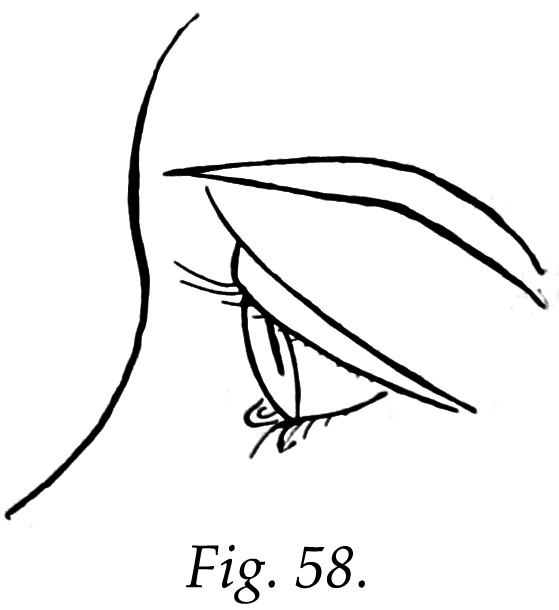
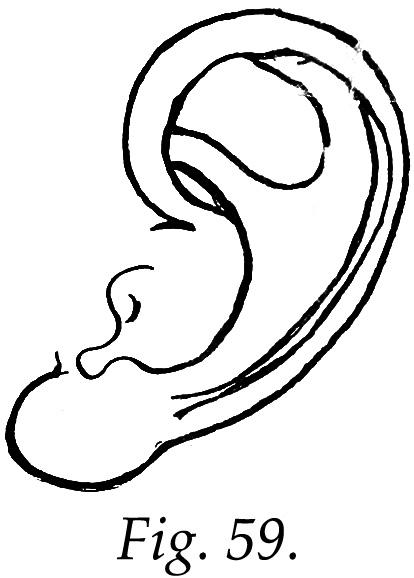
Fig. 60 shows how the neck connects the head with the shoulders. Notice the slanting dotted lines, which indicate how much hio-her the neck is at the back than at the front.
The dotted lines in front of the faces in Figs. 57 and 60 show the ordinary angle of lines drawn from the forehead to the end of the nose, and from there to the end of the chin.
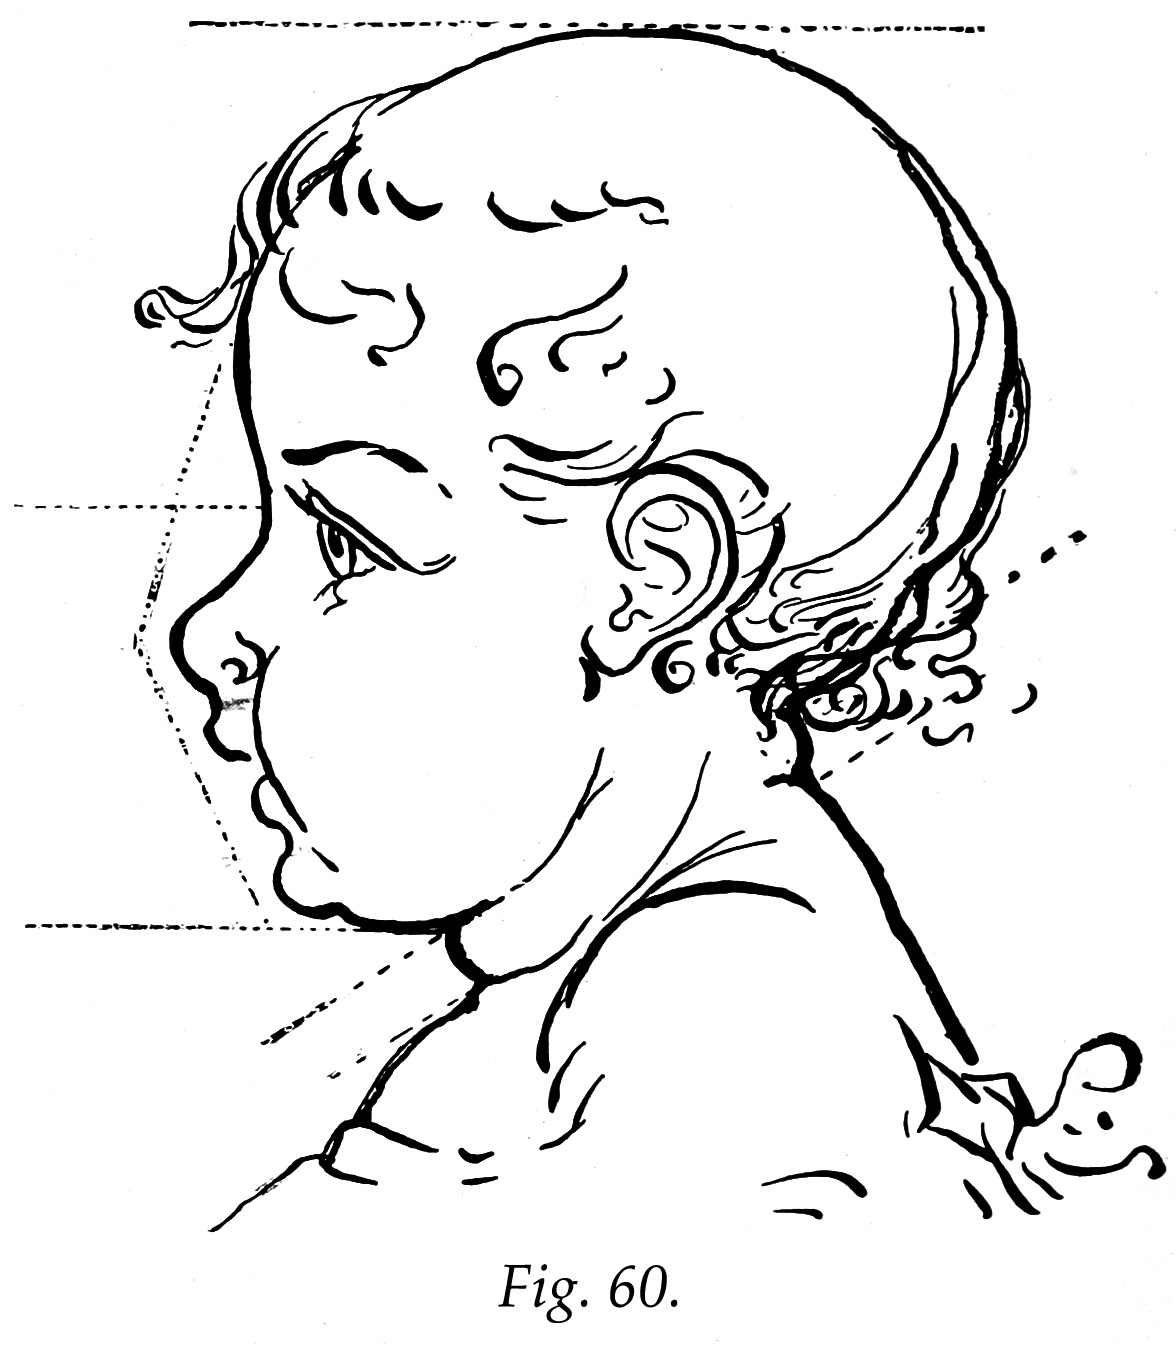
In this connection it will be interestina; to com-pare the child face and the adult face in Fig. 60-a. and note the differences and the changes that come with age — the higher forehead, the projecting chin, the convex line of the nose, the nostril opening downward, even backward, and the thin, compressed lips.

Old age and infancy express two extremes of dependency. When the figures are erect, both incline forward. The difference of treatment in these forms is the following: in old age the outline is angular, the sharpness being carefully softened in effect by the suggestion of a curve; while in infancy the outline is all curves, without a suggestion of an angle.
The most delicate and exquisite appreciation of sentiment is needed to enable one to represent this most difficult of all; viz., old age in its perfection. The baby figure forms its natural and beautiful contrast.
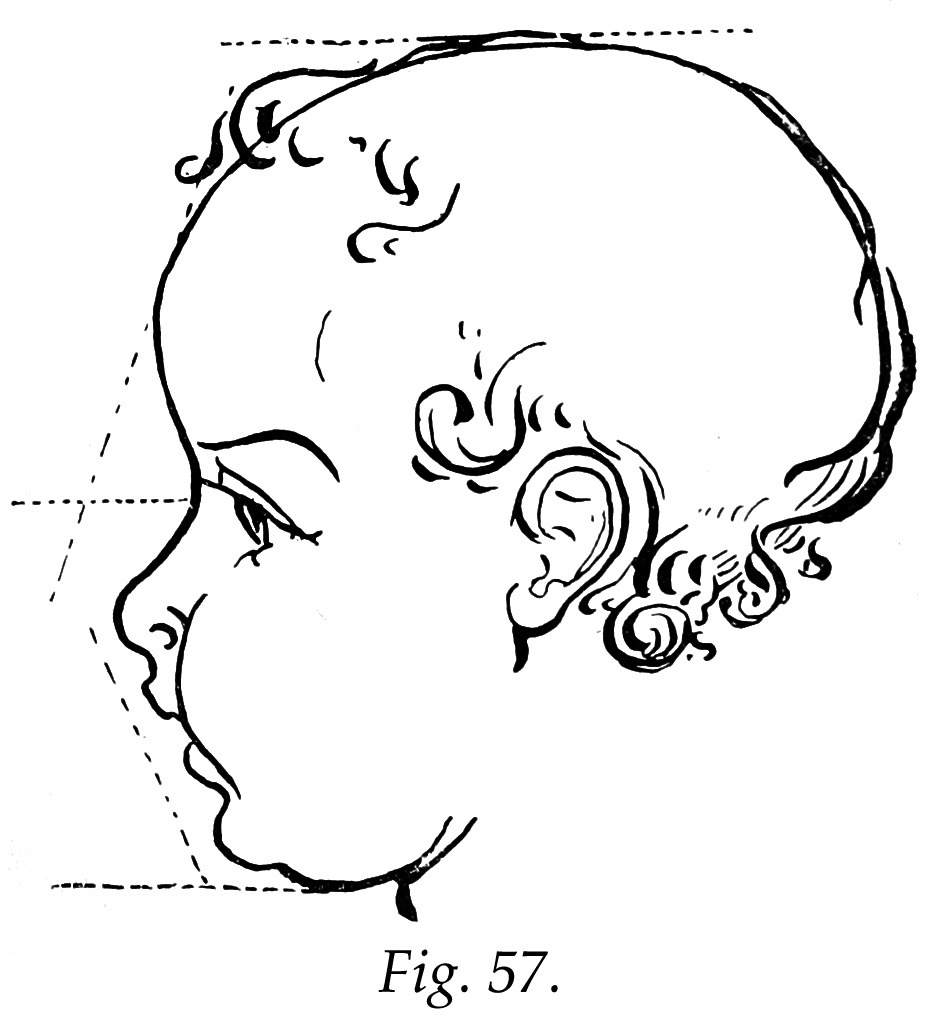
For the head in back view we have again to take the egg-shaped oval. We add to it a curved Une, as in Fig. 61, for the base of the head. This we know to be opposite the ear, and we place the ear-lines accordingly.

The young child carries the head thrown a little forward, covering some of the neck in front and side views, but at the back its whole length and width can be seen. It is always a small section — giving the feeling that the head is a little heavy for its support. The shoulders and top of back should now be added as in Fig. 62. From the base of the head, down to the top of the back, draw a line which shall stand for the spinal column, or middle line of the neck. On either side add another. These side lines give the place occupied by an important muscle, the trapezius, but slightly developed in the child, however (Fig. 62). Still another line placed outside each of these defines an important muscle at the side of the neck called the sterno-mastoid (Fig. 63). In the adult these same parts are as shown in Fig. 64.
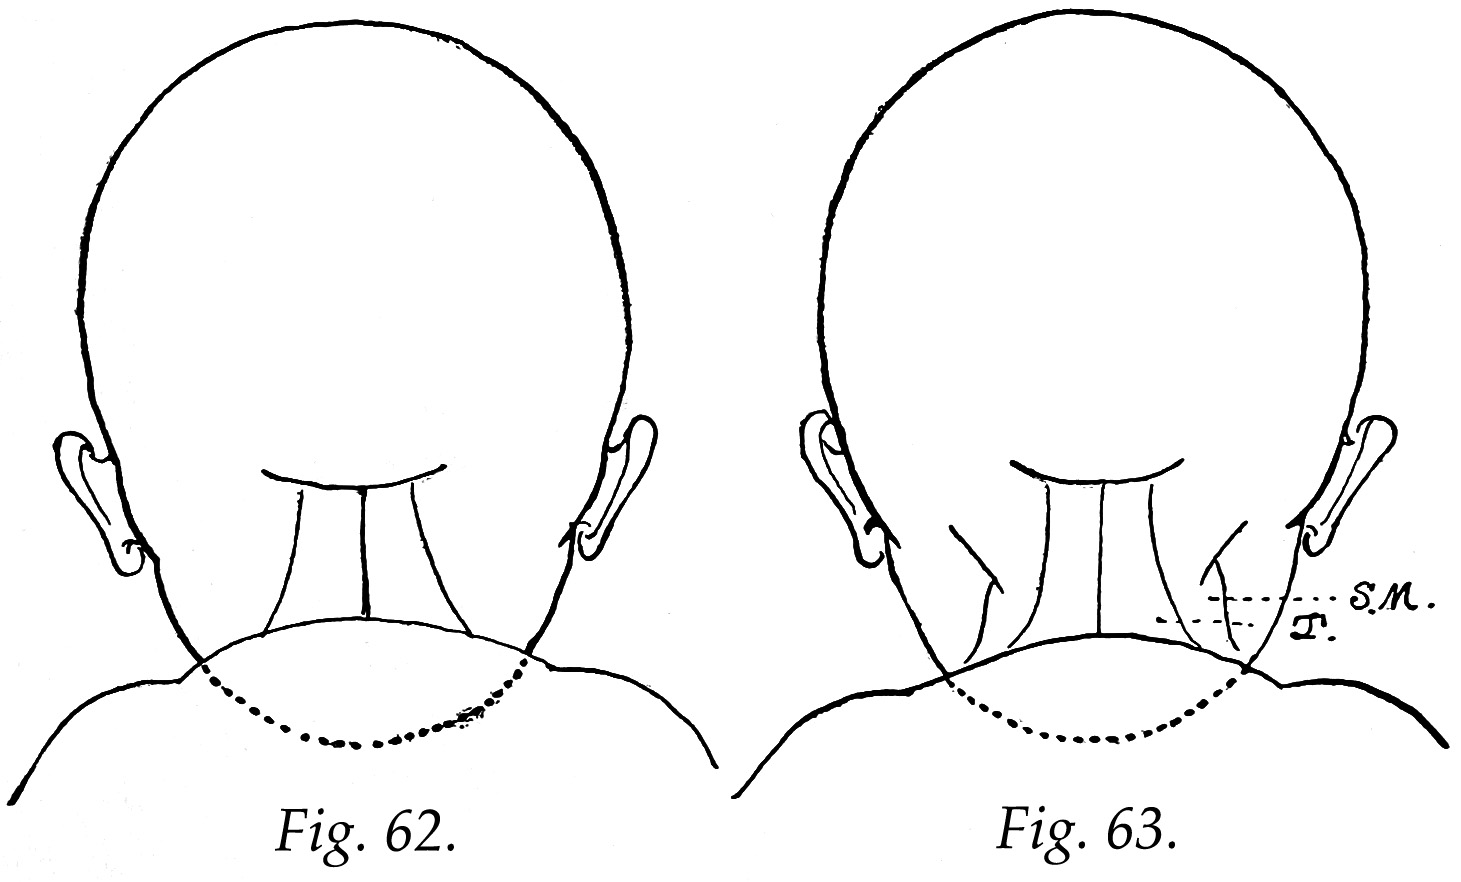
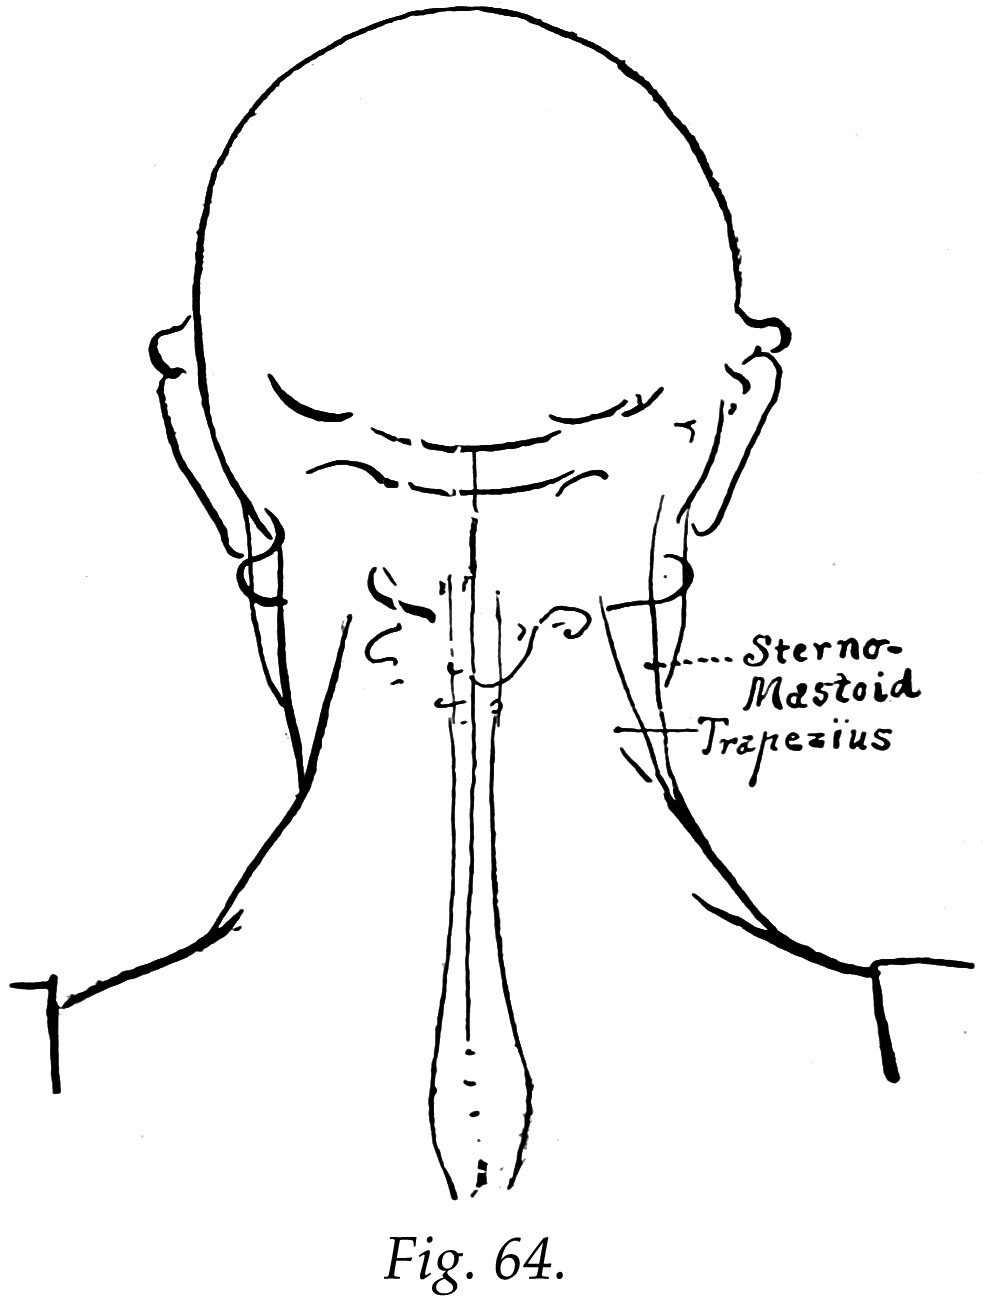
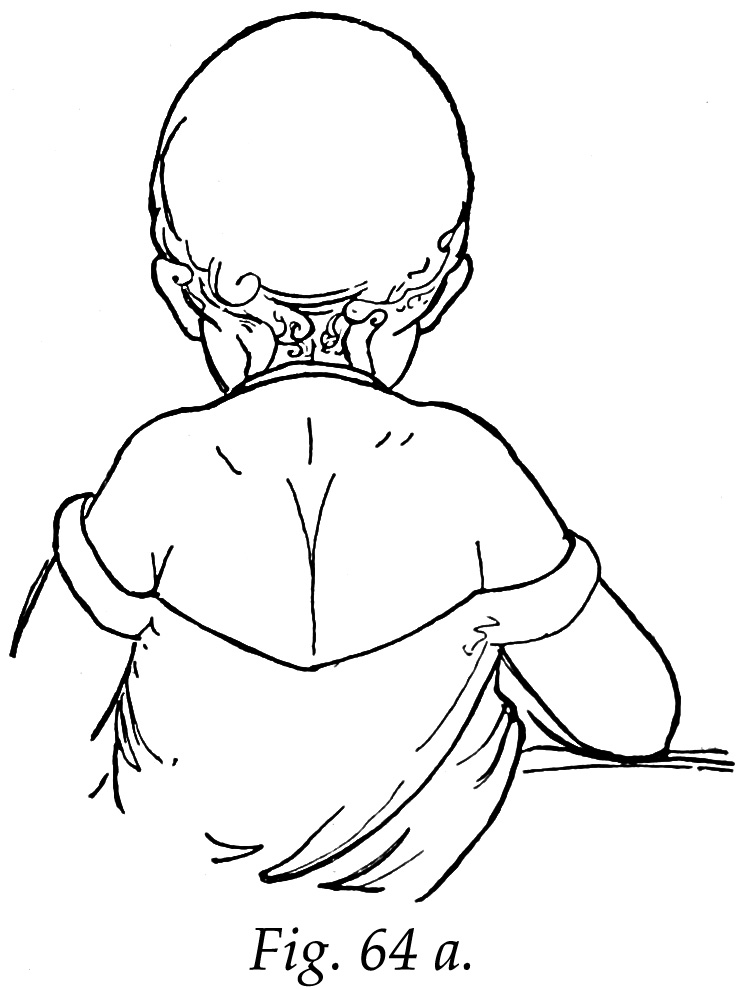
The muscular forms are all under an integumentary or soft covering in the child. Be very careful not to have the neck long, or too wide. The shoulders at the back are high, and often represented by a curved line. At the top of the back, near the neck, is a fold of integument (Fig. 64 a).
We now come to the subject of facial expression.
The expression most natural to the baby face is one of inquiry, and it assumes a form that to a certain extent is passive.
At times it seems as if the child was having great thoughts about everything, and again it seems as if he had none at all, but sat waiting for some to come, the face changing from the one to the other as circumstances determine. To represent happiness, displeasure or grief in the child face the change of lines made in the adult to produce these expressions must be used, but with greater care, since little Hberty can be taken with the form of the features. Any approach to extravagant expression would not only be coarse, but wholly out of place in the subject.
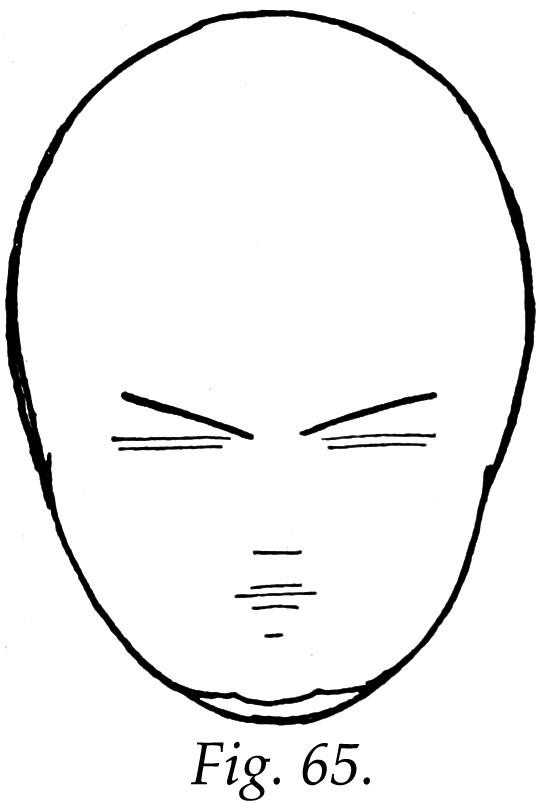
Straight o r horizontal lines used for the features always stand for a quiet or passive expression. We will suppose, at the start, that the prevaihng lines are horizontal, that we may the more readily note the changes in expression produced by varying the directions of the lines.
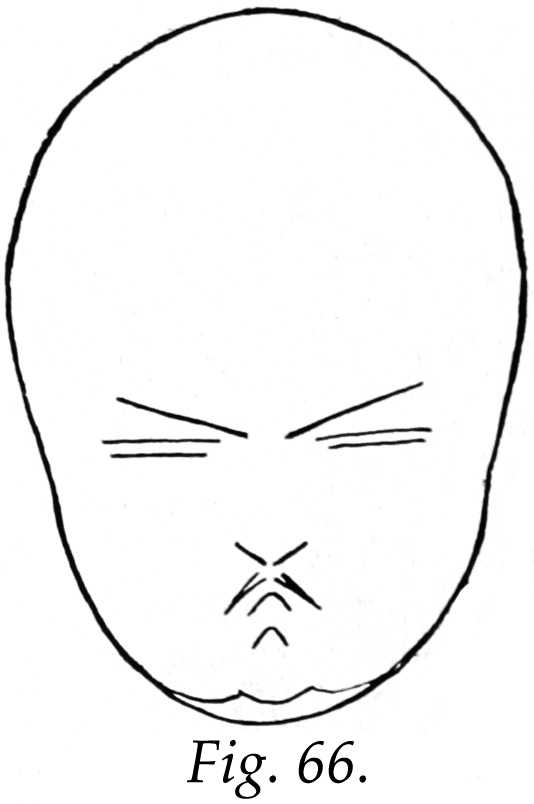
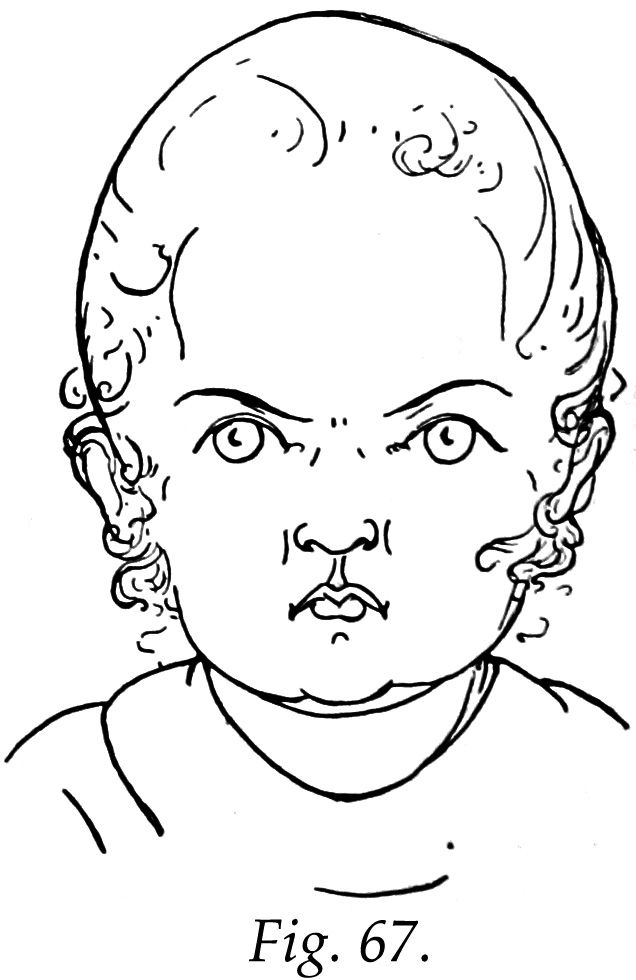
To begin with displeasure, the first change is to lower the inner ends of the eyebrows, letting them approach so as to cause a slight wrinkle over the nose (Fig. 65). The corners of the mouth are lowered also, and the nostrils raised, as shown in Fig. 66, and in the completed drawing, Fig. 67.
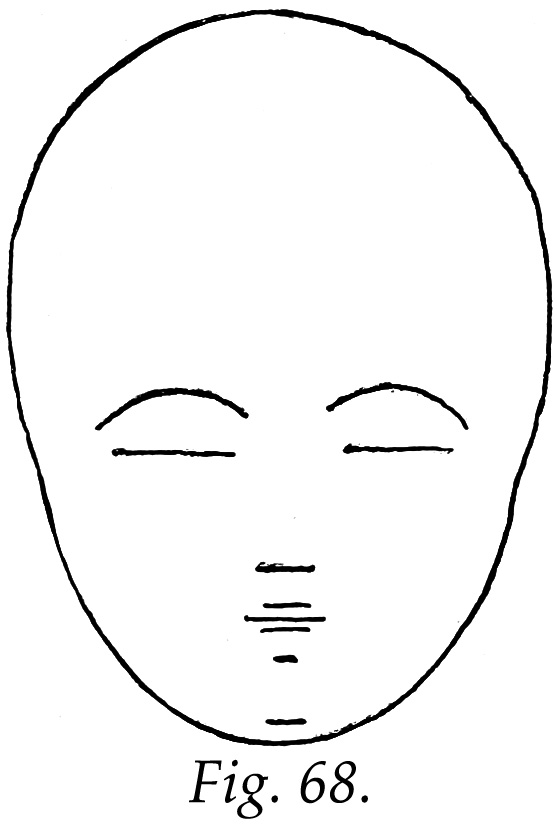
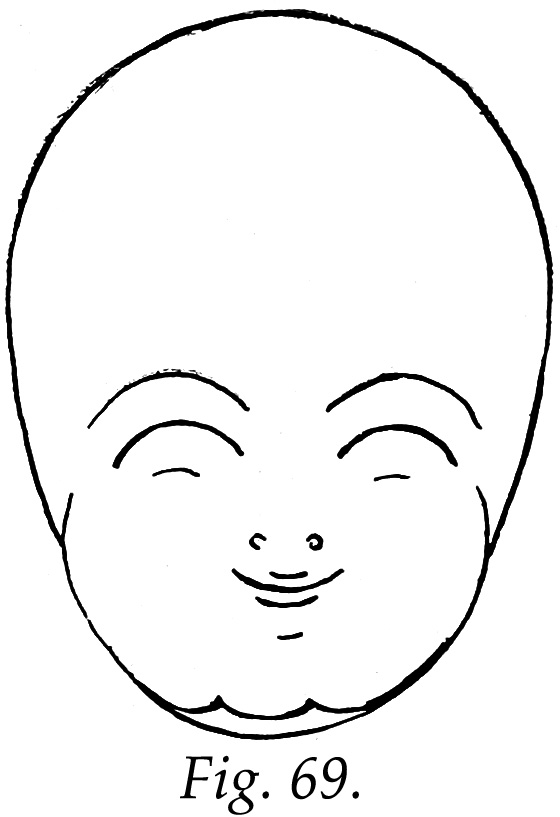
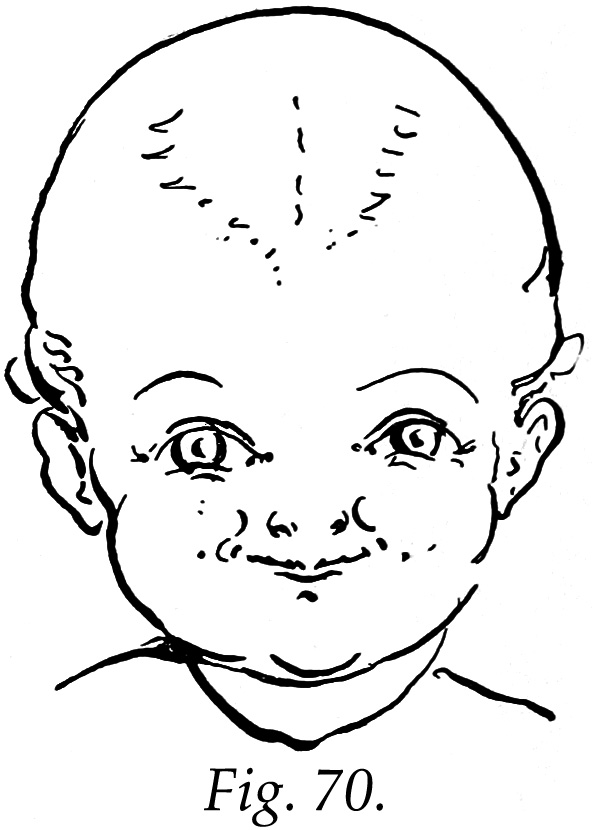
For the expression of pleasure, raise the eyebrows (Fig. 68). Also raise the corners of the mouth, and let the flesh of the cheeks press up against the eyes, as in Fig. 69, and in the completed diawing, Fig. 70.
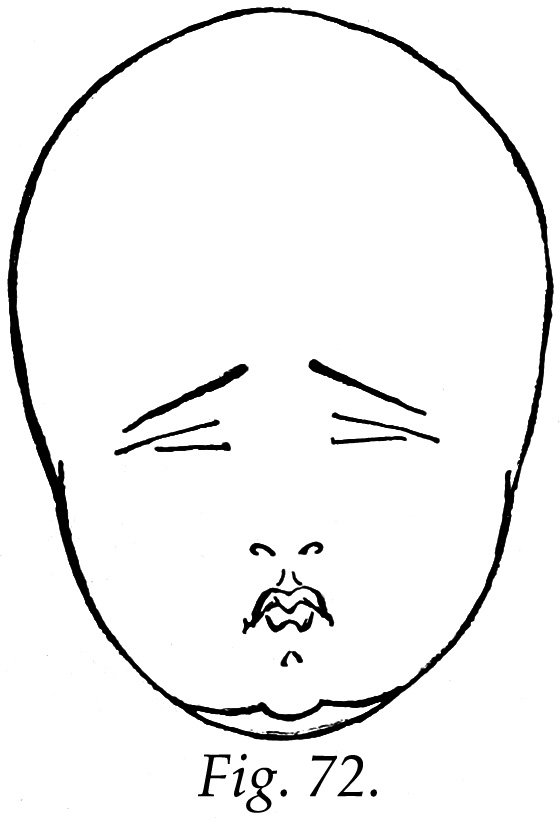
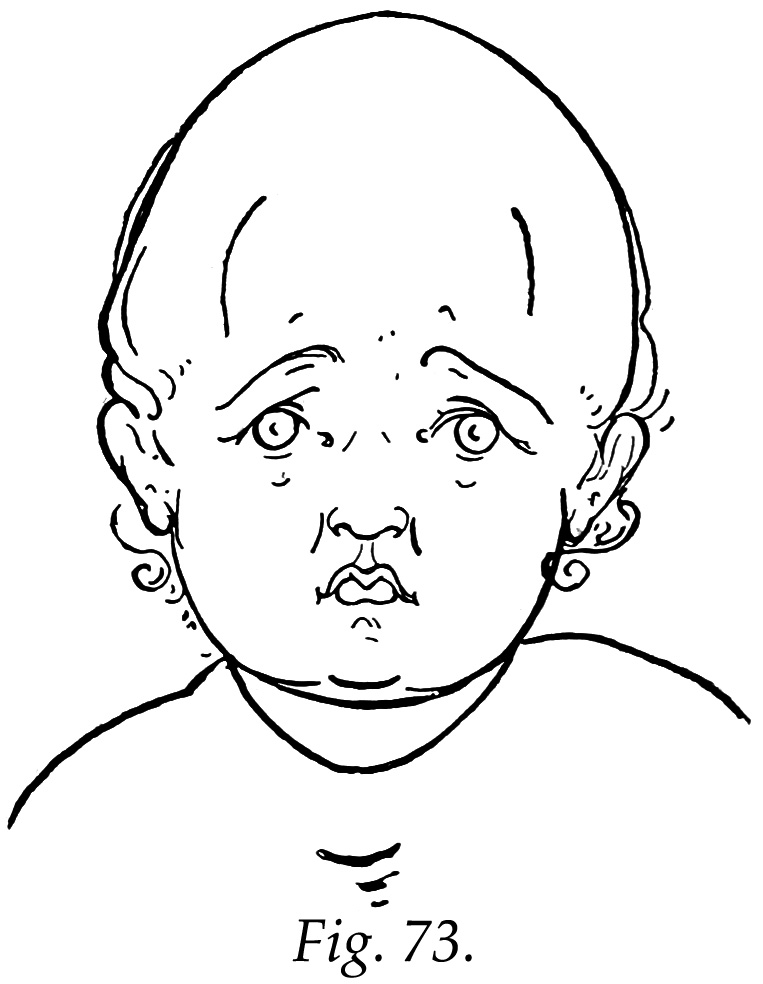
For grief, raise the inner end of the eyebrow, lower the outer part of the upper lid of the eye (Fig. 71), and turn the corners of the mouth down — also the lines at the side of the nose — as shown in Fig. 72, and in the completed drawing. Fig. 73.

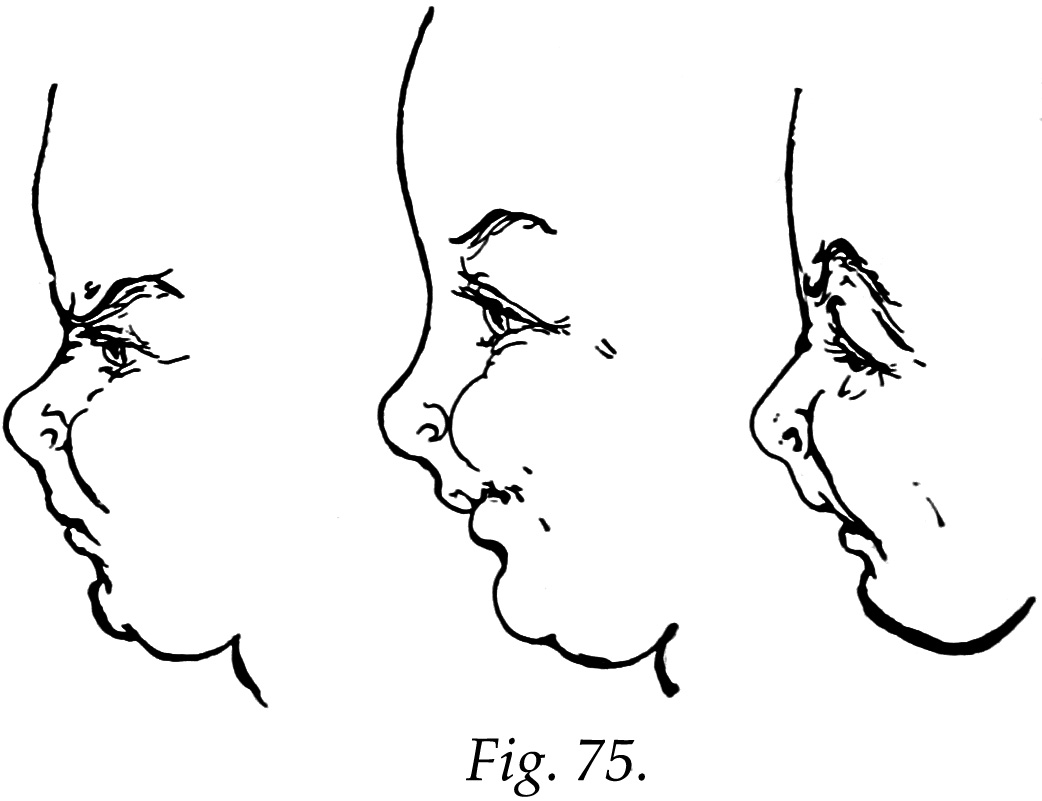
For side views of the face with these different expressions, see the outlines in Fig. 74., and the more detailed drawings in Fig. 75. The eye of the art student should ever be alert — noting the various expressions of children's faces on the street, in the car, at the public gathering—seeking to discover what lines and combinations of lines produce each expression — and then, at home, he should endeavor to reproduce these expressions from memory.

In the time between the seeing and the drawing, the minor details are likely to fade and be forgotten, and only the more important and primary lines remain in mind.
There are other ways of telling what a child is thinking about and how he is feeling than by seeing his face, though any disturbance or change of feeling most frequently shows itself there first. The attitude of the whole figure too is very full of meaning. Indeed, all the movements of a child are honest portrayals of feeling or sentiment and should be carefully noted.
It will be found as one goes on that the nearer the work approaches perfection the greater will seem the least mistake; one will not, as at first, feel the delight at a little good, but the disturbance at a little wrong. Do not let this discourage you, for sometimes the trouble may be only a hair-breadth that is between your failure and your success.
having so far regarded the arm, fore-arm and hand only as a section of the whole fig-ure, we must now studv them in detail.
The arm proper is the part from the shoulder to the elbow, the fore-arm that from the elbow to the wrist; these two sections, with the wrist and hand, are usually referred to collectively as the upper extremity.
The upper extremity is, on the whole, a small division, its full integumentary outline making it seem shorter than it is, and even appearing to interfere with its ready use. This is notably the case when the abdominal line is well rounded; as when a baby is seated on the lap of nn adult. Owing to the full integumentary development no deep indentations occur in the outline. Where one might be expected, a fold, or extra fullness of flesh, will be found to fill the depression. In the chubby child hand and arm this is particularly noticeable.
To clearly understand the construction and movement of the arm, one should first study the framckwork, or bones. Like all parts of the skeleton, they are marvelous in construction, and in the adaptation of each to its special purpose.
First, noting the length of the whole section, we see that when the arm hangs by the side the finger tips reach to the middle of the thigh.
In the child, the arm is a little shorter than the fore-arm — the reverse being the proportion in the adult.
In the arm there is one long bone, the humerus, from shoulder to elbow. In the fore-arm there are two long bones, the ulna and the radius, from elbow to wrist. In the wrist there are eight small bones, arranged in two rows. In the solid part of the hand there are five slender bones, extending from wrist to fingers; in each finger, three bones; in the thumb, two bones. The general form and arrangement of these bones is shown in Fig. 76.

It must be borne in mind that these parts, and all parts of the frame or skeleton, are not of the same size and strength in the child as in the adult; indeed, you can quite readily imagine the extreme delicacy of the bones at the age when their growth has only begun.
The position of the arm in Fig. 76 shows all the bones distinctly, but in most positions the bones of the fore-arm are crossed. As a guide to their location, keep in mind that above the Httle finger is the lower and smaller end of the ulna, and that the upper and larger end of the ulna makes the elbow projection. Above the thumb is the lower and larger end of the radius, the up])er and smaller end of which does not enter into the mechanism of the elbow joint, but wheels about, as it were, on the ulna. To repeat: the bone that is largest at the elbow, and undoes the joint with the lower end of the arm bone, is the smallest at the wrist; while the one that is smallest at the elbow is largest and most important at the wrist.
Raise your hand easily up before you, or let it rest lightly upon the table beside you, and observe that two thirds of the back of the hand goes in one direction, or plane, and the other third (or thumb section) goes in another. This makes it possible to use the thumb in connection with any or all of the fingers, which could not be done were the arrangement like that in the foot.
Note carefully the proportions of the hand: that the length, from wrist to finger tips, is twice the width, as in Fig. 77; that opposite the longest, or second finger, the solid part of the hand is longer on the inside, or palmar part, than on the back, or dorsal part.
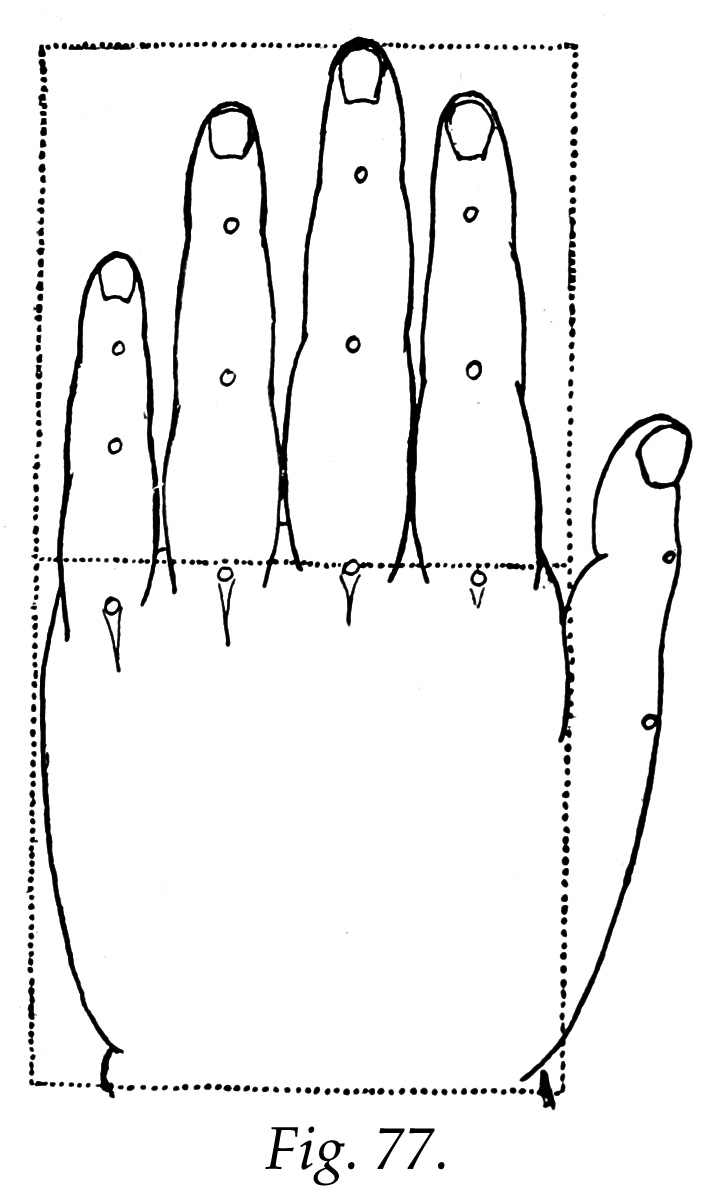
The length of the fingers is greater on the back side than on the inside, because the soft part of the fingers, as shown in Fig. 78. Examine your own hand and this will be evident.

The tipping up of the ends of the fingers which is frequently seen in a baby's hand, and is found so often a characteristic feature of a picturesque hand, is in part due to the fact that the flesh on the underside of the ends of the fingers is decidedly full at the point opposite the lower end, or beginning, of the nail. The flatness of the nail increases the appearance of the bending up of the imder line of finger toward the end. The fingers in this kind of hand must be long and tapering.
The fingers, especially of a baby or young child, are always larger at the base, where they start from the solid part of the hand, than at the tips. In a very plump baby's hand the width often seems to overbalance the length, because the broad or base end is so very large in proportion to the small end of the finger. In a plump child's hand the flesh rounds out between the knuckles, while at the knuckles the bending of the joints and the attachment of the muscles cause depressions called dimples. At the finger tips, however, there is little more than the frame, hence at this stage of bone growth they are tiny.
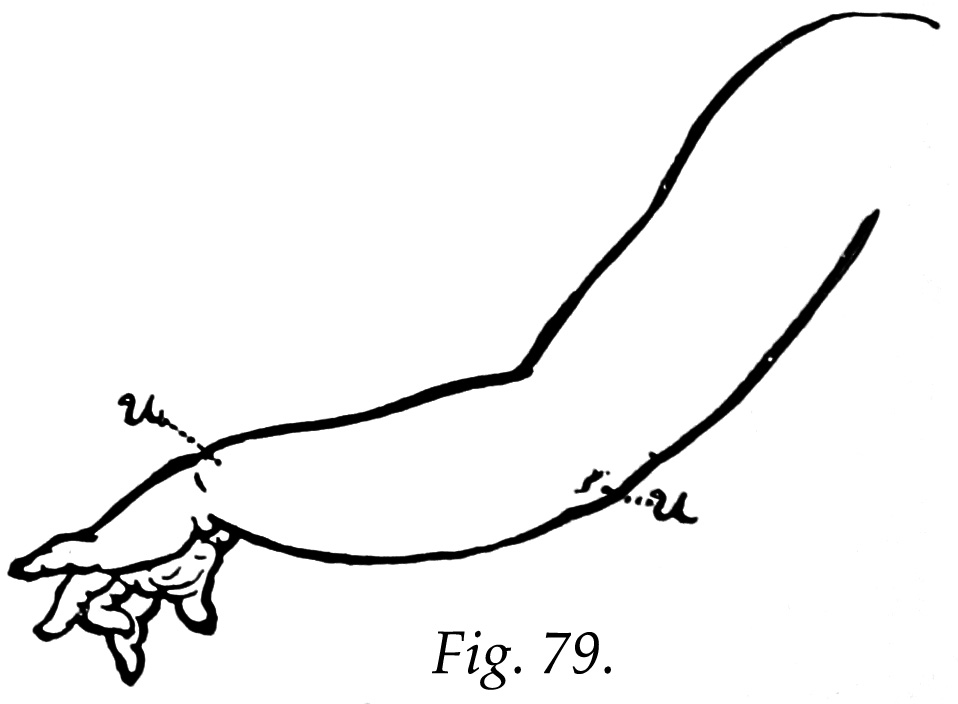
For the arm and fore-arm in different positions, refer to Figs. 79 and 80.
Observe the fold of flesh at the baby wrist, and take note of the little creases in the palm of the hand, and wherever, from the fullness of the flesh, one part folds upon another.
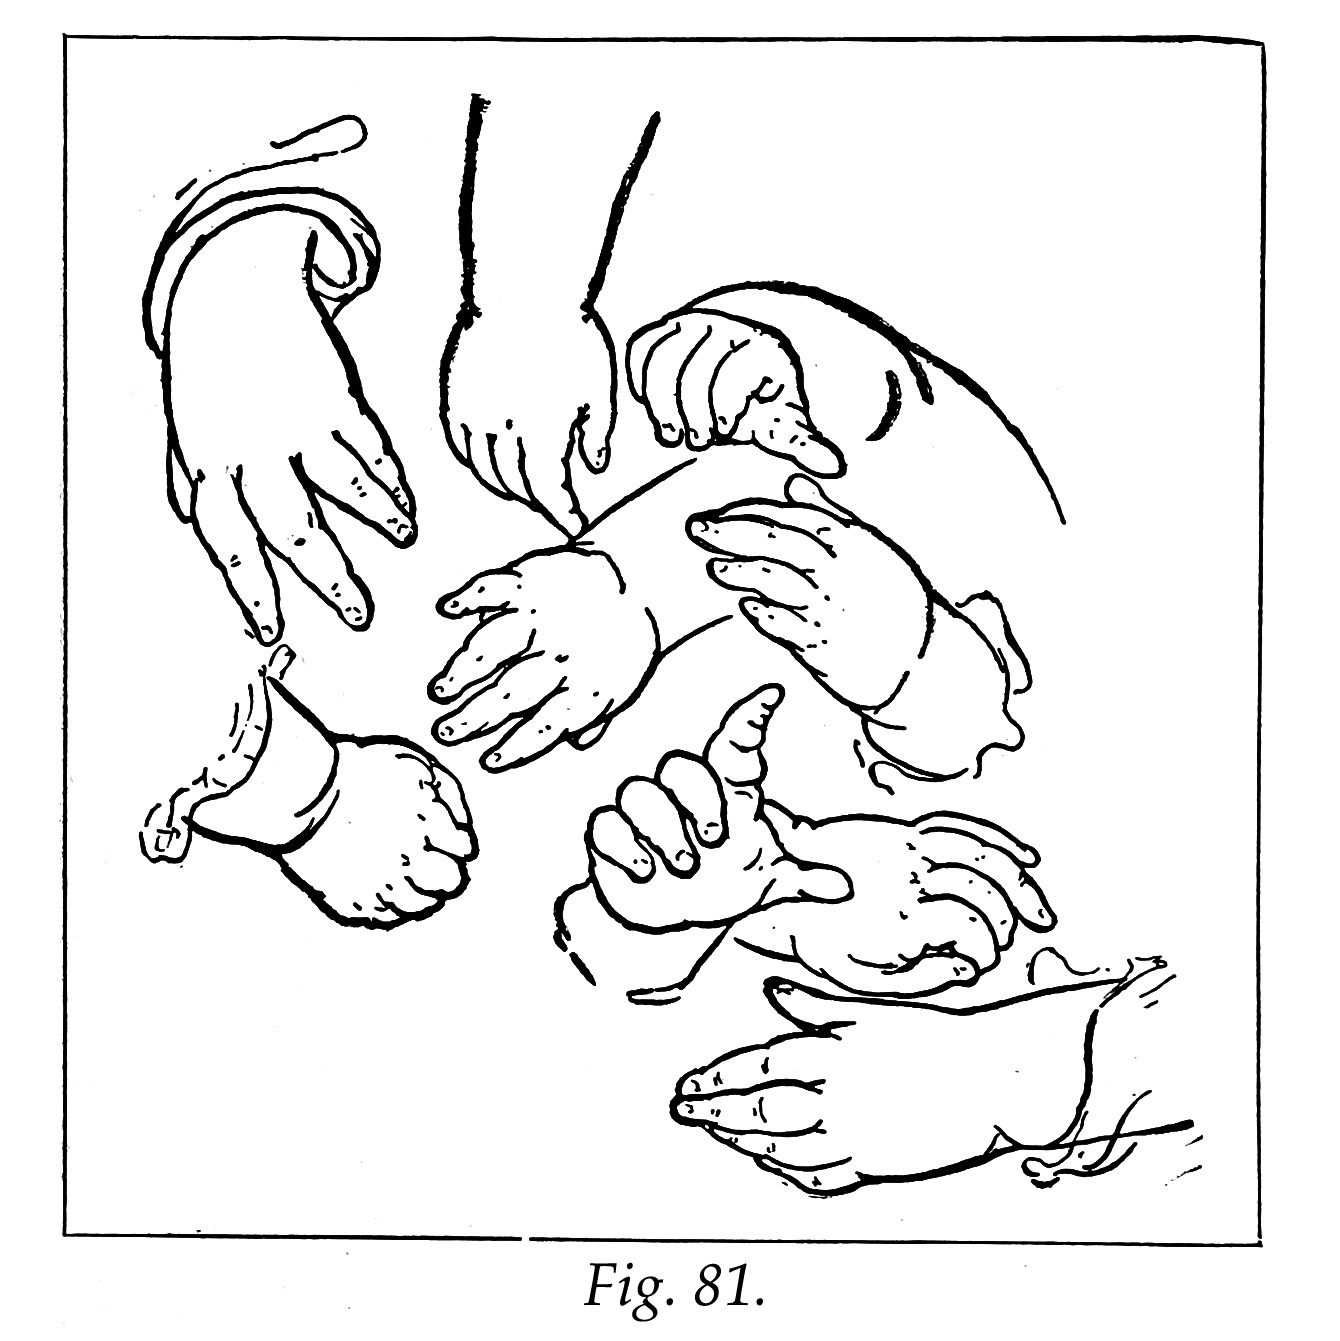
Everywhere the joints are carefully protected, and you will need to study them all the more carefully as the form is not boldly indicated. Bear in mind that wherever the outline runs to a joint it touches a fine or delicately molded part, instead of a clumsy or heavy form (Fig. 81).
The elbow joint, or upper end of ulna, is but slightly seen, appearing most prominent when the arm is bent. The place is marked by a cavity or dimple when the arm is straight.
The usual flatness of wrist found in the adult or growing-youth, is almost lost sight of in the baby.
When drawing from or simply observing; the life, notice the slight difference in size from shoulder to wrist; the change, however, must be carefully noted, and the peculiar modeling of each section studied well in order to give the proper character to each part.
When the child's hand is doubled, see how nearly it resembles a ball; and notice the flatness of the part between the knuckles and first joint compared with the roundness of the back of hand. The forefinger is often used very independently of the other fingers. In some hands the two thumb joints are not graded in their shape into the larger section or ball of the thumb, but are so much smaller they appear to be set abruptly into the heavy mass of the hand.
The entire child-form is full of exquisite elusive lines which must be caught and fixed on paper if we are to express the charming spirit of the whole proportion and action.
The comparatively straight lines, and the angles of later life, are hardly hinted at in the child-figure, the outline, from all points of view, being made up of multitudinous arcs or segments of circles.
It would be well if, when working from life, the student could feel that each division of the figure had an individuality that claimed his conscientious study; as if each part were a person, or had a personality; for to slight the beauties or peculiar features of any section, is to rob it of its claim for appreciation.
Passing from the upper extremities to the lower, we find that, like the arm, the leg is in several sections: the thigh, corresponding to the arm proper; the leg, corresponding to the forearm; the foot, corresponding to the wrist and hand.
As with the arm, it is well to study at the start the underlying framework. In the thigh there is one long bone called the femur, extending from hip to knee. In the leg there are two long bones, from knee to foot, called the tibia and the fibula (Fig. 82). The tibia is on the inside of the leg, and is much the larger of the two.

Just at the knee, where the thigh and leg bones articulate, there is a small bone called the patella, or knee-pan. It helps in the action of the muscles, and protects the joint (Fig. 82).
The point where the leg unites with the foot is called the ankle.
In the solid part of the foot there are seven small bones, which form the heel and that part of the foot on which the leg bones rest, and five long bones, wdiich lead to the five toes. These twelve together form the heel and instep (Fig. 83).
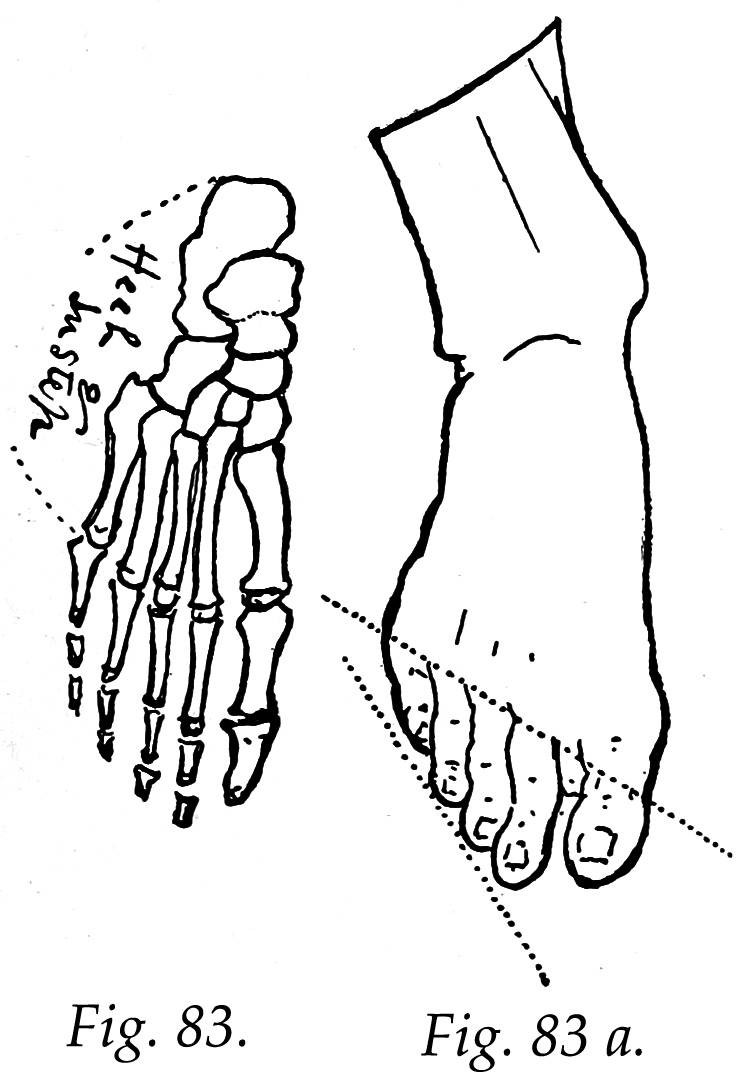
In each of the toes, except the great toe, there are three free bones. Like the thumb, the great toe has but two free bones (Fig. 83).
The ankle bones seen projecting upon the outline (Fig. 83 a), are not formed by the small bones of the foot, but are the lower ends of the two long bones of the leg. The end of the tibia forms the inner ankle projection, the end of the fibula makes the outer projection. The inner or tibia projection is always higher than the outer, coming just above the instep, while the outer or fibula projection falls just below the instep.
In all forms there are certain parts, particular lines, curves or angles, projections or indentations, which are most essential in giving the character.
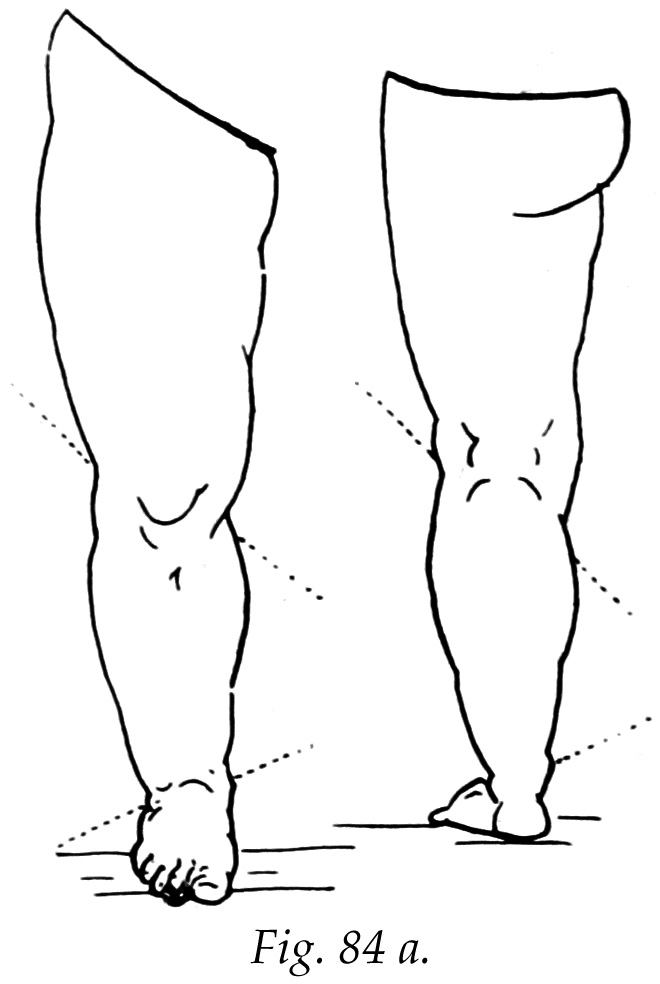
When beginning to draw anything that is difficult, say to yourself: " If I were obliged to tell this form in three lines, which three should I take? "After deciding upon them, allow yourself to add to these first three two other lines, and see if you cannot in them get the essentials of the whole form. A pupil cannot too often be reminded of this wny of proceeding when starting upon a difficult task. It helps to simplify any seeming confusion of small parts, and gives one a ground on which to attempt work. In the three views of the lower extremity front, side and back, in Fig. 84, observe that the outline on the outside is almost an unbroken line—two long curves with slight indentation at the knee. The inside outline, however, is much broken, that is, the direction is often changed.
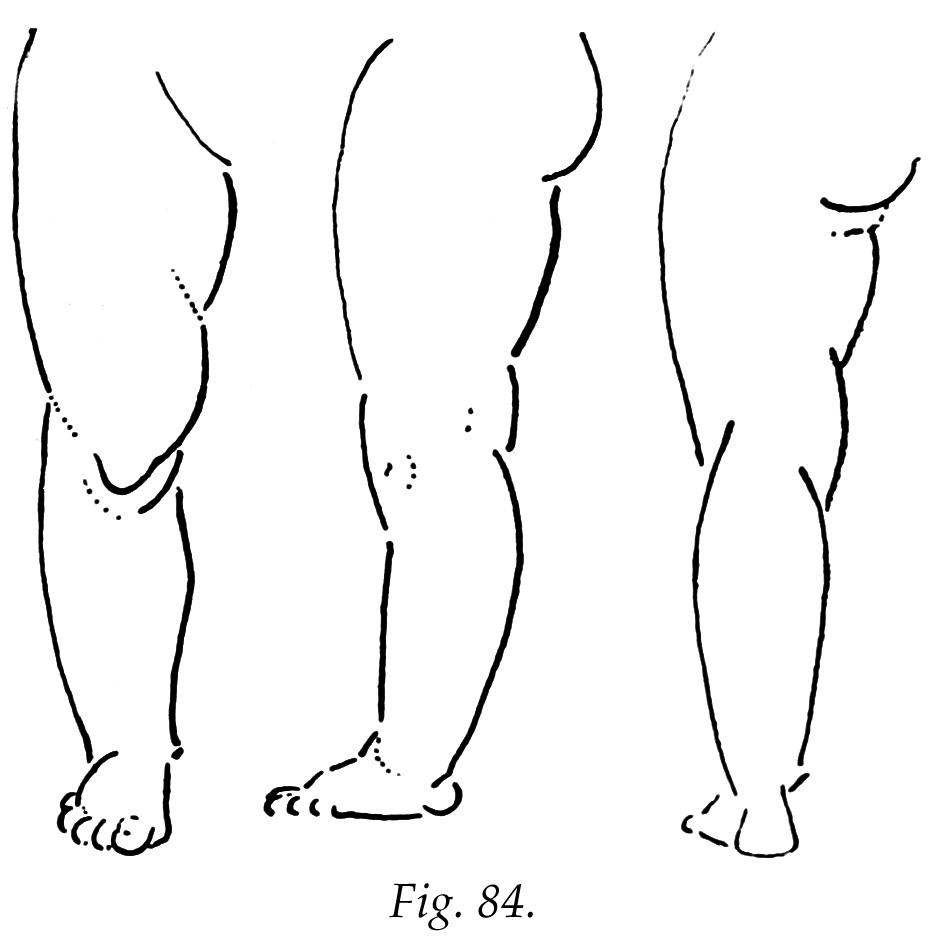
The knee is protected by a mass of integument, and is sometimes a heavy section. The indentations about the knee should be irefullv studied.
Observe that the points where the thigh and the leg; begin on the outside are higher than where they begin on the inside; but at the lower end of the leg, at the ankle, the opposite condition will be found, making the inside length of the entire limb shorter than the outside length, in both back and front views (Fig. 84 a).
The ankle bones seem to clasp the top of the foot. Never allow the ankle and foot to be heavy, though they should be well covered with integument.
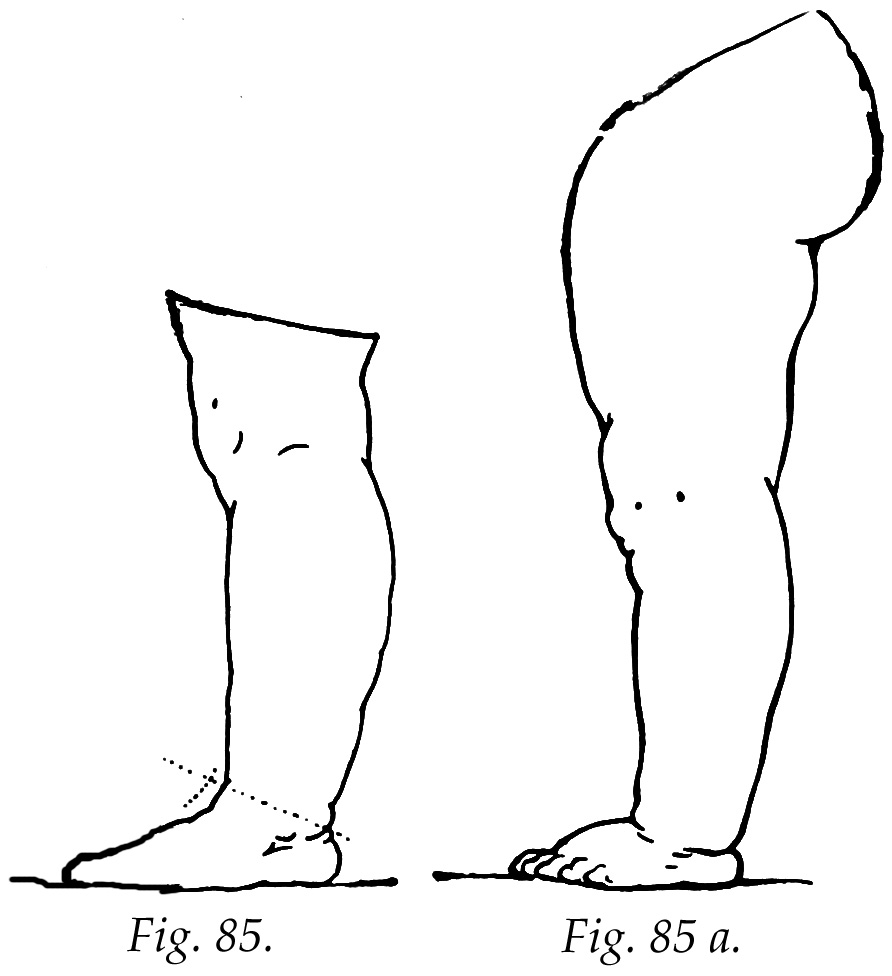
In studying the foot we must first notice the way in which it starts from the leg. Observe that it begins with a slightly curved line (Fig. 85). When the bones are small, and the integument full, the connection will be more like that in Fig. 85 a. If you are always careful to place this curve as it should be in your drawings, you will avoid one of the difficulties in making a good ankle. Note also that the point where the leg unites with the foot at the back, or heel, in lower than where the leg ends on the instep (Fig. 85).
To understand the construction of the foot, refer again to the bonv frame in Fig. 83. This shows the way in which the toes are set upon the body of the foot. Notice the length of the great toe, and the larger length of the one next it, and then the way in which the rest of the toes steadily shorten, one after the other, to the little toe. The line where the toes unite with the foot does not change so rapidly as the line of the end of the toes (Fig. 83 a).
The views giving the chief characteristics of the form of the foot are the outside and inside views (Figs. 86 and 86 a, 87 and 87 a). In both these it will be seen that the top line of the foot has four different planes, or five if the second division of the toes is counted (Figs. 86 and 87). These changes of direction are always more or less plainly seen, and if kept in mind will aid greatly in making any drawing of the foot.
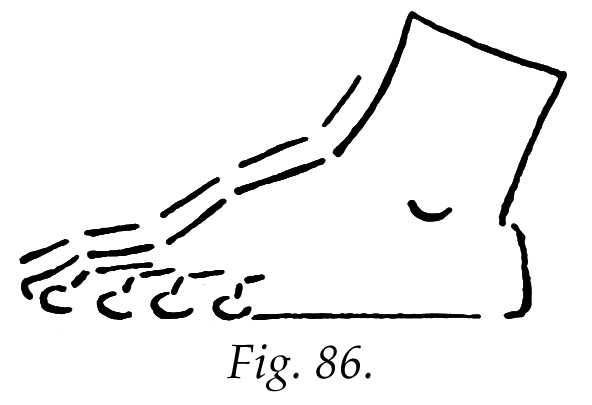
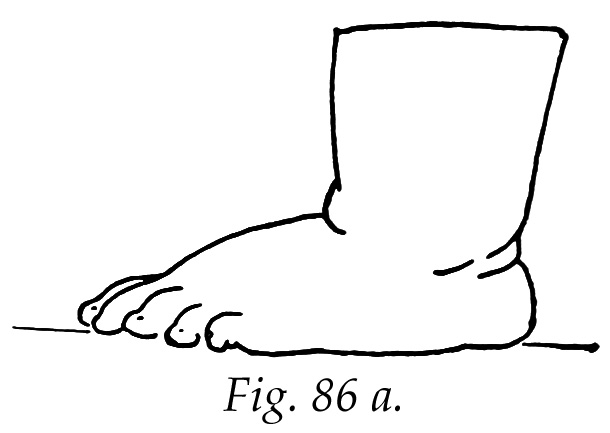
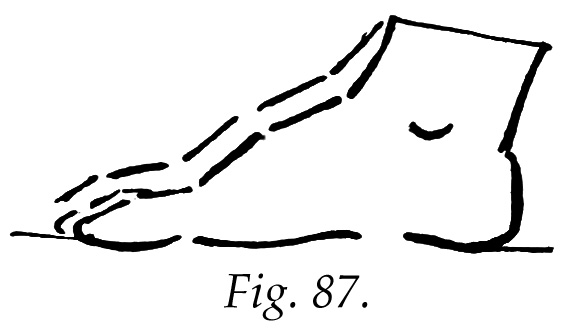
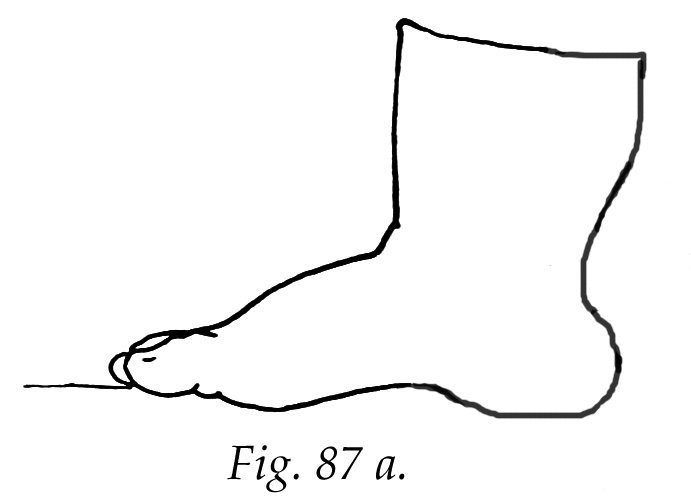
Three essentials are to be noted in the outside view of the foot: first, all the toes are seen; second, the line of the sole is about straight, that is, it fits the ground; third, the ankle bone, being the lower one, is drawn a little below the top of the instep (Figs. 86 and 86 a). Three essentials are'also to be noted on the inside: first, only the great toe and a bit of the second are seen; second, the ground line of the foot is raised half-way between the ball of the foot and the heel; third, the ankle bone on this side, being the higher, is drawn a little above the instep.
The toes are sometimes long and thin compared with the round mass of the foot. Again they are doubled up, and appear but a short proportion added to, but not detracting from, the cushion-like roundness of the foot.
The heel is quite independent of the other parts, being always round and harder than the rest — quite rosy, too, in color. The foot upon the ground fits more closely to the hard surface than does the foot in the adult.
Having now gone over all the parts of the child-figure, and studied the more or less in detail, the pupil must go on and study from life carefully for himself. He must go further than the teacher has taken him, or can take him. by giving his own interpretation to what he sees.
Whenever in the company of children, watch them, observe form, outline, action, expression. It is not easy to measure how much of the real spirit of their life and of every movement we may be able to capture by this method.
Do not feel obliged to remember to the hair's breadth the detail of everything you study; but while you watch and they play, note in their action that which is purely and essentially child-like or baby-like. See, when they try to do a difficult thing, how unlike a man or a youth they attempt it. Note how from certain positions they invariably fall, and the positions in which they can stand.
Though you may not be able to remember, all at once, the little characteristic bits gained here and there from this observation will store themselves away in your mind, especially those you most admire, and when they are needed they will come from the storehouse of vour memory, and enter the lines to live again in some charming creation of your own.
Such application is what you need, rather than to set yourself to commit to memory stiif rules, to make a mere machine of yourself. If you love nature, if you admire form and delight in action, and can observe well, then let people see what you discover; and trust your feeling — that which says stop here or go on there.
When any one is standing erect and facing us, with the arms hanging at the sides, it is easy to make a drawing of that person, but if one arm is raised toward us, or a foot lifted as if to take a step forward, a change takes place which makes the task difficult.
Curiously, the arm raised toward us, while really the same length as before, has apparently lost part of its length. In the same way, the leg that is lifted seems, in one section or more, to have lost in length, because, in bending, the full right angle view is changed to an oblique view.
This apparent lessening of length, when looking at an object obliquely, is called foreshortening.
If we notice the lifted leg carefully, comparing it with the limb still unmoved, we shall see that the knee, instead of being by the side of the other, is now somewhat higher; and a similar change will be noted at the foot.
In any position the human figure may take there will be more or less foreshortening. Here again comes in the valuable help to be had in all work from comparison. Compare one part with another — the length and width of the part in action, with the length and width of the corresponding part on the other side which is quiet. Whenever drawing from life (and particularly when there is much foreshortening), begin by studying the entire bulk — compare the whole height with the whole width, and place the result upon paper. Do the same with the component parts — body, head and limbs; and after the large divisions are all secured, and their leading proportions recorded, note the small divisions with their individual proportions as they appear, going from the larger, always, to the smaller.
Now take an example of foreshortening, a child sitting on a couch, for instance. (It will be well to practice considerably with the plans already given, before working from life.) Imagine the exact pose, and, when it is clearly in mind, place dots on the paper where the joints should come (Fig. 88).
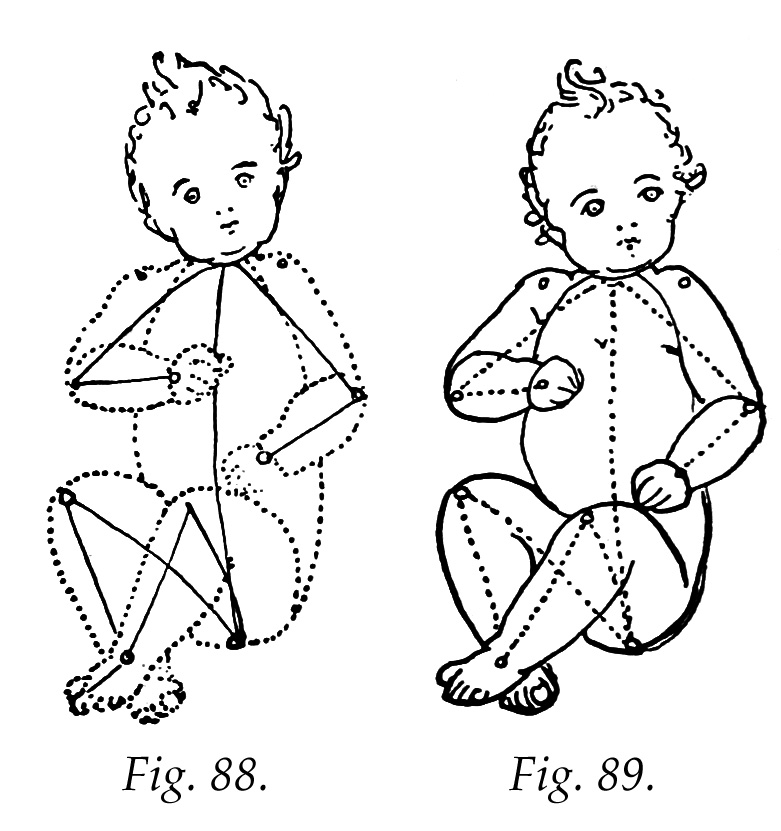
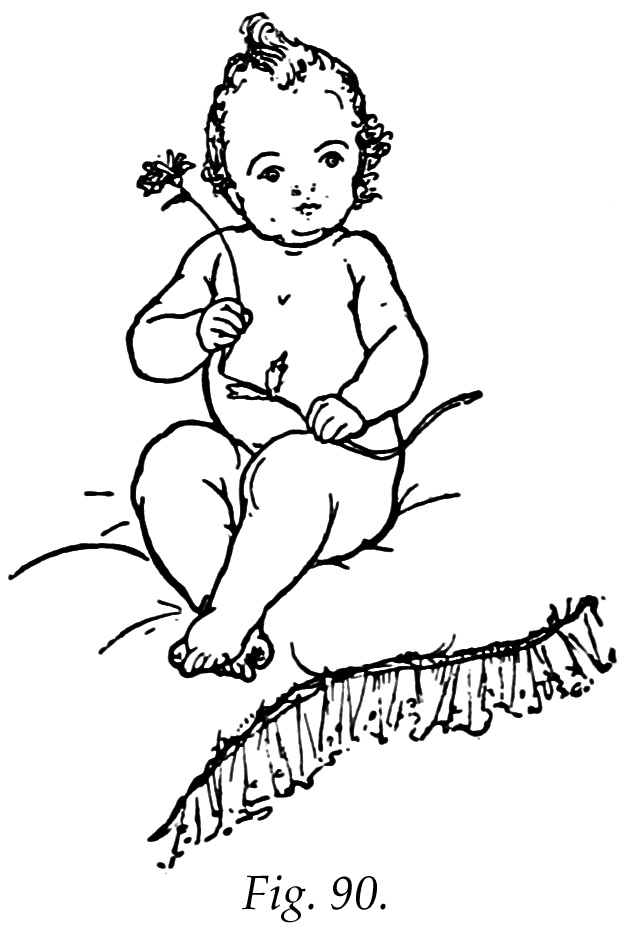
Draw the head in its proper slant, and then the plan of the rest of the figure simply by single lines (Fig. 88), being guided by the dots which locate the joints. The solid sections are indicated by the dotted outline. Next draw the child as in Fig. 89, reversing the order and letting the single lines be the imaginary ones, and drawing the solid sections, with due reference to the dots at the joints. After this it will be comparatively easy to accomplish a more finished figure, which shall express all that you had in your first idea (Fig. 90). In Fig. 90 note the apparent shortening of the thigh compared with the leg.
These gradual steps are a good means to employ that the difficulty met in attempting new and complicated work may not lead you to forget the importance of starting intelligently and keeping the separate sections and proportions clearly in mind to the end.
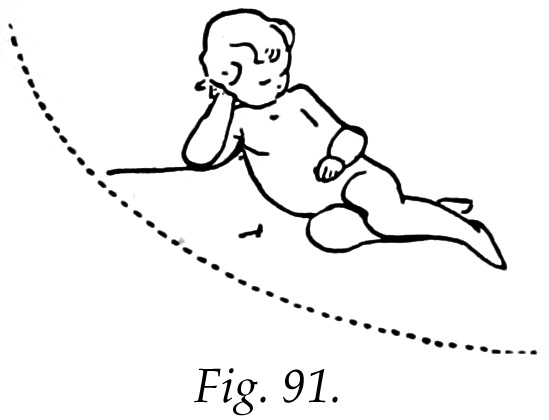
For another example, see Fig. 91. Starting with the one governing line of action, as shown by the dotted line, pose the figure in the mind so that the solid sections will carry out this irlea. Proceed as before, by the successive steps, to the completed result in Fig. 92.
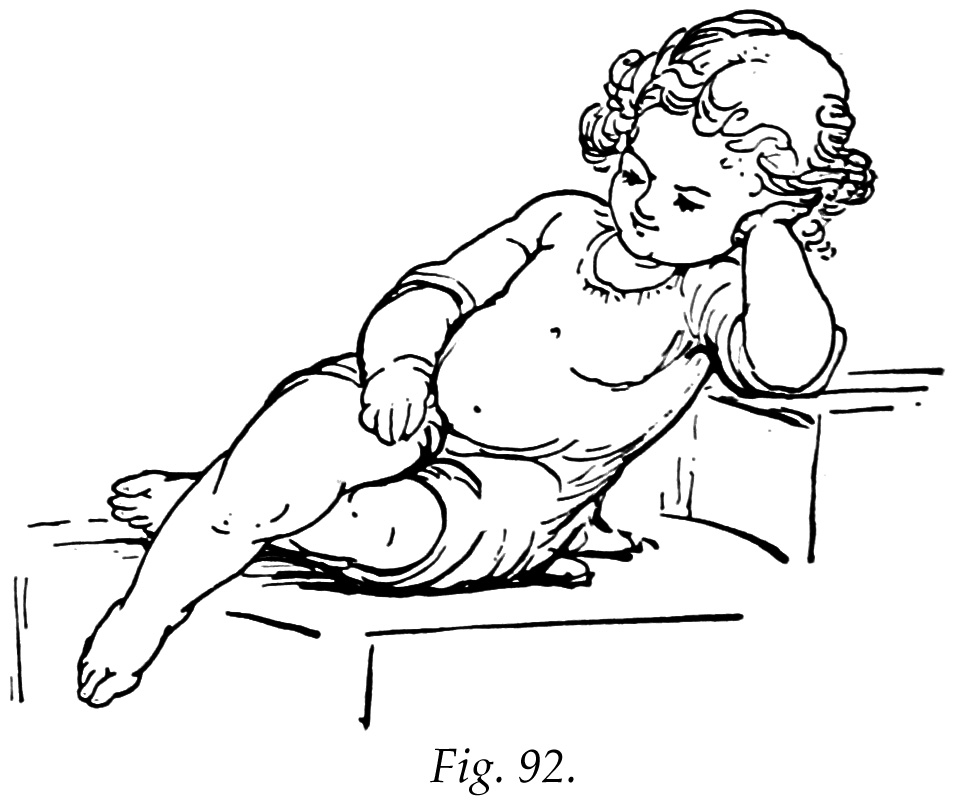
Continue exercises of this sort till foreshortening becomes familiar and easilv managed. Foreshortening is always considered a most difficult part of figure drawing, but you may be sure that you have the key to the problem if you will but locate the joints first, as they occur in relation to each other. You can then build readily the bulk of the solid sections from these important starting points. The location of joints and the line indicating pose are the first essentials in drawing a foreshortened figure.
Seldom, even if always drawing from still-life, is one satisfied to work for form alone, for without expressing some idea or sentiment the result would be monotonous indeed. Composition is the grouping of objects and persons, with accessories, to express idea and sentiment. A good composition is one with no irrelevant features, one where , everything, even to minor details, helps toward the expression of the central idea.
Some young artists who wish to compose pictures of their own feel the lack of ideas; others hesitate over the way to express their ideas by drawing. While modesty is to be commended in a student, too much diffidence is a great drawback, as often in that case one feels sure he cannot do a thing before having made a reasonable effort to accomplish it — fails for lack of courage even to begin.
The desire to do indicates that there is some power stirring for means of expression which should be given freedom. It is not impossible that beautiful and noble conceptions may come from earnest faithful workers who as yet have done little. Each one owes himself a fair trials at least.
It is well at first to take some simple subject, make a rough sketch, and then turn critic, examining it as a whole, and then in detail. For example, let us suppose the subject is "Mary and her Lamb," that scene of the familiar tale where both are on the way to school, walking side by side along a path, a stone wall beyond them, and the school-house seen across a distant field. Make a rapid rough sketch, then consider it carefully — the main points, Mary, the lamb, the school-house. See if the general placing of these three is agreeable. Do not huddle all together, or let them fall in line one beyond the other. Rather let the lamb fall behind Mary, and the school-house in the distance to the side toward which the two are moving. Consider the age of the girl — and the lamb should not be a sheep. Give Mary a costume suited to school wear. The lamb should be the nearer of the two, the taller figure of the girl beyond. The position of Mary and the lamb should express their affection one for the other.
Take other subjects in the same way—arrange and rearrange the parts in your plan until a satisfactory picture is produced. After a time one will come to have quite decided opinions and ideas concerning a few subjects at least, and before long there will be the desire to choose and work out subjects entirely original.
Choose direct plain subjects. Quite as much can often be expressed by a single figure as by many. When more than one figure is needed in a picture, make all become as one; that is, let the secondary figures be added to help carry out the idea which the central or primary figure alone cannot fully express. Have all harmoniously arranged. Keep your intention clearly in mind so that it may be plain to those who look at the work.
Next to getting a good idea is the need of giving it the best expression that is possible. Do not be led away from this by working up details too carefully at first. Never let the points of interest be scattered over too much space. If you find that you have ideas enough for five pictures, then make five different pictures; do not put all into one and make it crowded and confused. The figures should be as sentences to tell a story, and ought to be made very eloquent. Try and tell short stories on paper in the clear language of line and form.
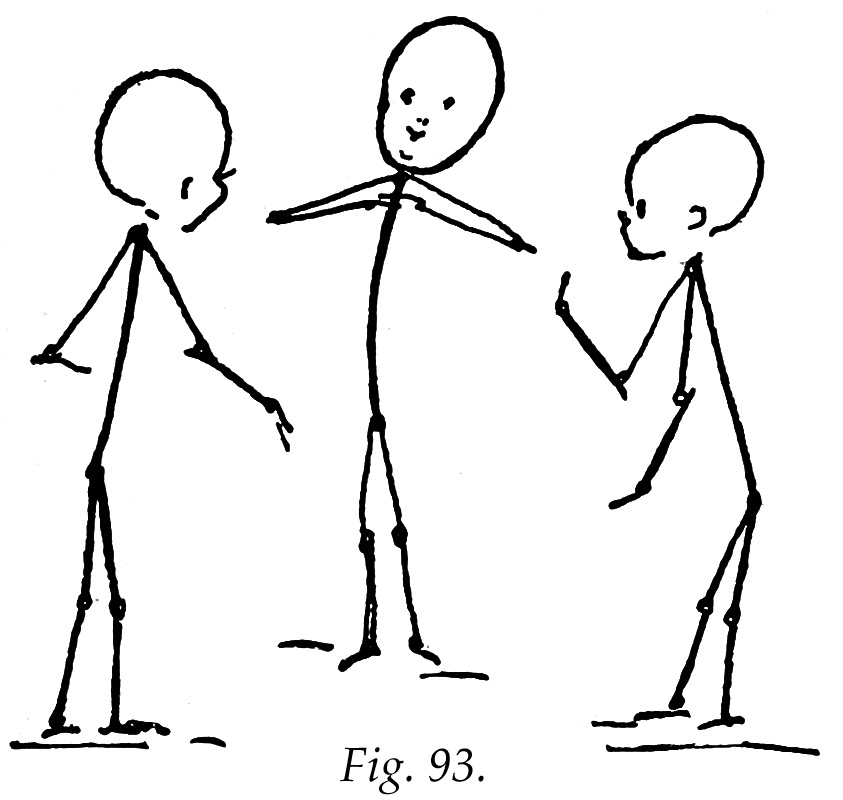
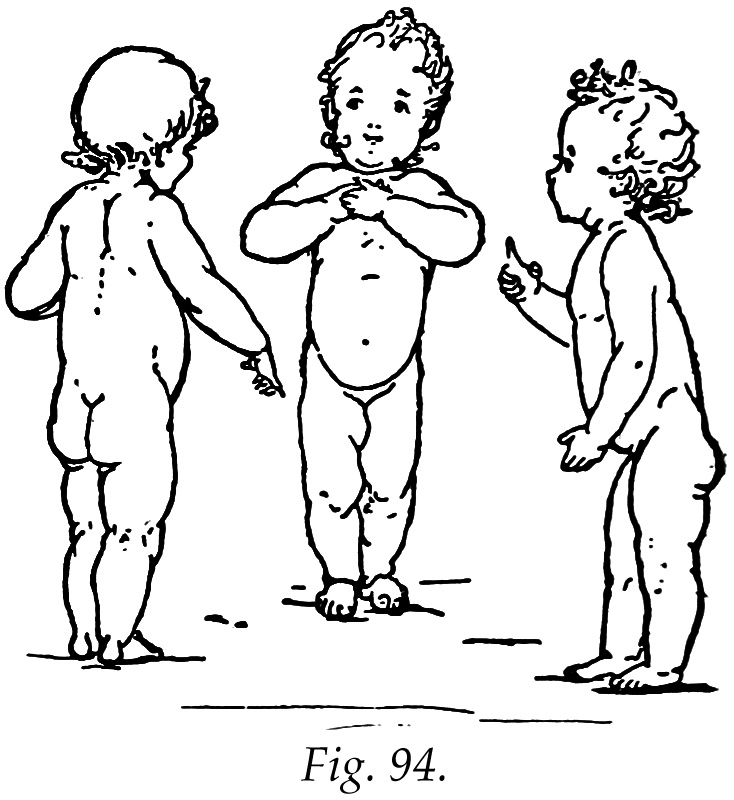
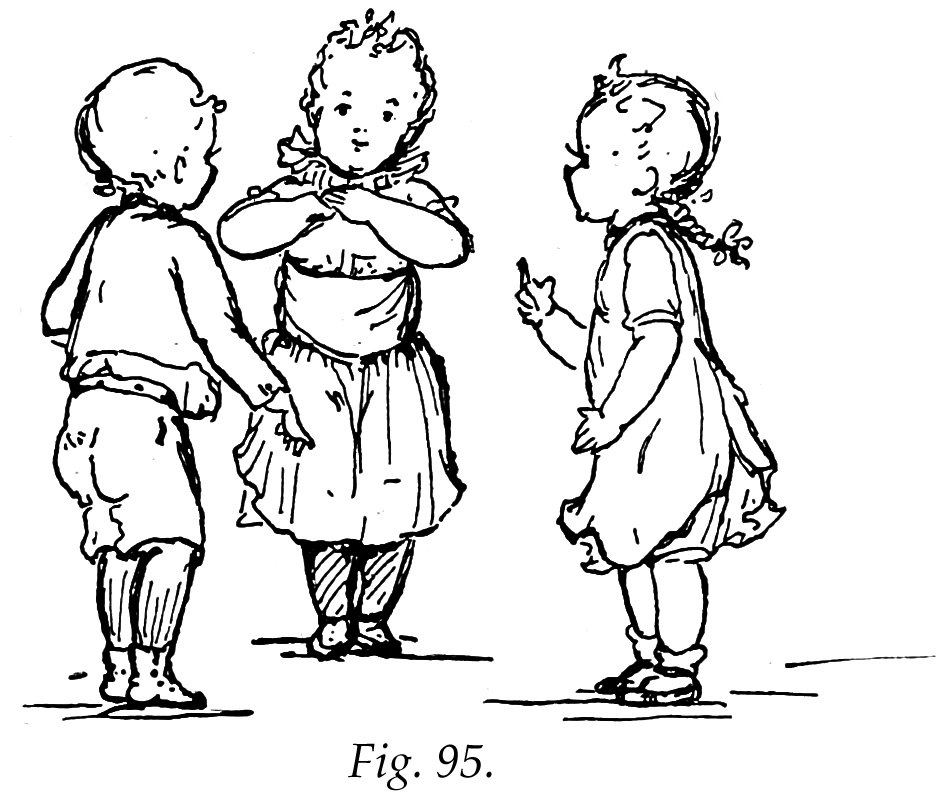
Before beginning to draw, think of the shape the whole must have when done. It may be well to start with single-line figures, arranging them so that they will all help to express the leading thought (Fig. 93). Then give the solid sections (Fig. 94), and after that the solid sections draped (Fig. 95).
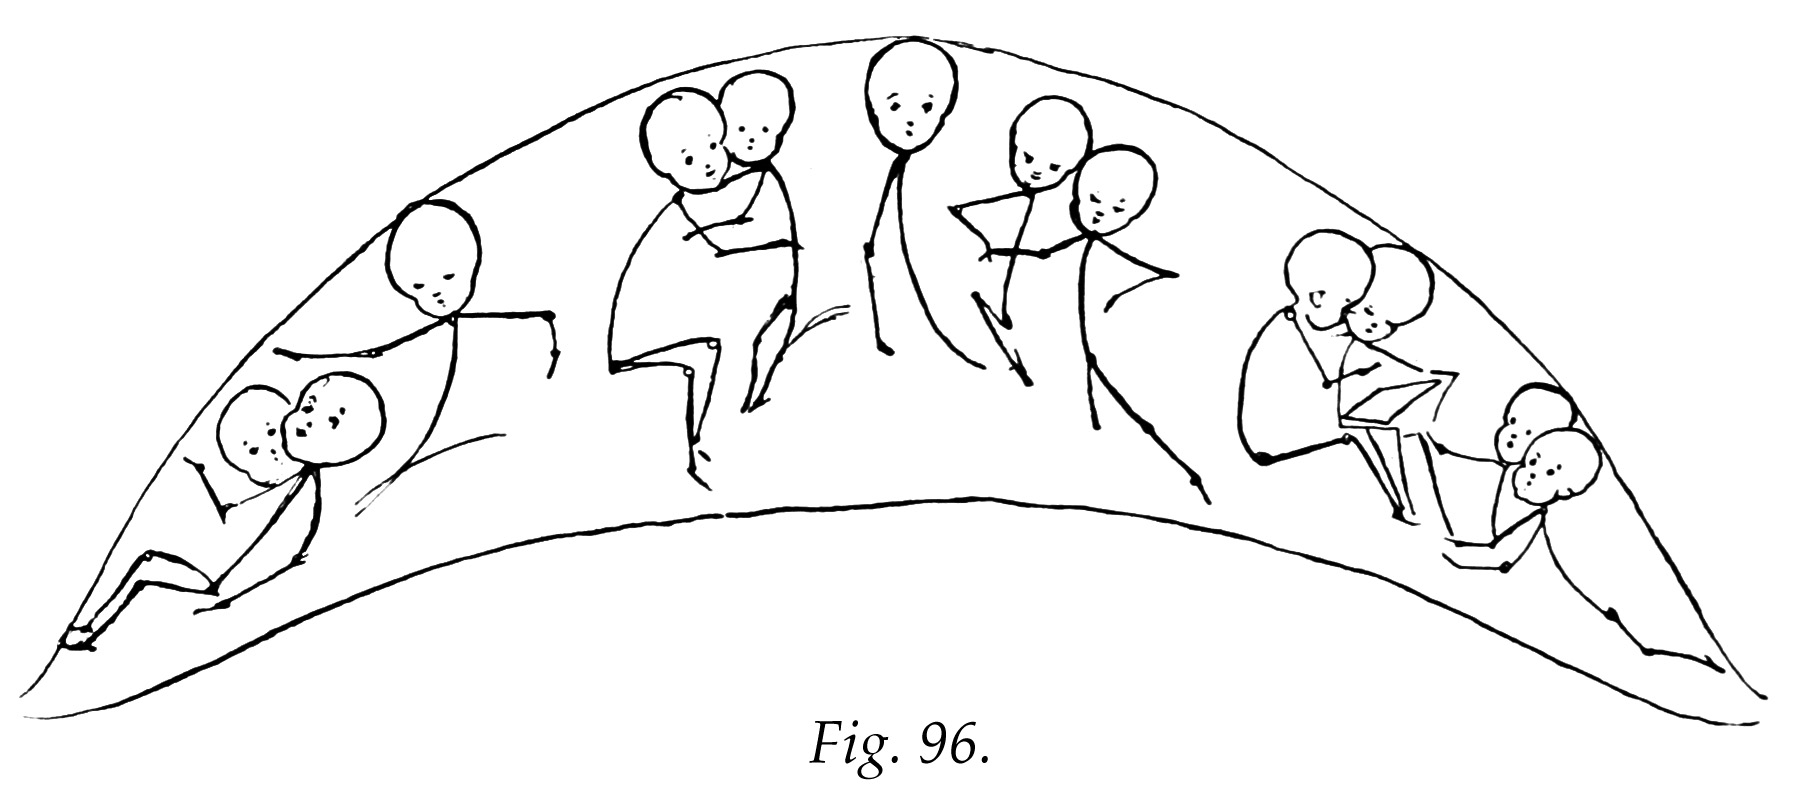
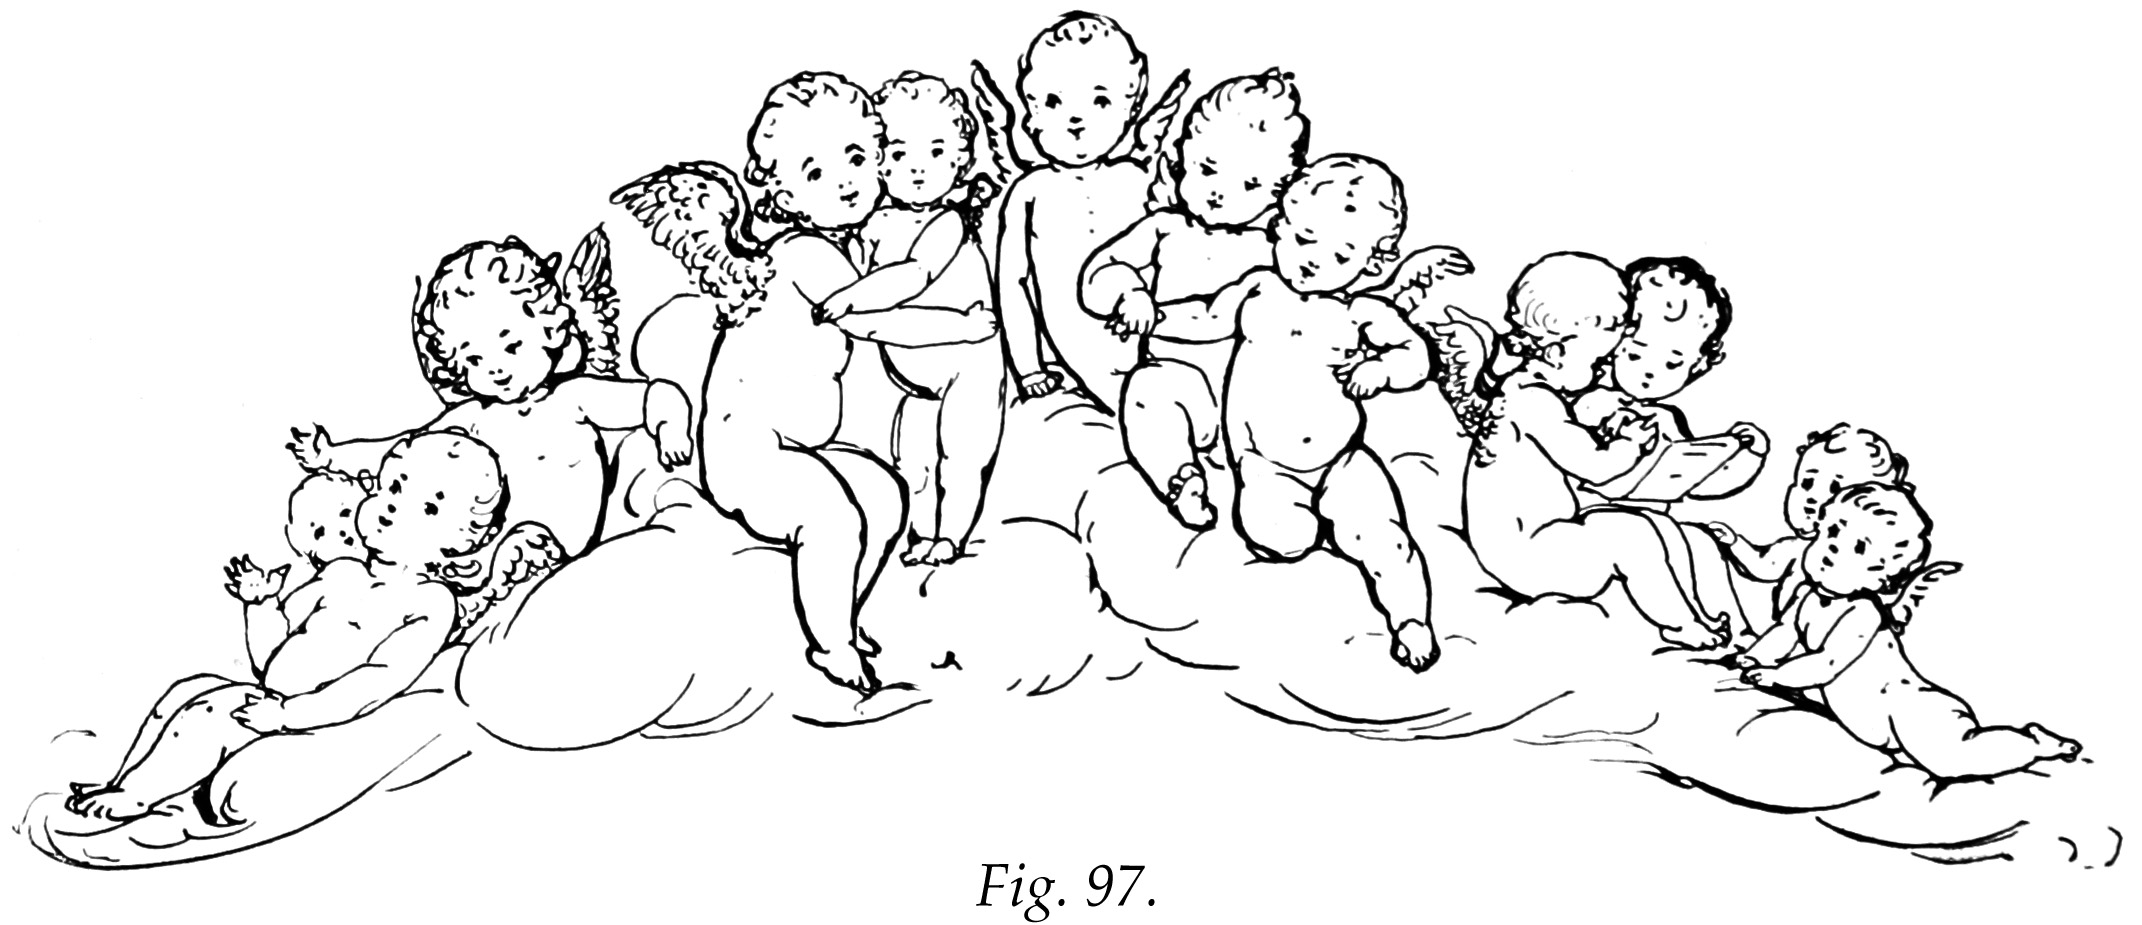
In a more elaborate picture, after determining the general shape of the composition as a whole, indicate the leading lines which the figures shall conform to — the most important groups first, and then the minor groups and single figures as in Fig. 96. Then develop the details as in Fig. 97.
Make the picture a unit, not by one form, but by arranging a variety of forma harmoniously as one whole.
When any fhffioulty is met in the drawing, go back to the simplest form, the single-line figure, and work by degrees from that to the finished figure.
It is commonly thought that drawing is only tor a pastime, that its pleasures can all be had easily. This is a serious mistake. A pupil is kept at the study of music for a long time, constantly practicing over and over endless exercises, and if at the end of years he can perform the compositions of another with credit, then the time has been well spent. In drawing, where so much is to come from familiarity with materials, from knowledge and originality in the artist, creditable results cannot be expected unless one gives to the work long, earnest and loving labor.